-
How to use Pavtube Blu-ray Ripper
Pavtube Blu-Ray Ripper is a powerful Blu-ray editor, converter, and ripper. It removes the protections and enables movie lovers to backup, convert and edit both Blu-ray and DVD movie freely. With this easy-to-use tool you can rip your Blu-Ray discs and general DVDs at any length into other popular audio and video formats like AVI, ASF, MPEG, MP4, WMV, MKV, MOV, FLV, SWF, RM, 3GP, AAC, AC3, MP3, OGG, WAV, WMA, M4A, etc for playback and edit. The following guide gives you a general idea of how to use Pavtube Blu-ray Ripper. You may click here to download free trial and have a try. For more details about this product, please visit Blu-ray Ripper. Mac users may visit Blu-ray Rippper for Mac.
A detailed guide on how to use Pavtube Blu-ray ripper is for your reference below:
1. Load Blu-ray and DVD disc/ Folder.
For Blu-ray disc, click ‘BD/DVD ROM’; for Blu-ray Folder, click ‘BD/DVD Folder’ and browse to the Blu-ray directory.
Note: Blu-ray IFO/ ISO image file is not supported by the current version.
a. Title Mode
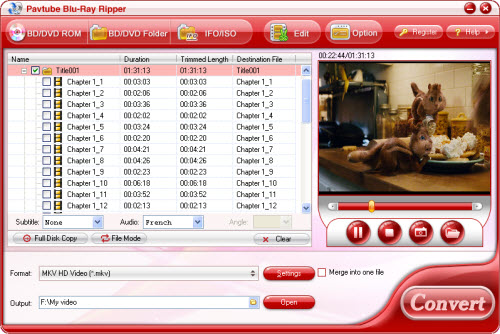
By default the files are listed in Title Mode , all the chapters are in numerical sequence for you to check individually. For checking the subordinate chapters of certain sequence, please click its plus sign. Generally, ‘Title001’ contains the main movie, and other Titles are commentary, menus, titles and ads. By default all the Titles are selected for editing and ripping. If you want to rip the main movie and nothing more, do uncheck other sequences. If you would like to retain everything in the Blu-ray disc, simply use the default settings. If you want to keep the movie in sections as it was made of, uncheck all the Titles and check all the subordinate Chapters.
Tip: A fast way to select the main movie is, right-click in file list field and choose ‘Uncheck All’ in shortcut menu and then check the main movie (longest m2ts file). To check all the chapters, simply choose ‘Check Subchapters’.
b. File Mode
Click ‘File Mode’  if you’d like to switch to file mode. In File Mode the movie clips are listed as they are made of. And you can check and preview each chapter.
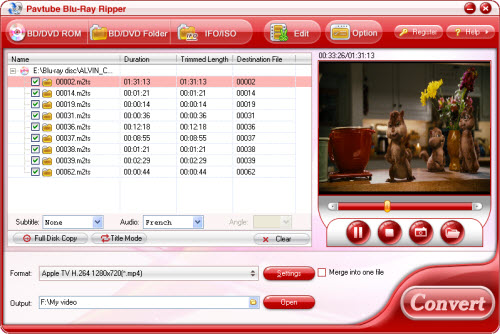
Tip: In File mode all the m2ts files in file list are checked by default. If you want to select but the main movie, a fast way is to right-click and choose ‘Uncheck All’ in shortcut menu and then check the main movie (longest m2ts file).
c. Quick Copy
To make a quick and full copy of the Blu-ray movie, you can click ‘Full Disk Copy’ . In this way all contents in the Blu-ray disc will be copied to your hard drive, including the menus and titles. After the process completed, you may click ‘Open’ button
  to locate the Blu-ray directory. Open BDMV-> STREAM folder and you will find all the m2ts movie clips.
2. Preview and Snapshoot
Double-click on a file to preview when you would like to preview it. You are allowed to take snapshots when previewing the movie. Simply click ‘Snapshoot’ button. To set image format, location and size of thumbnails, please click ‘Option’ menu. To locate the thumbnails, please click ‘Open folder’ button.

3. Select Subtitle and Audio track
Right below the file list you could find ‘Subtitle’ and ‘Audio’ drop-down list, where you may set subtitles and dubbings to the languages you like. Always select the title/ chapter before setting its subtitle and audio. In the preview window you can check the Subtitles and Audio track.

Note: By default no subtitle is selected. Some chapters have no subtitle or audio, in that case the Subtitle list will show ‘None’ only.
4. Set output format
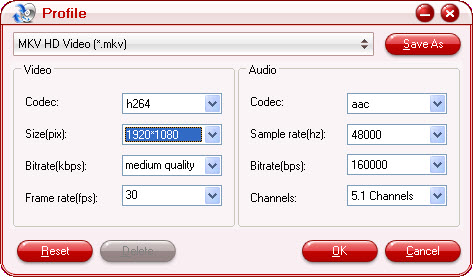
Click on Format bar to select an appropriate format from the profile list. Blu-ray Ripper features various output formats for portable players, removable devices and multiple editing software. You can click the up arrow and down arrow to view the formats. To further customize the format, please click 'Settings' button  and adjust advanced video/ audio parameters. For instance, when you rip Blu-ray to MKV container format for playback on HD TV, you can follow HD Video->HD MKV then click “Settings” and customize advanced audio and video parameters. For instance, you may set Video to 1920*1080p (to fit for the wide screen), 25mbps, 24fps, and Audio to AC3/AAC codec, 192kbps, 5.1 channels. Do not forget to click ‘OK’ to confirm your settings.
Tips on selecting format:
A. If you only want to backup the Blu-ray m2ts files to your hard disc, please select Copy->directly copy as output format. ('Full Disk Copy' copies m2ts files and the BD structure)
B. If you want to rip the Blu-ray movie to portable players like iPod, Archos 5/7, Creative Zune, iPhone, Gphone, Blackberry etc, first find the corresponding format group and then find a proper format (resolution) to fit for the model of your player (better check the screen resolution to make sure the format be right).
C. If you would like to rip the Blu-ray movie to Apple TV, PS3, Xobx 360 etc for enjoying on wide screen TV, you are recommended to select a higher resolution(1280*720 and above) for better effect. 5.1 sounds is available for some formats, not all. You could click 'Settings' button and check if 5.1 channels is available.
D. If you would like to rip Blu-ray movie for editing, please follow Powerpoint, Adobe Premiere/ Sony Vegas or Remux to transode the m2ts files to editable formats. To acquire lossless movie clip, Remux->MPEG2/TS is recommended.
5. Set output location
Either type in save path in Output field or click the small folder icon and specify a desired output location.

6. Start ripping Blu-ray disc.
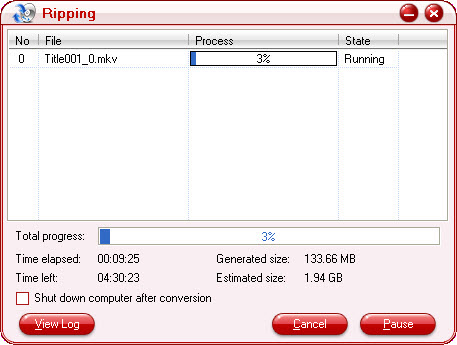
Click on the “Convert” button ![]() and the program will rip Blu-ray movies to desired format. Blu-ray ripping is time-consuming. You can set auto shutdown in progress window (it pops up once you click Convert) or leave it there and come back later (the ripper will tell you how long it takes).
and the program will rip Blu-ray movies to desired format. Blu-ray ripping is time-consuming. You can set auto shutdown in progress window (it pops up once you click Convert) or leave it there and come back later (the ripper will tell you how long it takes).
7. Find output files.
Click the ‘Open’ button  next to Output bar and the ripper will open output folder that the generated files saved to.
8. Play m2ts files on PC.
If you choose ‘Full Disk Copy’ mode or ‘Copy-> Directly Copy’ format, the ripper will copy the original Blu-ray m2ts files to your hard drive. To play the m2ts files, you may use VLC player or KMPlayer.
Editing features of Blu-ray Ripper
Pavtube Blu-ray Ripper also features some editing facilities. If you want to cut off black edges, trim the movie to desired length, divide the movie to multiple segments, replace the original audio with favorable music, add text/image/video watermark to the movie, rotate the image, adjust the volume of the movie etc, please click Edit menu  to enter editing interface.
I. Crop
Switch to Crop tab to cut unwanted edges. You can crop the movie by adjusting the crop frame (drag the green dotted green square frame to circle the part you want to retain) or setting values (Left, Top, Width and Height) of crop area.
Keep Video Aspect Ratio
Once checked this function, the output file will derive its aspect ratio from the parameter of cropped area. Keep in mind that ‘Original’ should not be set as video size in ‘Settings’ window.

II. Trim
Under 'Trim' tab you are allowed to cut out unwanted part of selected clip. To trim the movie, simply type in desired time value in ‘Start’ and ‘End’ box and click ‘Set’ button. Or you can click left square bracket and right square bracket to set start and end time when previewing the movie.

III. Watermark
If you would like to add text watermark to the movie, please switch to Text Watermark tab, and check ‘Enable’. Type the text you want to use as watermark in text watermark area. Click the ellipsis button to set font, size, color etc. Finally set the position of text watermark by inputting values in ‘Left’ and ‘Top’ box. To add image or video as watermark, simply switch to ‘Image/ Video Watermark’ tab to set.
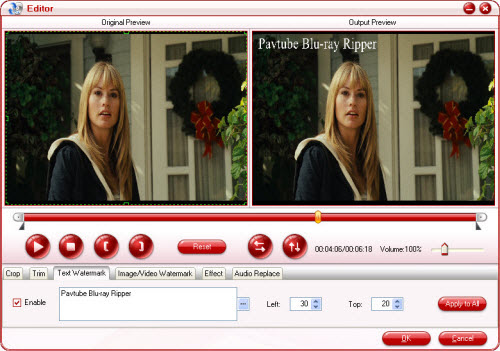
IV. Effect
You can adjust the effects by adjusting the following parameters when switch to Effect tab: Brightness, Contrast, Saturation, Volume, Special Effect.
Tip1: In the Effect drop-down list you can choose one special effect option from the drop-down list of Simple gauss blur, Simple laplacian sharpen, Aged film, Flip color, Invert and None.
Tip 2: In case that interlacing lines (strips) appears, check the 'Deinterlacing' box to eliminate the lines.
Tip3: With Horizontal and Vertical flip button you can mirror or reverse the image.

Click ‘Apply to All’ button if you want to apply the same effect settings to all the selected files. Make sure you have checked all the desired files before clicking this button.
V. Audio Replace
You can replace the original audio track with your favorite music in Audio Replace tab. Check ‘Enable’ option, then hit the browse button to select the audio file you wan to add. If the replaced audio is not long enough, you can loop the audio by tick the Loop option.
Please note that the trial version output video with a watermark on the screen. Besides, the Full Disk Copy option is restricted to use three times.
Guide
- Convert Video to DV AVI
- Convert MKV to MP4
- Convert MKV to MPEG
- Convert MKV to WMV
- Convert HD to SD
- Convert MOD to MPEG
- Convert MOD to MP4
- Convert MOD to WMV
- Convert MOD to WAV
- Convert MOD to AVI
- Convert AVCHD to AVI
- Convert AVCHD to iPod
- Convert AVCHD to SD
- Convert AVCHD Video
- Blu-Ray to 3GP
- Blu-Ray to Blackberry
- Blu-Ray to DVD
- Blu-Ray to iPod Nano
- Blu-Ray to iPod Touch
- Copy Blu Ray to Hard Disk
- DVD to Apple TV
- DVD to AVI
- DVD to Blackberry
- Convert M2TS to HD MP4
- MTS/M2TS to Apple TV
- MTS/M2TS to iPhone
- MTS/M2TS to iPod
- Blu-Ray to Divx
- Blu Ray to Xvid AVI
- Capture Blu-Ray Screenshot
- Extract MP3, WMA from Blu-Ray
- Rip Blu-Ray to audio
- Rip Blu-Ray to PC


