-
How to use Pavtube DVD Ripper
Pavtube DVD Ripper is a powerful DVD editor, converter, and ripper. It rips DVDs either protected or not popular audio and video formats such as AVI, ASF, MPEG, MP4, WMV, MKV, MOV, FLV, SWF, RM, 3GP, AAC, AC3, MP3, OGG, WAV, WMA, M4A, etc for playback and edit. With this software you can make full movie collection out of your DVDs and share them on server with family members and friends. The following guide gives a general idea of how to use Pavtube DVD Ripper. You may click here to download its free trial version and have a try.
Step 1. Run Pavtube DVD Ripper and import DVD movie.
Install Pavtube DVD Ripper and run the software. To load DVD, DVD-ROM is required. Click on “DVD ROM” and the software will import DVD movie from the optical drive and arrange them as a directory in file list. You can check any of the episodes and view them in the preview window. Taking snapshots can be done by one click on Snapshoot button when previewing. You can load DVD folder or DVD ISO/IFO image file in the same way by clicking on “DVD folder” or “IFO/ISO”.
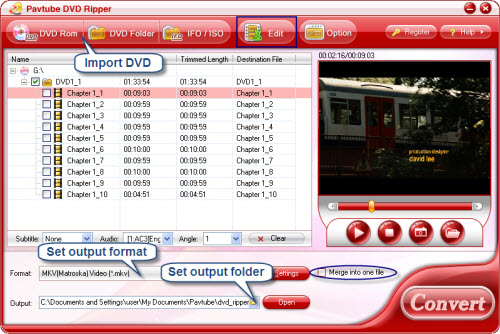
(Tip: Check Merge into one box if you want to combine multiple selected DVD episodes together).
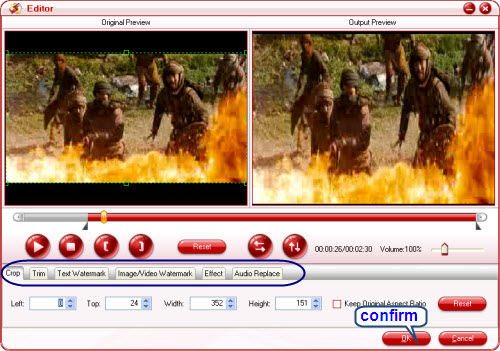
Step 2. Edit DVD episodes
Select the episode you would like to edit, and click on “Edit”. Pavtube DVD Ripper features with the following basic editing functions: trim, crop, watermark, effect and audio replace. In the editor interface you can cut off unwanted edges (refer to the thumbnail below), determine the aspect ratio of output video, crop the movie to any length, add personalized watermark to the video, replace the original audio with whatever you like, adjust the volume, etc. Do not forget to click “OK” after settings are done.
Step 3. Set output format and destination.
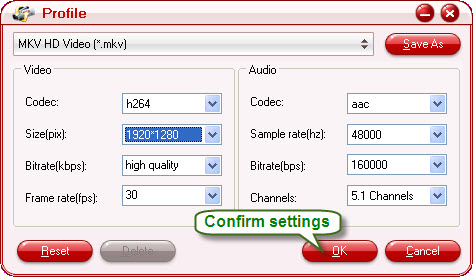
Click on the format bar and there are various output formats for you to choose from. Apart from common video, audio, HD video, Flash video, there are customized formats for portable devices such as iPod, iPhone, PSP, Blackberry, Nokia, Zune, Creative Zen, Archos and video game consoles like PS3 and Xbox360. In output path box you can set output destination. To further customize output audio and video parameter, you may click “Settings” button.
Step 4.Ripping DVD to specified video format
Simply click on “Convert” button to start ripping. You can view the progress information and cancel it halfway. You could set auto shutdown as well.
Guide
- DVD to Audio
- DVD to Divx AVI
- DVD to FLV
- DVD to HD AVI
- DVD to iPod
- DVD to iphone
- DVD to Apple TV
- DVD to AVI
- DVD to Blackberry
- Convert Video to DV AVI
- Convert MKV to MP4
- Convert MKV to MPEG
- Convert MKV to WMV
- Convert HD to SD
- Convert MOD to MPEG
- Convert MOD to MP4
- Convert MOD to WAV
- Convert MOD to AVI
- Convert AVCHD to AVI
- Convert AVCHD to iPod
- Convert AVCHD to SD
- Convert AVCHD Video
- Blu-Ray to 3GP
- Blu-Ray to Blackberry
- Blu-Ray to DVD
- Blu-Ray to iPod Nano
- Blu-Ray to iPod Touch
- Copy Blu Ray to Hard Disk
- Convert M2TS to HD MP4
- MTS/M2TS to Apple TV
- MTS/M2TS to iPhone
- MTS/M2TS to iPod
- Blu-Ray to Divx
- Blu Ray to Xvid AVI
- Capture Blu-Ray Screenshot
- Extract MP3, WMA from Blu-Ray
- Rip Blu-Ray to audio
- Rip Blu-Ray to PC