
 Home
HomeWhy Can't Edit FLV in Windows Movie Maker?
Some Video fan like to watch Youtube which can provide user many perfect video, when user download Youtube video for editing on Windows Movie Maker, there is some flaws, one is that most Youtube video is FLV formats which isn't the Windows Movie Maker native video formats. In other words, user can't edit FLV in Windows Movie Maker directly, Windows Movie Maker can't recognize FLV.
To video fan, share the video is the main stream video entertainment. FLV is the popular video formats which are supported by many video websites, like YouTube, Facebook, Vimeo, Flicker, etc. So find a way to edit FLV in Windows Movie Maker is necessary. In fact, it's not a big problem, the right way is to convert FLV to Windows Movie Maker supported video formats with a third video converter.
How to Edit FLV in Windows Movie Maker
Choose a Windows Movie Maker Video Converter, user have many options, which one is the best FLV to Windows Movie Maker Video Converter? How to choose a good FLV to Windows Movie Maker Video Converter as the video assistant? First the video conversion is important, in addition, the safe and stable software is user's dream tool. I have used Pavtube Video Converter for many years which is a is a professional Video Converter software. High stable running, user-friendly interface, reasonable price, effective serve support...
Of course, this software is the best FLV to Windows Movie Maker Video Converter, user can convert FLV to Windows Movie Maker supported formats for editing, such as: WMV, AVI, MPG, MOV, etc. Also user can convert Windows Movie Maker unsupported formats for editing, like H.265, H.264, MXF, VOB and so on. The 30X faster conversion speed than other competitors, user can get the high quality output video.
Except edit FLV in Windows MovieMaker, user also can choose other excellent NLE to edit FLV video, , such as: Adobe Premiere Pro, Sony Vegas Pro, Pinnacle Studio, iMovie, etc. By the way, this software is also a good video editor, user can adjust the video effects, like: video background, video brightness, video length, etc. Also user can add the subtitles, watermark in video. More editing features are waiting for you.
Good news, this software also is a simple video editor, user can trim FLV video, crop FLV video, merge FLV clips, cut FLV video user don't want, add watermark to FLV video file, change FLV video size, frame rate, bitrate, etc. Here, you are the video host, all the video effects are up to you. Mac user also can own the powerful FLV to Windows Movie Maker Video Converter. This article can help you to know more information about this software.


How to Use the FLV to Windows Movie Maker Video Converter?
Step 1. Load FLV to Windows Movie Maker Video Converter
Install and launch FLV to Windows Movie Maker Converter on your computer, click "File" > "Add Video/Audio" to load FLV files to the software. You can click the "Folder" button to batch load multiple FLV files into the program. This Windows Movie Maker Video Converter can do batch video conversion with high running stability.

Step 2. Choose FLV to Windows Movie Maker Acceptable Formats
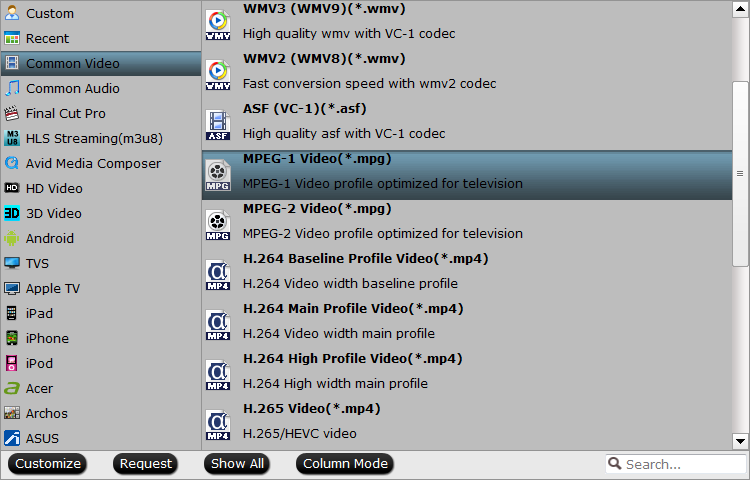
Click "Format" bar, from its drop-down list, select FLV to Windows Movie Maker supported format, from Windows Movie Maker official websites, WMV is the best format for Windows Movie Maker, you can also choose other video formats which is supported by Windows Movie Maker according to your own needs, like: MPEG-1, AVI, etc.
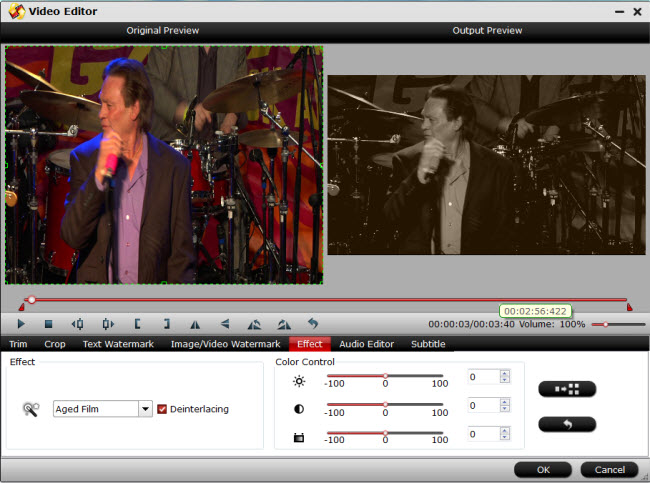
TIP: Want to explore the video editing features? Just click the pen icon which is at the top f the main interface, only when user import the video to the software, this pen is active. All the buttons are waiting for you to creat the special video.
Step 3. Begin FLV to Windows Movie Maker Format Conversion
After all the format and codec settings are done, go back to main interface, hit right-bottom "Convert" button to start FLV to Windows Movie Maker supported format process Just wait for a while, you can get a brand new video file. When you are waiting the result, you can watch the video at the preview window, so nice.
How to Import Converted FLV to Windows Movie Maker From PC
Step 1. In the Task pane on the left side of the screen, click "Capture Video", at the drop-down list, choose the "Import video" section.

Step 2. Windows Movie Maker will navigate to the folder that contains all the components of your movie. Click the converted FLV video to Windows Movie Maker.
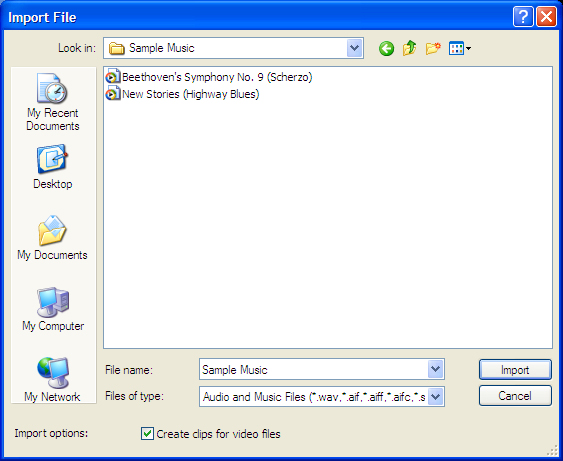
Step 3. After you choose the video, on the navigate right window, click the "Import" to start to import converted FLV to Windows Movie Maker.
TIP: Windows Movie Maker Supported Formats
| Video File Types (format) | File Name Extensions |
| Windows Media Video (WMV) files | .wmv |
| Windows Media files | .asf and .wm |
| AVCHD files | .m2ts, .mts, and .m2t |
| Apple QuickTime files | .mov and .qt |
| DV-AVI files | .avi |
| Microsoft Recorded TV Show files | .dvr-ms and .wtv |
| MPEG-4 movie files | .mp4, .mov,.m4v, .3gp, .3g2, and .k3g |
| MPEG-2 movie files | .mpeg, .mpg, .mpe, .m1v, .mp2, .mpv2, .mod, .vob, and .m2t |
| MPEG-1 movie files | .m1v |
| Motion JPEG files | .avi and .mov |
|
Audio Files Types |
File Name Extensions |
| Windows Media Audio (WMA) files | .asf, .wm, and .wma |
| Pulse-code Modulation (PCM) files | .aif, .aiff, and .wav |
| Advanced Audio Coding (AAC) files | .m4a |
| MP3 files | .mp3 |
 Free Trial Video Converter

Useful Tips
- How to Flip or Rotate Videos using Handbrake?
- Play Tivo Recordings with Windows Media Player
- How to Use VLC to Convert AVI to MP4 on PC/Mac?
- MOV Compressor: How to Compress MOV to a Smaller Size on Windows/Mac?
- Stream 4K Video to Chromecast Ultra via Plex
- Get Chromebook Pro/Plus to Play MKV Files without Any Problem


