
 Home
HomeMany video-sharing websites like YouTube, Google Video, metacafe, Yahoo! Video, Reuters.com, etc. always provide people with original videos about meaningful, interesting, or important events that happened all over the world in real time, and nearly all of them use FLV format to save these video files. Maybe you have collected many sorts of your favorite videos downloaded from the above mentioned video websites, and want to import them to your free editing program iMovie to do further editing, so that you can enjoy your own works on local computer or upload them to your website or blog to share with your friends or other people, or copy them to your electronic gadgets such as iPod, iPhone, iPad, and Samsung Galaxy Tab for playback.
Unfortunately, FLV files cannot be imported to iMovie directly, because iMovie only supports formats like DV (standard definition), HDV (high definition), MPEG-2, and AVCHD from Camcorders, MPEG-4, and MOV files. If you want to add FLV files to iMovie without troubles, you should convert them to iMovie acceptable format like AIC MOV firstly.


How to import FLV files to iMovie for editing on Mac Yosemite ?
Step 1: Download, install and run Pavtube Video Converter for Mac.
In the main interface, click "Add video" or "Add from Folder" icon to load FLV files that you want to convert for using in iMovie.

Step 2: Select output format and and specify the destination folder
Click the drop-down list of "Format" to select "Apple InterMediate Codec (AIC) (*.mov)" as output format under "iMovie and Final Cut Express" catalogue.

Tips:
If you want to combine several FLV files to be a single one, you can choose "Merge into on file". At the same time, you should hit "Browse" to decide where to locate the output files; otherwise, they will be exported to a default folder specified by the program itself.
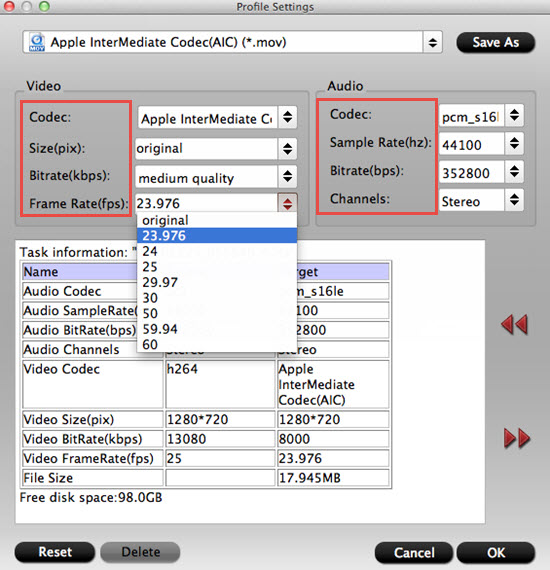
Step 3: Set advanced settings (optional)
Click "Settings" button, the following "Profile Settings" panel will show up, where you can adjust parameters like codec name, screen size, bit rate, frame rate, sample rate, and audio channels.
Step 4: Convert FLV to AIC for iMovie
After the above mentioned steps have done, you can press "Convert" to start encoding FLV to AIC for iMovie editing. The following "Conversion" window will show you the converting progress as well as elapsed time, remaining time, generated file size and estimated file size. All these would remind you how long time the conversion will cost and how much space it will occupy. If you don't want wait around for the entire conversion process, you can check "Shut down computer after conversion". Pavtube will take care of the rest.
As soon as the FLV files have been converted to iMovie workable AIC format, you can click "Open" to find out the output files. If you forget to set the file location, you can find them in the default location, just click "Open output folder".
For new users who just start to use iMove, you can know how to load media files into iMove here.
 Free Trial Video Converter for Mac

Useful Tips
- Import/Edit/Transcode Sony NEX-5N/NEX-7/A57/A65/A77 1080 50/60P AVCHD to iMovie on Mac
- Transcode TiVo Shows to AIC for Editing in iMovie and FCE
- Import Canon Rebel T4i (EOS 650D) MOV to iMovie for Editing – H.264 MOV to AIC Conversion
- Best Way to Import Nikon H.264 MOV to iMovie for Editing and Playing
- How to Convert QuickTime File to iMovie?
- Convert Sony AVCHD MTS/M2TS to AIC MOV for iMovie


