
 Home
HomeVLC media player is one of the most acclaimed and feature-rich media players available, without a doubt. The reason is that it supports a wide variety of media files and discs. Well, VLC Media Player is not just a great tool for playing videos and discs, it can do a whole lot of other things like convert videos between different formats. For example: Convert from AVI to MP4. If you're not familiar with the VLC transcoding feature, it's time for you to learn the cool hidden features of VLC media player right now. Here you'll see the step-by-step guide for converting video files on Windows and Mac: AVI to MP4 taken as example.
Part 1: How to use VLC to convert AVI to MP4 on Windows
Part 2: How to transcode AVI to MP4 on Mac with VLC
Part 3: Best VLC Alternative to Convert AVI to MP4
Part 1: How to use VLC to convert AVI to MP4 on Windows
This part, we focus on how to convert AVI to MP4 on Windows PC with VLC. Here are the steps:
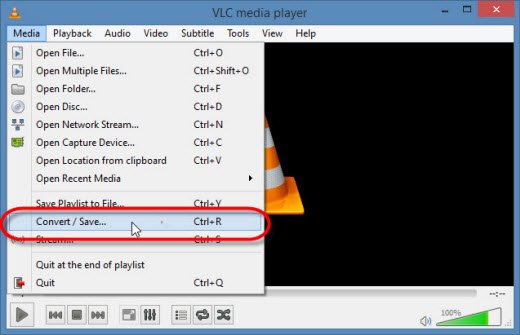
Step 1: From VLC menu bar click on Media > Convert/ Save [Shortcut: CTRL + R]
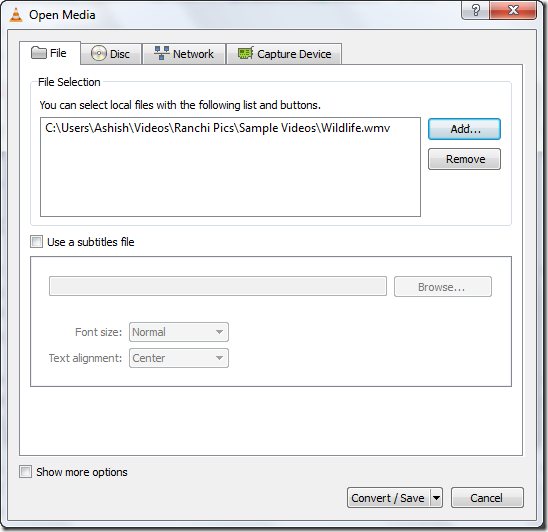
Step 2: Open Media dialog box is opened. Under the file tab, click on the Add button to browse for the AVI files that you want to add. Afterwards, select "Convert" from "Convert/Save" options at the lower right side of the window.
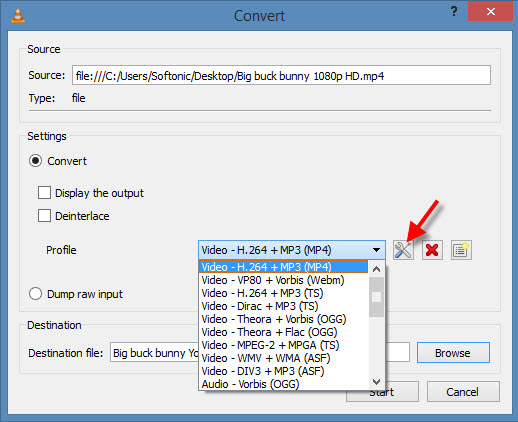
Step 3: In the next dialog box, conversion options are displayed. The options are:
Setting:
# Convert: Make sure this radio button is selected as you want to convert your file.
# Display the output: Play/show the output in the player as the conversion happens.
# Deinterlace: Check this option if you are converting from interlaced video formats example: 1080i, 720i formats displayed in televisions.
# Profile: Select your desired target file type. Since we are converting AVI to MP4, just select "Video - H264+ MP3 (MP4) on profile section.
You can select advanced video and audio codec combinations from the Edit selected profile or Create new profile button but this isn’t usually required.
# Dump Raw Input: This will keep all the file sizes the same, only changing the file format. Don’t select this option.
Step 4: Select a destination filename, the one that is converted and saved. Hit Browse, select a location, give a name like final and click on Save. Then click "Start" to start converting AVI to MP4 on Windows PC.
Tip: By default, VLC Media Player supports video conversion to the following range of video formats and containers:
H.264 video format in MP4 file container, H.264 video format in TS file container, H.265 video format in MP4 file container, Dirac video format in TS file container, MPEG video format in TS file container, Theora video format in OGG file container, WMV video format in ASF file container, DIV3 video format in ASF file container, MPEG 1080p/720p video format for TV/device in MP4 file container, DivX video format in AVI file container, SD video format for iPod in MP4 file container, HD video format for iPod HD/iPhone/PSP in MP4 file container, SD low and high video format for Android in MP4 file container, VP89 VIdeo File in Webm container
*Note: You can also create new media profile with your own combination of video and audio formats. It is explained in the profile section of step 3 of the tutorial above.
Part 2: How to transcode AVI to MP4 on Mac with VLC
You can also download VLC player for Mac on your Mac OS operating system. Here are the steps for converting AVI to MP4 with VLC on mac:
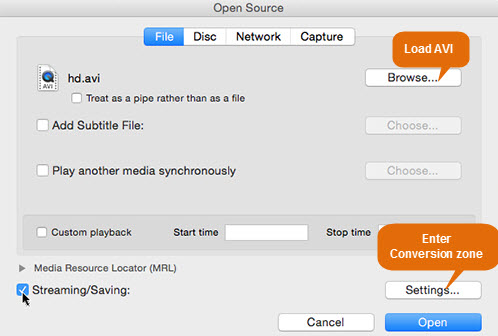
Step 1: launch VLC on your Mac. Click "Open media" option and then click "Browse" button to load AVI video file on the pop-up "Open Source" window.
Step 2: Tick "Streaming/Saving" and press "Settings" button. (If you plan to add SRT subtitles to AVI file, you can tick "Add Subtitle File" and click "Choose" option to import your downloaded subtitles.)
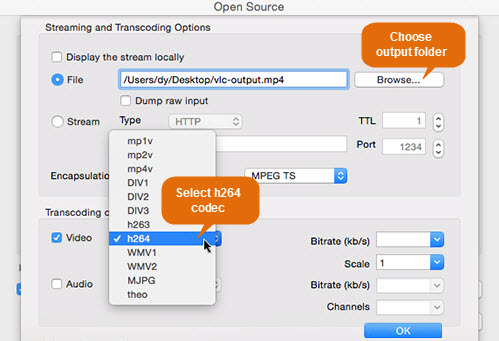
Step 3: Tick "File" and click "Browse" to choose a destination folder for output file storage on the Streaming and Transcoding Options interface.
Step 4: Tick "Video" and choose "h264" as video codec in the Transcoding options section.
Step 5: Click "OK" and hit "Open" button on the Open Source window. Then VLC media player will begin to convert AVI to MP4 on Mac computer for free.
Part 3: Best VLC Alternative to Convert AVI to MP4
The video converter feature in VLC media player is good enough. You can even edit the video parameters like frame rate, bitrate, codecs etc. Audio formats are also supported. VLC media player can convert video to audio if you set the output file to an audio format like mp3. However, you still may have some troubles while converting videos like unsupported video codec, slow conversion process, limit video editing function, etc. VLC media player can be a substitute for professional video converters if your needs are minimal and basic. When you need to convert many video files simultaneously for professional use, it is better to use some other video converter.
Unlike VLC, Pavtube Video Converter for Window /Mac supports batch conversion mode, you can load multiple files with different file formats and compression codec into the program at one time. As for the output file option, you can find some file formats and video or audio codec that can't be produced by VLC Converter in Pavtube. Besides plain file formats, you can also use this software to convert preset profile formats that's specially tailored for hot devices and programs.
This professional video converter also offers beneficial video customization function and video editing function. You can flexibly adjust output profile parameters such as video codec, resolution, bit rate, frame rate, audio codec, bit rate, sample rate, channels, etc to get better output video and audio quality. Edit video by trimming video length, cropping video black bars, adjusting output video aspect ratio, adding watermark, split or merge video, inserting external srt/ass/ssa subtitle, etc. You can find more features from this review.
Quick Guide: Convert AVI to MP4 with best VLC Alternative
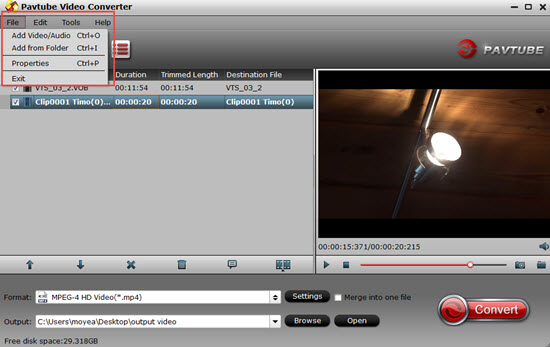
Step 1. Import AVI videos to this AVI to MP4 converter
Once launched Pavtube video converter, click “File” > “Add Video/Audio” or “Add from folder” (batch load multiple files) option, or you can just import your AVI files with the easy to use drag and drop method.
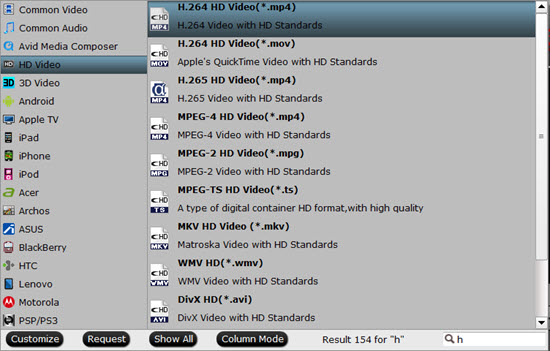
Step 2. Choose MP4 as output format
Click the “Format” bar drop-down list, you can choose “H.264 HD Video(*.mp4)” under “HD Video” main category as output format. H.265 MP4 is also provided.
You are also allowed to choose other Common video, HD video, 4K video, 3D video, also you can choose the portable devices you want to play video on: iPad, iPhone, PS4, Xbox One, or choose the NLE software: Sony Vegas, iMovie, FCP, etc.
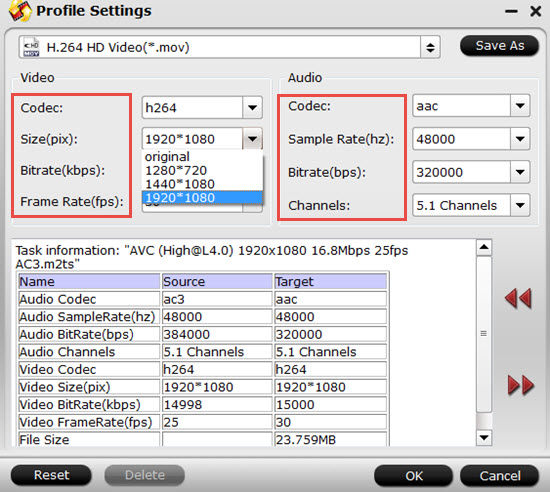
Step 3: Adjust output video/audio profile parameters
Click “Settings” on the main interface to open “Profile Settings” window, here, you can flexibly adjust output profile parameters including video codec, resolution, bit rate, frame rate, audio codec, bit rate, sample rate, channels, etc as you like to get better output video and audio quality.
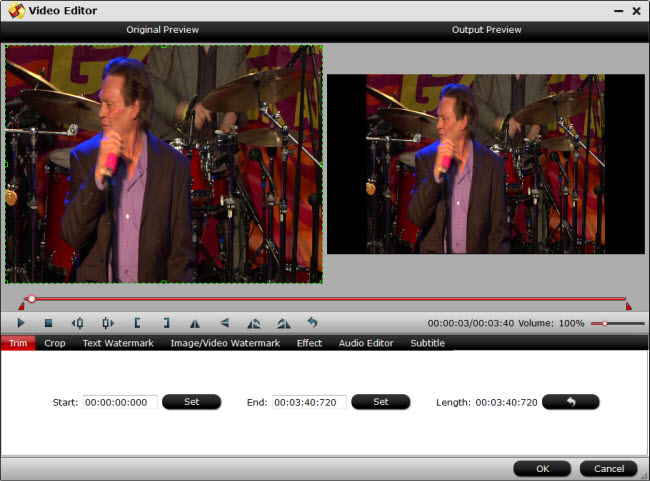
Step 4: Edit video with built-in video editing function
By default the Edit icon is grayed out. To activate the Edit menu, you have to select an item first. When a video or movie is selected, click the pencil like Edit icon on the left top tool bar to open the video editor window, here, you can flip or rotate video, trim, crop, add watermark, apply special effect, edit audio or insert external subtitles, etc.
Step 5. After all setting is completed, click right-bottom "Convert" button to begin the AVI to MP4 conversion process.
Conclusion:
Apply VLC media player or Pavtube video converter to convert AVI to MP4? You might have no idea. The following part shows you the specific performances of VLC and Pavtube Video Converter. Just select any one by your own need.
|
Video Converter
|
Pavtube Video Converter
|
VLC Media Player
|
| Video Input | 200+ | 100+ |
| Video Output | 250+ | 100+ |
| Batch Convert | Yes | No |
| GPU Acceleration | Yes | No |
| Video Playback | Yes | Yes |
|
Video Setting
|
||
| Video codec | Yes | Yes |
| Audio codec | Yes | Yes |
| Video resolution | Yes | Yes |
| Video bitrate | Yes | Yes |
| Video frame rate | Yes | Yes |
| Audio bitrate | Yes | Yes |
| Audio sample rate | Yes | Yes |
| Audio channels | Yes | Yes |
|
Video Editing
|
||
| Rotate video | Yes | Yes |
| Merge video | Yes | No |
| Crop video | Yes | No |
| Add subtitles | Yes | No |
| Replace audio | Yes | No |
| Trim Video | Yes | No |
| watermark | Yes | No |
 Free Trial Video Converter

Useful Tips
- How to Flip or Rotate Videos using Handbrake?
- Play Tivo Recordings with Windows Media Player
- How to Use VLC to Convert AVI to MP4 on PC/Mac?
- MOV Compressor: How to Compress MOV to a Smaller Size on Windows/Mac?
- Stream 4K Video to Chromecast Ultra via Plex
- Get Chromebook Pro/Plus to Play MKV Files without Any Problem


