
 Home
HomeCan You Edit H.264 in Windows Movie Maker Smoothly?
Many video editor fan are eager to know whether Windows Movie Maker can support direct import and editing H.264 footage? Bad news, as far as we have known that currently Windows Movie Maker can't support H.264 codec. In other word, H.264 isn't the Windows Movie Maker supported format which cause user fail to edit H.264 in Windows Movie Maker.
Is there some way to import and edit H.264 in Windows Movie Maker? Thankfully, a Windows Movie Maker Converter is the video savior. By a Windows Movie Maker Video Converter, user can convert H.264 to Windows Movie Maker supported video formats effortlessly. Following will show you the best H.264 to Windows Movie MakerConverter and tell the way to do.
Best H.264 to Windows Movie Maker Converter
There are too many softwares on market which all claim that they can convert H.264 to Windows Movie Maker for editing, some are true, some are false, how to avoid being defrauded? Choose a Windows Movie Maker Video Converter who has user for a long time without any problem is the best realiable. After countless freeware test and verify, Pavtube Video Converter is worthy consideration which can solve all the problems that fail to import H.264 to Windows Movie Maker, this software allows you to convert any H.264 to Windows Movie Maker supported formats, for example: Covert H.264 to WMV, AVI, MPEG-1, MP4 etc, which are all supported by Windows Movie Maker.
User also also can convert H.264 to other NLE ( non-linear editing systems) with keeping both efficiency and quality, such as: H.264 for Adobe Premiere Pro, Sony Vegas Pro, Pinnacle Studio, iMovie, etc. With this Windows Movie Maker Video Converter, user can be the master of video.
H.264 is also the common format for streaming 4K video which capacity is huge, even though some editing tool can support H.264, the poor stability and intermittent editing will destory a nice editing experience. This H.264 to Windows Movie Maker Video Converter can prevent the tragedy, in addition, user can do the batch video conversion according to the high stability.
This friendly software can support Mac operating system well. Following provides you the download link which is easy to install and master. Want to know more about the excellent Windows Movie Maker Video Converter? this article may be helpful for you.


How to Use the H.264 to Windows Movie Maker Converter?
Whatever use can't import H.264 to Windows Movie Maker or can't edit H.264 in Windows Movie Maker smoothly, here will provide you the best solution to import and edit H.264 in Windows Movie Maker.
Step 1. Load H.264 to Windows Movie Maker Video Converter
Install and launch H.264 to Windows Movie Maker Converter on your computer, click "File" > "Add Video/Audio" to load H.264 files that has been transferred from your other video storage to computer local drive to the program. You can click the "Folder" button to batch load multiple H.264 files into the program.

Step 2. Choose H.264 to Windows Movie Maker supported format
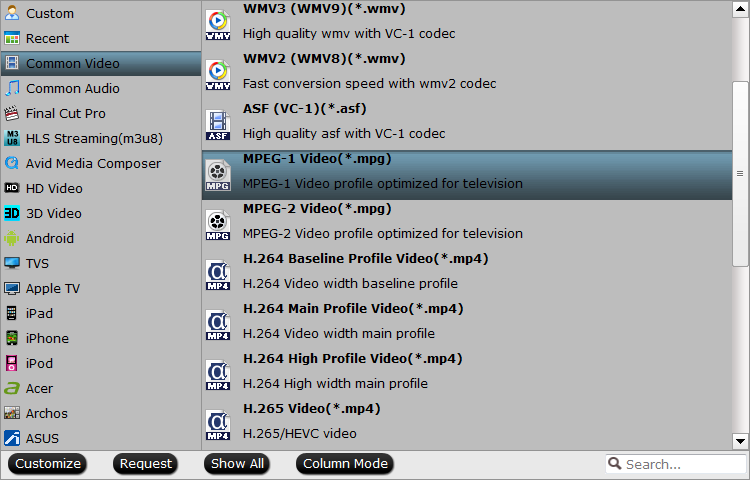
All H.264 problem is not the problem any more with using the Windows Movie Maker Converter. Click "Format" bar, from its drop-down list, select H.264 to Windows Movie Maker supported format, from Windows Movie Maker official websites, WMV is the best format for Windows Movie Make, you can also choose other video formats which is supported by Windows Movie Maker according to your own needs, like: MPEG-1, AVI, etc.
Step 3. Edit H.264 to Windows Movie Maker Supported Codec
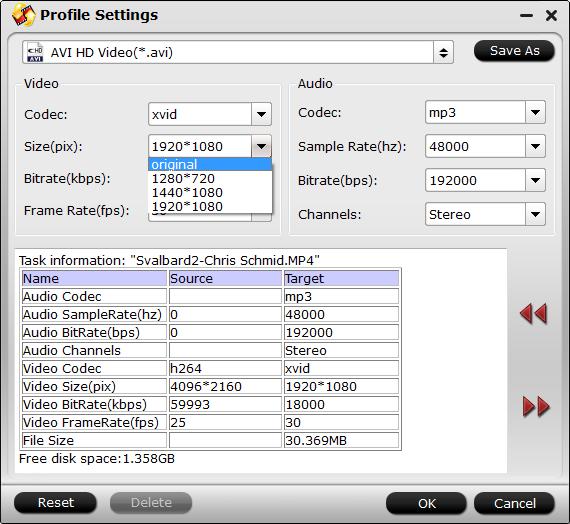
Sometimes, user can't still import WMV to Windows Movie Maker due to the video and audio codec incompatibility, except to convert H.264 to Windows Movie Maker supported video format, user also can can enter the "Setting" menu to set the video and audio codec to Windows Movie Maker best supported codec. In addition, other video and audio parameters you can adjust too, like: Video frames, video bitrate, audio sample rate, audio channels, etc.
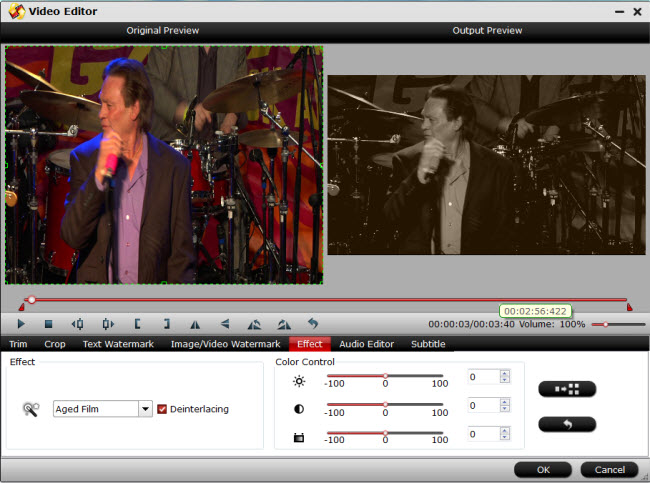
TIP: Before the exciting conversion, user can edit the video at the editing menu, click the "Edit" icon on the tool bar to open the "Video Editor" window, here you are the video master, any video effect is up to you, every editing button is waiting for you to create the magic power.
Step 4. Begin H.264 to Windows Movie Maker Supported Format Process
After all the format and codec settings are done, go back to main interface, hit right-bottom "Convert" button to start H.264 to Windows Movie Maker supported format process Just wait for a cup of coffee time, you can get a brand new video file.
The finial job is to import converted H.264 to Windows Movie Maker for editing, for example: Import H.264 to Windows Movie Maker from PC, following will show the simple steps.
How to Import Converted H.264 to Windows Movie Maker From PC
Step 1. In the Task pane on the left side of the screen, click "Capture Video", at the drop-down list, choose the "Import video" section.

Step 2. Windows Movie Maker will navigate to the folder that contains all the components of your movie. Click the converted H.264 video to Windows Movie Maker.
Step 3. After you choose the video, on the navigate right window, click the "Import" to start to import converted H.264 to Windows Movie Maker.
Actually, with the help of the H.264 to Windows Movie Maker Converter, this issue is not a big problem. You can download the trial version for testing, also you can buy and own it forever. Hope this software will be your best video assistant.
You may be interested in these:
H.265 to Windows Movie Maker | MXF to Windows Movie Maker | WMV to Windows Movie Maker
 Free Trial Video Converter

Useful Tips
- How to Flip or Rotate Videos using Handbrake?
- Play Tivo Recordings with Windows Media Player
- How to Use VLC to Convert AVI to MP4 on PC/Mac?
- MOV Compressor: How to Compress MOV to a Smaller Size on Windows/Mac?
- Stream 4K Video to Chromecast Ultra via Plex
- Get Chromebook Pro/Plus to Play MKV Files without Any Problem


