
 Home
HomeHave downloaded a 4K movie from popular 4K movie streaming services or captured a 4K video footage with one of your 4K device recorders and wish to load those 4K video into Sony Vegas Pro for some professional post editing workflow. The following article will talk about the workflow of 4K video with Sony Vegas Pro.
Can Sony Vegas Pro handle 4K video?
From Wiki special page for Sony Vegas Pro, we get the information that Sony included 4K resolution editing support since Vegas Pro 9.0 version. However, this does not mean that you will have no problem to load 4K video into Sony Vegas Pro or will definitely have a smooth workflow of 4K video with Sony Vegas Pro. There are still other two important things you should take into consideration: whether your computer meet the minimum requirements to edit 4K video or the 4K video is natively supported by Sony Vegas Pro.
Edit 4K video with Vegas Pro on underpowered computer
If you are working on a computer with limited processing power, to edit 4K video with Sony Vegas, it would be much ideal for you to create a Proxy file with lower quality standard which helps to streamline the editing process and allow you to preview your project.
1. Capture or import your 4K clips.
2. Start a new project.
3. Add your 4K clips to the Project Media window.
4. Right-click the clips in the Project Media window and choose Create Video Proxy from the shortcut menu.
Vegas Pro creates video proxy files (.sfvp0) alongside the original files in Windows Explorer. You will not see these files in the Project Media window or Vegas Pro Explorer.
5. Add your 4K clips to the timeline and edit your project as usual.
The Preview Quality setting in the Video Preview window determines whether the proxy files or original files are used for editing and preview:
- When the preview quality is set to Draft or Preview, the proxy file is used.
- When the preview quality is set to Good or Best, the original file is used.
Alternatively, you can also select to compress 4K video to 1080p, which will ensure you a smooth editing workflow on a underpowered computer.
Edit unsupported 4K video with Sony Vegas Pro
Sometimes, even if your computer are powerful enough to handle 4K video editing, you may still fail to import the 4K footage into Vegas Pro due to the incompatible video codec, the newest version Vegas Pro 14 have native input support for 4K XAVC, 4K XAVC S, 4K MP4, 4K MOV, 4K WMV, 4K H.264/AVC, if the 4K video are encoded with H.265/HEVC, Prores or VP9 codec, Vegas Pro will fail to read them. Fortunately, here comes a powerful video conversion application called Pavtube Video Converter (best video converter review), which can fully convert all the unsupported 4K video to Sony Vegas Pro editable 4K file formats listed above. In addition, you can enhance you video to a high level with its built-in video editing tool. Trim or cut video to remove unwanted parts or segments, split large video into small parts by file size, count or length, crop video to remove black bars or unwanted area, add image/video/transparent text watermark, apply special rendering effects, flip or rotate video, etc.


How to Convert and Compress 4K Video with Sony Vegas Pro?
Step 1: Load 4K video into the program.
Open the program, click "File" menu, from its drop-down option, select "Add Video/Audio" to load 4K video to the program.

Step 2: Choose output file format.
If you have an old computer, you can directly use the program to output Premiere Pro CC specially optimized editing format "MPEG-2(*.mpg)" under "Adobe Premiere/Sony Vegas..." main category.

Then, click "Settings" to open "Profile Settings" window to to compress 4K to 1080p for smooth editing workflow by choose the output file resolution as 1920*1080 from "Size(pix)" drop-down option.
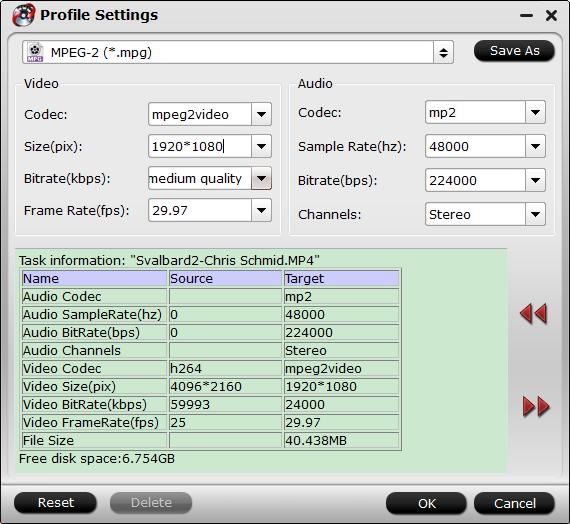
If your computer can perfectly handle 4K video, but the 4K video is not supported by Sony Vegas Pro, you can select one of Sony Vegas Pro compatible 4K format such as 4K H.264/AVC from "Common Video" > "H.264 High Profile Video(*.mp4)".

Step 3: Edit 4K video(optional).
Check an item to active the "Video Editor" function, then click the pencil like icon on the top tool bar to open the "Video Editor" window, you can trim video length, crop video black bars, add watermark, apply sepcial rendering effect, remove/replace audio in video, etc.

Step 4: Start the conversion process.
After all settings are done, click right-bottom "Convert" button to begin to convert and compress 4K video to Sony Vegas Pro compatible editing codec or resolution.
When the conversion is completed, you will have no problem to import 4K video to Sony Vegas Pro for smooth post video editing workflow.
 Free Trial Video Converter

Useful Tips
- How to Flip or Rotate Videos using Handbrake?
- Play Tivo Recordings with Windows Media Player
- How to Use VLC to Convert AVI to MP4 on PC/Mac?
- MOV Compressor: How to Compress MOV to a Smaller Size on Windows/Mac?
- Stream 4K Video to Chromecast Ultra via Plex
- Get Chromebook Pro/Plus to Play MKV Files without Any Problem


