
 Home
HomeAre you a user of Adobe Premiere Pro? As a timeline-based video editing software, Adobe Premiere Pro (CC, CS6, CS5, CS4) have massive fans. Normally, it is easy to import video to Premiere Pro (CC, CS6, CS5, CS4) for editing. But there is still trouble that happens when you importing H.264 video to Adobe Premiere Pro (CC, CS6, CS5, CS4). User' reports said that it's sometimes laggy and slow when eding H.264 video in Premiere Pro. Moreover, some can't import H.264 video to Premiere Pro.
In Premiere Pro supported media page, Premiere Pro supports various media that use H.264 encoding. So why can't people edit H.264 video in Premiere Pro smoothly? Reasons are various to cause the issues. Now, read on and find the best solution to solve the issues for you.
Solutions to Fix "Can't Import/Edit H.264 Video in Premiere Pro"
Solution 1: When you imported H.264 video to Premiere Pro for editing, Adobe Premiere Pro CC is very slow, lagging preview. You can try disabling "Enable accelerated Intel h.264 decoding" option in Media tab (preferences).
Solution 2: Premiere Pro does not support H.264 in an AVI container. So if your H.264 video is AVI format, you can't import and edit your H.264 video in Premiere Pro. You can try changing the filename extension from AVI to MOV.
Solution 3: H.264 is a delivery codec and it isn't an ideal codec for editing. That's why you cannot edit H.264 in Premiere Pro or Final Cut Pro smoothly sometimes. Luckily, there is an easy solution to fix the problem. The easy workaround is transcoding H.264 to MPEG-2 or ProRes for Premiere Pro (CC, CS6, CS5, CS4).
Convert H.264 to MPEG-2 or ProRes for Premiere Pro (CC, CS6, CS5, CS4)
To convert H.264 to Premiere Pro, you need a H.264 video converter. Searched online, you can find that Pavtube Video Converter for Mac is a decent H.264 video decoder and encoder. It simply changes your H.264 encoded MP4, MKV, AVI, etc video to Premiere Pro most compatible MPEG-2 and ProRes codec video within 3 cliks. On the other hand, it also can encode other video files to H.264/AVC encoded video files, with this small but powerful tool, you can create creating an H.264 movie by yourself.
When it comes to setting up the video parameters, you can select the video codec, pick the video size, and adjust the framerate, while the audio ones can be tweaked in terms of bitrate, codec, and sample rate. You even can trim, crop, merge, split, flip, rorate, add subtitles/watermarks before you start to convert H.264 AVC video to Premiere Pro.
If you are Windows users, Pavtube Video Converter is the alternative choice.
Getting Started to Convert H.264 to MPEG-2 or ProRes for Premiere Pro
Step 1. Load H.264 files
Here you can directly drag & drop the H.264 files to the converter, or click “Add Video” or “Add from folder” button on the top menu to browse and choose H.264 files. Besides H.264. Pavtube Video Converter for Mac also can convert H.265/HEVC video to Premiere Pro accepted video.

Step 2. Choose the preset output format
If you have an old computer, you can directly use the program to output Premiere Pro CC specially optimized editing format "MPEG-2(*.mpg)" under "Adobe Premiere/Sony Vegas..." main category.
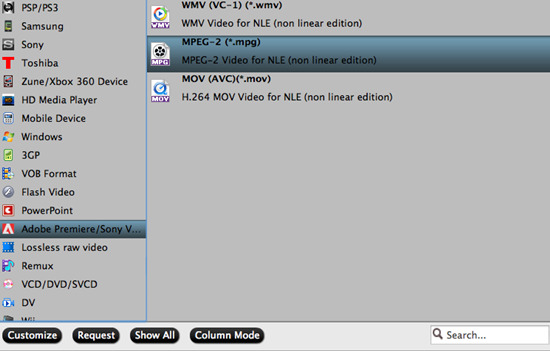
Then, click "Settings" to open "Profile Settings" window to to compress 4K to 1080p for smooth editing workflow by choose the output file resolution as 1920*1080 from "Size(pix)" drop-down option.
If your computer can perfectly handle 4K video, but the 4K video is not supported by PPC, you can select one of PPC compatible 4K format such as 4K Prores from "Final Cut Pro" > "Apple Prores 422(*.mov)" or "Apple Prores 422(HQ)(*.mov)".

Step 3. Start converting H.264 files.
Click the big “Convert” button in the main UI to begin the H.264 to MPEG-2 or ProRes conversion. You can see your converted videos by clicking “Open” button.
Then you are able to import and edit converted H.264/HEVC footage in Premiere Pro all versions without any problem (The Hot Key to load files to Premiere is “Command” + “O”). Enjoy!
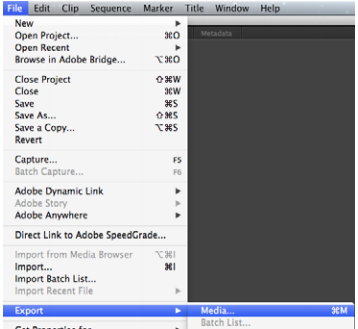
How to Export H.264 video from Adobe Premiere Pro CC?
Although you can't edit H.264 video in Premiere Pro perfectly, you can export H.264 video from Premiere Pro easily.
With the timeline as the active pane, go to File > Export > Media
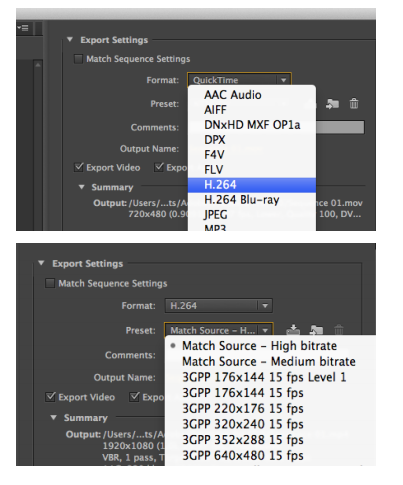
In the export dialog box, select “H.264” from the Export Settings > Format dropdown, then “Match Source - High bitrate” from the Export Settings > Preset dropdown
Ensure that Export Video and Export Audio are checked, then click on the Output Name option to provide a file name and save location for your exported video
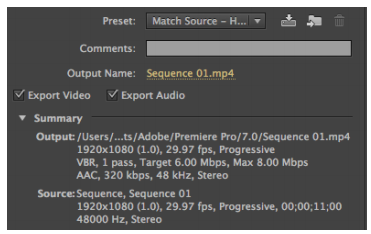
Finally, click the Export button at the bottom right of the dialog box, and wait for the export process to complete

You also can export FLV, F4V, etc from Premiere Pro, then use Pavtube Video Converter for Mac convert the Premiere Pro export to H.264 MP4, H.264 MKV, H.264 AVI, etc video.
 Free Trial Video Converter for Mac

Useful Tips
- MOV to M4V: How to Convert MOV to M4V on Mac OS (macOS High Sierra Included)
- How to Play AVI Videos on MacBook(Air, Pro, iMac)?
- How to Import Android Videos to iMovie for Editing?
- How to Play a WMV File on Mac Computer
- Play H.265 Files with QuickTime Player on Mac
- Convert YouTube to MPG/MPEG with Easiest Way


