
 Home
HomeHEVC codec is getting more popular in 2017 cause more 4K video recording devices are becoming affable to normal people such as the famous DJI Phantom 4K drone. HEVC codec can make you record 4K video saving in a smaller size than using H.264 codec. This is good but it also causes some troubles. For example, when you record a footage and want to import the HEVC footage to Premiere Pro CC/CS6/CS5/CS4 for editing, it won't be easy for you.
"I know that Premiere is h.265 compatible, but apparently not with DJIs version. It won't import. Any work arounds?"
Why can't we edit HEVC/H.265 videos in Premiere Pro CC/CS6/CS5/CS4? Don't Premiere Pro CC/CS6/CS5/CS4 support HEVC codec? To figure out the reasons that Premiere Pro CC/CS6/CS5/CS4 can't edit x265 video, the NO.1 reason that if Premiere Pro CC/CS6/CS5/CS4 supports HEVC will be the first thing we should get.
Adobe Premiere Pro Supported native video and audio formats for import
Adobe Premiere Pro supports several audio and video formats, making your post-production workflows compatible with the latest broadcast formats.
| Format | Details |
| 3GP, 3G2 (.3gp) | Multimedia container format |
| AAC | Advanced Audio Coding |
| AC3 | Including 5.1 surround |
| AIFF, AIF | Audio Interchange File Format |
| Apple ProRes | Apple video compression format |
| ASF | NetShow (Windows only) |
| ASND | Adobe Sound Document |
| AVC-Infra | Panasonic codec |
| AVI (.avi) | DV-AVI, Microsoft AVI Type 1 and Type 2 |
| BWF | Broadcast WAVE format |
| DNxHD | Supported in native MXF and QuickTime wrappers |
| DNxHR | DNxHR LB, DNxHR SQ, DNxHR TR, DNxHR HQ, and DNxHR HQX |
| DV | Raw DV stream, a QuickTime format |
| GIF | Animated GIF |
| H.264 AVC | Various media that use H.264 encoding |
| HEVC (H.265) | H.265 media with resolutions up to 8192x4320 |
| M1V | MPEG-1 Video File |
| M2T | Sony HDV |
| M2TS | Blu-ray BDAV MPEG-2 Transport Stream, AVCHD |
| M2V | DVD-compliant MPEG-2 |
| M4A | MPEG-4 audio |
| M4V | MPEG-4 video file |
| MOV | QuickTime format |
| MP3 | MP3 audio |
| MP4 | QuickTime Movie, XDCAM EX |
| MPEG, MPE, MPG | MPEG-1, MPEG-2 |
| MTS | AVCHD |
| MXF | Media eXchange Format. MXF is a container format that supports
|
| Native MJPEGs | 1DC |
| OMF | Audio Project Format |
| OpenEXR | Files in .EXR, .MXR, and .SXR formats |
| VOB | Container format in DVD media |
| WAV | Windows Waveform |
| WMV | Windows Media, Windows only |
Note: Not all QuickTime codecs are supported by default. Some codecs may require third party components.
If you want to know the Supported native camera formats and the Supported still‑image and still-image sequence file formats, please read the page.
Fix "Premiere Pro CC/CS6/CS5/CS4 Can't Edit HEVC/H.265" Issues
From the chart in helpx.adobe.com page, it seems that Adobe Premiere Pro supports HEVC codec. But why some people can't edit H.265 in Premiere Pro?
Reasons and Solutions
1. Premier supports h.265 files but the P4P h.265 files are not recognized by any of the Adobe apps such as Premiere Pro CS5/CS4. Get the latest version of Adobe Premiere Pro CC.
2. Adobe is ALWAYS slow on this stuff. Lightroom won't have the lens corrections in there for 2-3 months, also. You can try DaVinci Resolve
3. What's the format of your HEVC video, MOV format or MP4? The reports are only accepting MP4 not MOV formats. If you shot h.265 in MOV, you can go into the folder where your files are from and edit the name of the file by changing the extension from a .MOV file to a .MP4 extension and accept the change of extension and then drag and drop into Premiere.
4. When you first try to import HEVC video to Premiere Pro, you need to install the HEVC codec, and by clicking "Ok", it will do it automatically and then import the video just fine.
5. You can solve the issue by converting h265 from P4P to Prorres HQ with DJI TRANSCODING TOOLS. https://dl.djicdn.com/downloads/inspire_1/DJI_Transcoding_Tool_v0.9.2.dmg
6. As stated above, use .mp4 and have an updated version of Premiere. If you have the CC license, it should be up to date already. Older CS versions don't support H.265. Keep in mind that 4K H.265 footage requires a ridiculous amount of processing power if you want to edit it in its original format, so you might want to create proxies of the clips before you start editing. Unless you have a very high-end PC.
7. Adobe first started support HEVC in CC2015 so any earlier versions don't have the codec. When you first try and import a H265 file a message should appear telling you that you need to license the codec . The license is part of Premiere Pro CC but not automatically turned on for every user unless they use it. WHY? there is actually a license fee that Adobe manage for you and it gets activated with your first Import or Export. You need to be connected to the internet for the first time you use it and once you do that you don't need to be connected to license again unless you re-install or there is a major update. Adobe is always "tweaking" playback with CPU/GPU support. H265 playback is decent in Premiere Pro CC 2017. Lots of people use it as a H.265 player - BUT, Encoding takes a longtime.
Ultimate Solution- Convert HEVC/H.265 to ProRes or MPEG-2 for Premiere Pro
HEVC/H.265 is stuttery and slow to edit, even on a really solid studio-pc. Transcoding HEVC to prores solved all issues. Use a HEVC converter, it will be easy. Pavtube Video Converter for Mac is just what you need to achieve your goal. With it, you can effortlessly transcode HEVC/H.265 MP4, HEVC MOV, 4K HEVC/H.265 to Adobe Premiere friendly movie format like ProRes, MPEG-2, MOV (Note: it applies to all kinds of Adobe Premiere including Adobe Premiere Pro, Adobe Premiere Pro CS3/ CS4/ CS5/CS6/CC) keeping the original quality. And Pavtube Video Converter for Mac outputs different types of Apple Prores Codecs for different Adobe Premiere Pro versions and also exports Adobe Premiere optimized presets.
Besides Adobe Premiere, this software can also export Apple ProRes, AIC, DNxHD for Final Cut Pro, iMovie, Avid Media Composer and more NLE systems. If you are Windows users, Pavtube Video Converter is the alternative choice.
Step 1. Load H.265 files
Here you can directly drag & drop the H.265 files to the converter, or click “Add Video” or “Add from folder” button on the top menu to browse and choose H.265 files

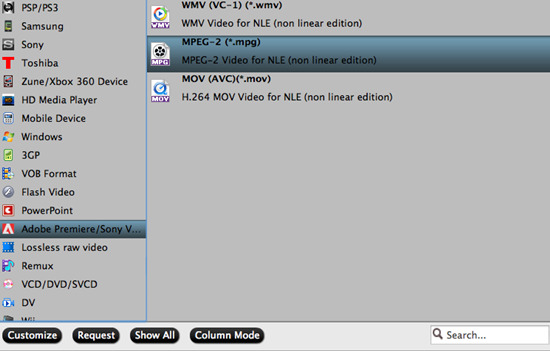
Step 2. Choose the preset output format
If you have an old computer, you can directly use the program to output Premiere Pro CC specially optimized editing format "MPEG-2(*.mpg)" under "Adobe Premiere/Sony Vegas..." main category.
Then, click "Settings" to open "Profile Settings" window to to compress 4K to 1080p for smooth editing workflow by choose the output file resolution as 1920*1080 from "Size(pix)" drop-down option.
If your computer can perfectly handle 4K video, but the 4K video is not supported by PPC, you can select one of PPC compatible 4K format such as 4K Prores from "Final Cut Pro" > "Apple Prores 422(*.mov)" or "Apple Prores 422(HQ)(*.mov)".

Step 3. Start converting H.265 files.
Click the big “Convert” button in the main UI to begin the H.265 to MPEG-2 or ProRes conversion. You can see your converted videos by clicking “Open” button.
Then you are able to import and edit converted H.265/HEVC footage in Premiere Pro all versions without any problem (The Hot Key to load files to Premiere is “Command” + “O”). Enjoy!
 Free Trial Video Converter for Mac

Useful Tips
- MOV to M4V: How to Convert MOV to M4V on Mac OS (macOS High Sierra Included)
- How to Play AVI Videos on MacBook(Air, Pro, iMac)?
- How to Import Android Videos to iMovie for Editing?
- How to Play a WMV File on Mac Computer
- Play H.265 Files with QuickTime Player on Mac
- Convert YouTube to MPG/MPEG with Easiest Way


