-
How to use Pavutbe Video DVD Converter Ultimate?
This guide is written for the first-time users of Pavtube Video DVD Converter Ultimate. It aims to introduce some practical tips as well as typical features of this application. Read it though and surely you find it could be very easy to use the Video DVD Converter Ultimate.
What can Pavtube Video DVD Converter Ultimate do for me?
That is a question asked by many first-time users. Well, in one word, it converts videos and DVDs to any popular video and audio formats so that you can enjoy them more freely. The app converts common video (SD video), HD video, Flash videos (flv, f4v, swf), AVCHD camcorder footages (mts, mod, tod, mov), DVR recorded files (tivo), QuickTime files, etc and rip DVDs (protected or not) to be compatible with portable media players, mobile phones, video game consoles, application software and home theatre system.
Tip: For Blu-ray movie lovers, Blu-ray Video Converter Ultimate will be more useful than this program.
Step-by-Step guide on using Video DVD Converter Ultimate:
Step One. Getting started
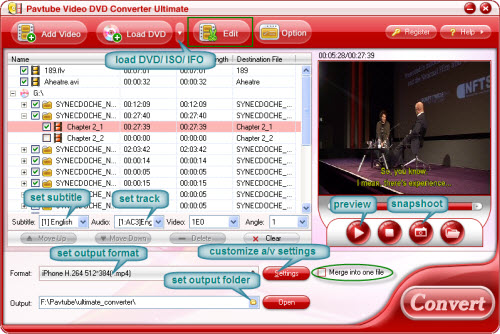
Install and run Video DVD Converter Ultimate. An intuitive interface will pop up. On the upper left you could see “Add Video” and “Load DVD” button. To import videos, you may click on “Add Video” or simply drag the video files in. To import DVD, you may click “Load DVD” after insert a source DVD into optical drive. If the source file is DVD ISO, or a folder in your PC, click the arrow button and find corresponding option in drop-down list.
Now that the files are loaded to file list, let’s see what you can do to them. Whatever you do, select the file in the first place.
Rename output file: See the field of Destination File? One click on it and input any name you like. Or right click the file and choose Rename in shortcut menu. (keyboard shortcut- F2)
Select and unselect all files: By default, all the files are selected. To unselect all, you could right-click and apply “Uncheck All”.
Preview and snapshoot: There are four control button below the preview window, namely play/pause, stop, snapshoot and open. When previewing the file, you can click Snapshoot button to capture favorable pictures and Open button to locate them. If you would like to save the snapshots to any folder other than default directory or change the picture format and size, please go to Option -> Thumbnail.
Specify output path and find converted file: Position cursor to Output box and type in output path; or click the small folder icon next to the Output box and browse to the location you’d like to save converted files. To view the converted files, simply click on the Open button.
Join/ combine multiple files together: Check the files you want to merge and tick the box of “Merge into one file”. Video clips and DVD episodes can be merged together as well.
Select Subtitle and audio track: Below the file list there are Subtitle and Audio box from which you can set subtitle and audio track.
Step Two. Select favorable format and customize the A/V settings
Click on the format bar and there are various video and audio formats for you to choose from: common video, HD video, flash video and customized audio and video formats for iPod, iPhone, Apple TV, PSP, PS3, Xbox 360, Ghpne, 3GP, Pocket PC, Nokia, Blackberry, Motorola, Sony Erickson, Creative Zen, Archos, Powerpoint, Adobe premiere etc. If these formats still can not meet your needs, you may customize the format to what you need by setting the audio and video parameters.
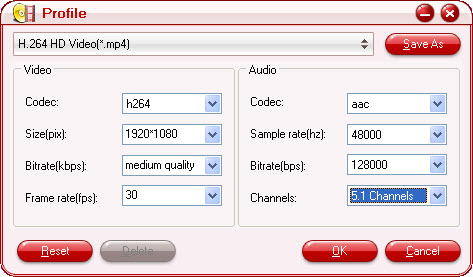
Customize A/ V settings: Click on “Settings” and you can adjust video codec, size, bit rate, frame rate, audio codec, sample rate, bit rate, and channels to required value. You may also save the customized format for future use. Simply click “Save As”, input a new name, like “My MP4” or whatever, and click “OK” to confirm. Next time you can find and choose this format by Format bar->Custom -> My MP4.
Step Three. Edit the video clips and DVD episodes.
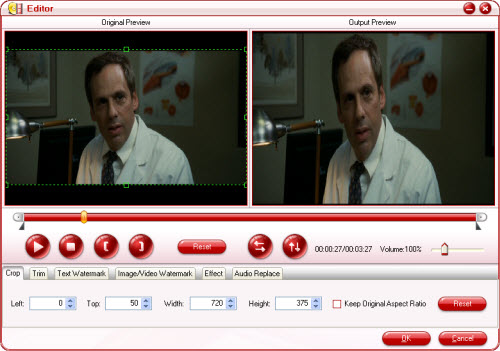
It is easy to enter editor interface. See the “Edit” menu in the upper middle? Click on it and you can cut off the black edges, trim out unwanted clips, add watermark to videos, set special effect, rotate the video, and replace original audio with any music you like. Notice that the “Edit” menu will be in disabled state if there is no selected file. Select some file first.
Crop the video: Either input values to the Left, Top, Width, Height box or drag the dotted green pane to select wanted area.
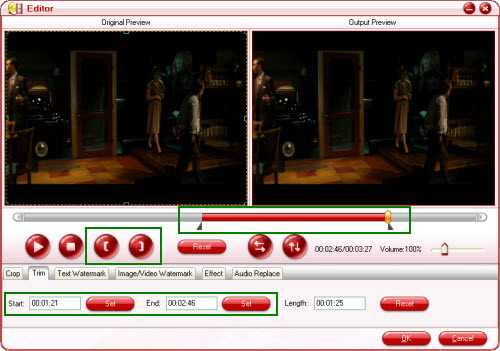
Trim out unwanted frames: The trim feature allows you to keep the part you want and cut off the other clips. There are three ways to go through. You may input specific time in “Start” and “End” box; drag the slider to where you would like to start and stop; or click the two square bracket buttons when playing the video.
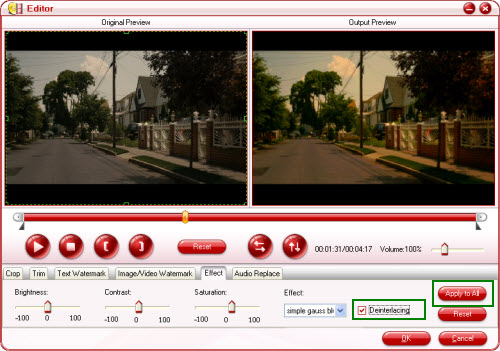
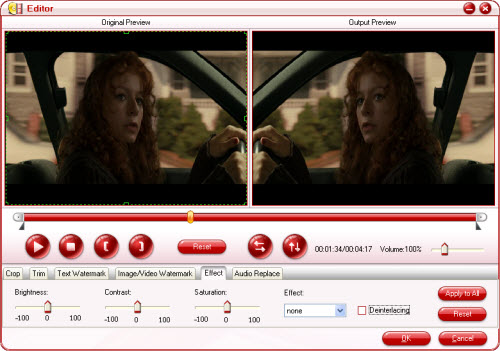
Add Effect to the video: Adjust the brightness, contrast and saturation to improve visual effect, or employ special effect in the drop-down list. An useful feature for handy cam users is “Deinterlacing”. For the footages with interlaced lines, the converted image quality will looks much better provided that “Deinterlacing” box is checked. If you’d like to set the effect to all the selected files, click “Apply to All”.
Text/ Image/ Video watermark & audio replace: You can add text, image and video mark to selected video and replace the original audio with favorable music.
Flip horizontal and flip vertical: By ![]() and
and ![]() button.
button.
Step Four: Start converting/ ripping.
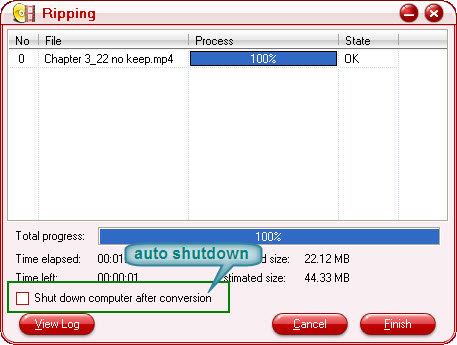
Save the editing result by clicking “OK”. When you back to the main interface, make sure everything is all right and finally click “Convert” button. The view log will shows you detailed information of conversion. If you can not afford much time waiting, simply check the box of “Shut down computer after conversion” and leave it be. After conversion, close the view log window. To view the converted files, please click on the “Open” button next to “Output” box on the main interface.
Tip: The trial/ demo version allows you to access all the features, profiles and functions of the app, yet the Pavtube logo will be displayed in the middle of converted videos. And that’s why we advise you to test the program with relatively smaller file----to save your time.
Tip: By default the app will be installed under "C:\program files\Pavtube\Video DVD Converter Ultimate", and set output folder as “C:\Documents and Settings\user\My Documents\Pavtube\ultimate_converter\”. In the event that “My Documents” folder is moved to any other disk, the output path will be invalid.
Guide
- Convert Video to DV AVI
- Convert MKV to MP4
- Convert MKV to MPEG
- Convert MKV to WMV
- Convert HD to SD
- Convert MOD to MPEG
- Convert MOD to MP4
- Convert MOD to WMV
- Convert MOD to WAV
- Convert MOD to AVI
- Convert AVCHD to AVI
- Convert AVCHD to iPod
- Convert AVCHD to SD
- Convert AVCHD Video
- Blu-Ray to 3GP
- Blu-Ray to Blackberry
- Blu-Ray to DVD
- Blu-Ray to iPod Nano
- Blu-Ray to iPod Touch
- Copy Blu Ray to Hard Disk
- DVD to Apple TV
- DVD to AVI
- DVD to Blackberry
- Convert M2TS to HD MP4
- MTS/M2TS to Apple TV
- MTS/M2TS to iPhone
- MTS/M2TS to iPod
- Blu-Ray to Divx
- Blu Ray to Xvid AVI
- Capture Blu-Ray Screenshot
- Extract MP3, WMA from Blu-Ray
- Rip Blu-Ray to audio
- Rip Blu-Ray to PC