
 Home
HomeIf you are a movie fan immersed yourself with WD TV Live Plus Network Media Player, you may be habituated to access Internet sites like Netflix, YouTube, and Facebook and stream movies and TV shows to your HDTV in spectacular 1080p Full-HD video and crystal-clear digital audio. WD TV Live Plus plays movies, music, and photos from your home network, USB drives, and other devices and streams entertainment to every corner of your home. This media player supports the most popular file formats listed as below:
Video: AVI (Xvid, AVC, MPEG1/2/4), MPG/MPEG, VOB, MKV (h.264, x.264, AVC, MPEG1/2/4, VC-1), TS/TP/M2T (MPEG1/2/4, AVC, VC-1), MP4/MOV (MPEG4, h.264), M2TS, WMV9, FLV (h.264)
Photo: JPEG, GIF, TIF/TIFF, BMP, PNG
Audio: MP3, WAV/PCM/LPCM, WMA, AAC, FLAC, MKA, AIF/AIFF, OGG, Dolby Digital, DTS
Playlist: PLS, M3U, WPL
Subtitle: SRT, ASS, SSA, SUB, SMI
Besides streaming and watching online movies, viewing local movies through WD TV Live Plus via USB drives is another choice. For well playback performance with WD TV media player, people usually need to remux their movie source to MKV or M2TS container format. That’s where Pavtube Media Magician for Mac comes in. It helps to rewrap camera footage like MTS, M2TS, MOD, TOD to MKV container with no conversion and remux M2TS to M2TS without changing file format.
How to remux camera videos to MKV/M2TS on Mac without Conversion?
Preparation:
 Free Trial of Media Magician for Mac
The free trial version of Pavtube Media Magician for Mac has the following limitations:
1). It will add Pavtube logo watermark in output file(s).
2). Lossless output has a file size limit of 5 minutes.
To experience the full functionalities of Media Magician for Mac, you need to purchase its full version.
 $45.00
Warnings:
To remux camera videos to MKV/M2TS, you need to use “Lossless Output” in Media Magician for Mac. There are some things you need to pay attention to while using “Lossless Output”:
1). Currently the “Lossless Output” only handles MTS, M2TS, MOD, and TOD formats, thus you are limited to do the following rewrapping without conversion:
- Remux MTS to MTS
- Remux M2TS to M2TS
- Remux TOD to TOD
- Remux MOD to MOD
- Remux MTS to MKV
- Remux M2TS to MKV
- Remux TOD to MKV
- Remux MOD to MKV
2). The format and codec of video files on timeline should be substantially the same;
3). Any editing effects (such as Effect, Audio, 3D) will be ignored when output.
The steps to remux camera videos to MKV/M2TS on Mac using Media Magician for Mac
1. Import source files into Media Magician for Mac
Run Pavtube Media Magician for Mac, load source videos into it. (Learn the details on how to import source videos into Media Magician)
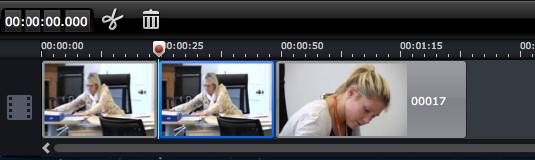
2. Edit the loaded clips in Timeline panel
In the Timeline panel of Pavtube Media Magician for Mac, you can copy a video clip by “Duplicate This Clip” in the Timeline. You can also change the start time and end time of a clip to trim/cut off unwanted parts in a movie clip. To remove clips, select one or more clips in the sequence and press “Delete”. You can also change the order of clips once they are there in the Timeline. If you would like to split a clip into two parts, you can drag the cursor/pointer to the right place and click the “Cut” button to cut off the clip.
Read how to Duplicate, Trim, Split and Delete a Clip with Media Magician for Mac.
3. Remux camera videos to MKV/M2TS with no conversion on Mac
Choose “Output” in the main interface, and click “Plus” icon to add conversion task before selecting output format. Then switch to “Lossless” > “original” or “Lossless” > “MKV” and click “Start” to begin exporting M2TS to M2TS or remux MTS/M2TS/TOD/MOD to MKV without recompression on Mac.
Soon after the rewrapping task is finished by Media Magician for Mac, you can add the generated M2TS or MKV files to your WD TV Live Plus for playback. Enjoy it!
 Free Trial Media Magician for Mac

Useful Tips
- How to convert AVCHD MTS/M2TS to MKV?
- Convert AVCHD (MTS/M2TS) Videos for Playing on iPhone
- Convert AVCHD/AVCHD Lite Footage to Apple ProRes 422 Encoded Files for Final Cut Pro
- Sony M2TS to Windows Movie Maker Converter
- Canon Vixia MTS to Windows Movie Maker Converter
- Convert 1080p MTS Videos to Windows Movie Maker


