Scenario:
I recently switched from my Windows PC to an iMac with Mountain Lion OS X Version 10.8.2, 2.7 Ghz Core i5 processor, with 8 gigs of memory. I have a Panasonic TM900 camera, which comes with OEM software disc for HD Writer. I can use the HD Writer to view videos, download them from my camera, etc. on my Windows PC. However, the HD Writer software doesn't work with Apple operating system. I attempt to import MTS footage from TM900 to work with iMovie or Final Cut Express. Some threads said that I need to get a file converter to transcode my MTS files. I have tried this option but the free converters all come with a bunch of crap spam. I was wondering if anyone else had this problem and knew of a solution.

Solution:
iMovie and FCE only recognizes AVCHD files importing directly from the camera. They won’t recognize loose files that are on your hard drive unless you imported them there from the camera first. Also, there are some import limitations even if you import directly from a camera, for example:
- iMovie does not support footage recorded in 1080-60p from Panasonic HDC-TM700 Camcorder.
- iMovie does not support footage recorded in 1080-60p from Panasonic HDC-HS900 Camcorder.
- iMovie 11 does not support footage recorded in 1080-50p from Panasonic HDC-SD900 Camcorder.
If you are in the above mentioned situation, you might consider transcoding Panasonic TM900/HS900/SD900 MTS files to Apple InterMediateCodec for using with iMovie or FCE by using Pavtube Media Magician for Mac app. This Mac Camera companion tool works stably and crash issues will never occur. For more detailed information about this program, please refer to Media Magician for Mac Review.
How to convert Panasonic TM900/HS900/SD900 MTS files for iMovie/FCE on Mac 10.8?
Step 1: ![]() Free download Media Magician for Mac Trial Version, install and launch it
Free download Media Magician for Mac Trial Version, install and launch it
Notes: The free trial version of Pavtube Media Magician for Mac has the following limitations:
1. It will add Pavtube logo watermark in output file(s).
2. Lossless output has a file size limit of 5 minutes.
If the free trial version does what you want, you can click Buy Now here to purchase its full version to bypass the above mentioned free trial limitations.
Step 2: Add Panasonic TM900/HS900/SD900 MTS files into Media Magician for Mac
There are two ways available to import source media files:
1) Import from camera/camcorder
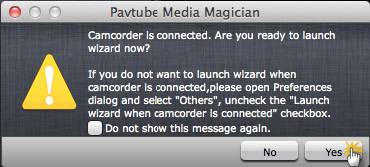
Connect your camera with your Mac computer and run Pavtube Media Magician for Mac. This Panasonic camcorder companion tool will detect your camera automatically and ask “Camcorder is connected. Are you ready to launch wizard now?” Click “Yes” to confirm.
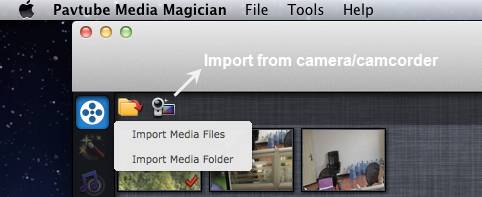
In the mean time, you are allowed to backup Panasonic MTS footage directly from camera to local computer. Also, you can click the camera icon to load camcorder videos as well.
2) Import from local computer
If you already have stored MTS clips shot by your Panasonic TM900/HS900/SD900 HD video camera on your computer’s HDD, you can choose to “Import Media Files” or “Import Media Folder” to browse and load your source files from computer.
Step 3: Drag and drop MTS clips captured by a Panasonic camera onto Timeline
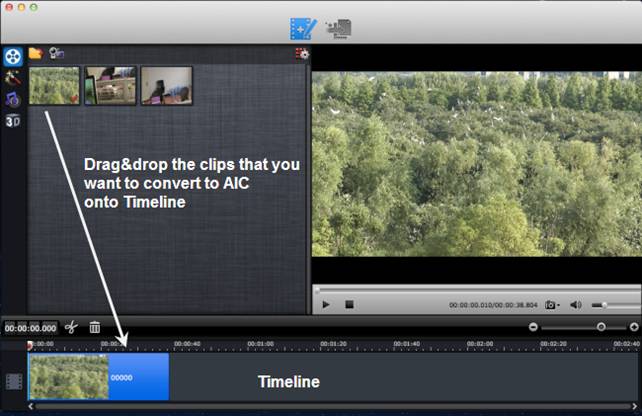
After source MTS clips are imported into the Media Magician for Mac program, you need to drag and drop the clips that you want to encode to Apple InterMediateCodec (AIC) onto timeline.
Step 4: Split/Cut/Reorder/Merge Panasonic MTS clips (Optional)
If you would like to cut off unwanted parts of your MTS clips, rearrange them in your wanted order, or merge them into one file, you can use the control buttons on timeline to do this.
The control buttons on timeline help you locate frames accurately so that you can cut, trim, delete, and merge video clips in a much easier way.

Control buttons on Timeline
1. Time Display Controller: Move your mouse cursor on timeline, the opposite time point will be displayed here. Once you entered a time point into the time display box and click enter, the Preview Window and Timeline will switch to the frame of this time point. This helps to locate to the accurate frame that you want.
2. Zoom in and Zoom out: Drag the bar on top-right of timeline to Zoom in or out for better view.
3. Preview: Highlight a clip on timeline and click Play button, you can preview. Double click on a clip can also begin preview.
4. Trim: Put your cursor to the start or end point of a clip on timeline until it changes to trimmer. Drag the trimmer and you can trim off unwanted starting or ending.
5. Cut: Drag the pointer to the right place; Put your cursor to process bar under preview window and select the right frame; Click the Scissors button and you can cut the clip. And then you can rearrange order or delete.
6. Delete: Highlight the unwanted clip on timeline, and click Delete button. You can also delete it with right-click menu.
7. Rearrange order: Drag and hold a clip to the right place until the place line shows. Drop the clip and it will be placed right there.
8. Merge and join: All files placed on timeline will be output as one file. So if you want to merge and join several clips, just drag them to timeline in right order.
Furthermore, you can add 3D effects, special effects (e.g. Simple Gauss Blur, Flip Color, Invert, Aged Film, and Gray), or adjust volume, contrast, saturation, brightness of selected clips. You can also flip video horizontally, vertically, and rotate clockwise and counter-clockwise as you like.

Step 5: Transcode MTS files to AIC for iMovie/FCE on Mac Mountain Lion
Choose “Output” in the main interface, and click “Plus” icon to add conversion task before selecting output format. Then switch to “Editor” > “iMovie and Final Cut Express” and click “Start” to begin encoding Panasonic TM900/HS900/SD900 MTS footage to AIC for iMovie and Final Cut Express.(Also read how to import MTS to FCP)
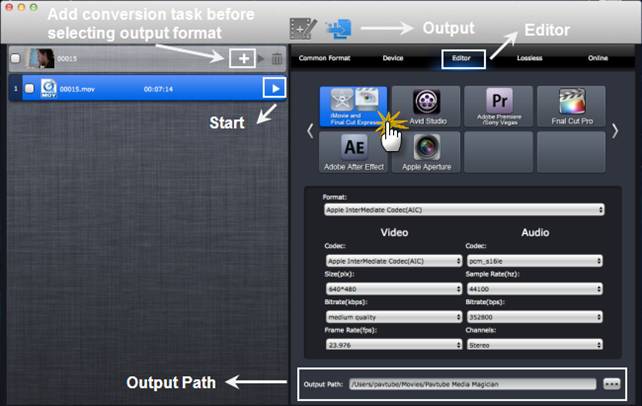
This Panasonic camera companion software will specify a default folder to save the converted videos. If you’d like to change the output location (output path), please click ![]() to navigate to the folder you’d like to save videos to.
to navigate to the folder you’d like to save videos to.
When conversion task finished, you can right click on the task list and check “Find Target” to get the generated AIC MOV files for editing use with iMovie or Final Cut Express.
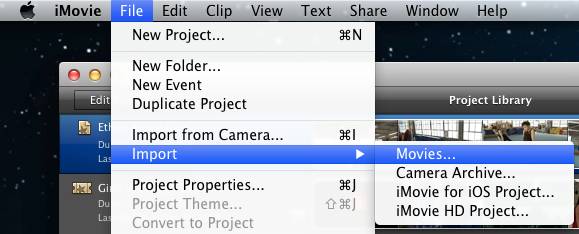
Launch iMovie, choose File > Import > Movies…, and browse to where you saved the generated AIC files to. Choose the videos that you’d like to add.
Useful Tips
- Import/Edit/Transcode Sony NEX-5N/NEX-7/A57/A65/A77 1080 50/60P AVCHD to iMovie on Mac
- Transcode TiVo Shows to AIC for Editing in iMovie and FCE
- Import Canon Rebel T4i (EOS 650D) MOV to iMovie for Editing – H.264 MOV to AIC Conversion
- Best Way to Import Nikon H.264 MOV to iMovie for Editing and Playing
- How to Convert QuickTime File to iMovie?
- Convert Sony AVCHD MTS/M2TS to AIC MOV for iMovie


 Home
Home Free Trial Media Magician for Mac


