This is a problem and solution post. We had this problem and while we found untold others who had the same issue we struggled to find a solution, so will post the solution we discovered for this problem.
Problem:
We have a Sony Alpha NEX-6 camera which can record 1080p 60p HD movies in AVCHD. We intended to edit the .mts video with Final Cut Pro X on our MacBook Pro running on Mac OX 10.8 Mountain Lion. We tried to import these clips into FCP X but realized that Apple’s FCP X refused to accept these 60p mts files. We upgraded FCP X to the latest version, no solution.
Solution:
In the end we converted these 1080/60p AVCHD video from Sony Alpha NEX-6 camera to Apple ProRes 422 by using Pavtube Media Magician for Mac app, and then imported the output MOV files into FCP X for editing smoothly. It’s just like FCP X has native support for the AVCHD footage.
More about AVCHD
AVCHD is basically a subset of Blu-ray and that's why the structure of AVCHD is like that. There are playlists (.mpl), title information (.bdm and such), clip info metadata (.cpl) and so on. There is also additional data which is not contained on Blu-ray discs like thumbnails for clips etc.
The playlists define the order of how clips are played and how clips are connected (seamless, non-seamless etc), the title information defines which playlists are contained in a title and the clip metadata describes useful information about the .mts file itself, like where the I-frames are (for easier seeking within the clip) and much more.
How to transcode MTS clips from Sony Alpha NEX Cameras to FCP 6/7 or FCP X for editing?
Preparation:
![]() Free download Media Magician for Mac Trial Version, install and launch it
Free download Media Magician for Mac Trial Version, install and launch it
Notes: The free trial version of Pavtube Media Magician for Mac has the following limitations:
1. It will add Pavtube logo watermark in output file(s).
2. Lossless output has a file size limit of 5 minutes.
If the free trial version does what you want, you can click Buy Now button below to purchase its full version to bypass the above mentioned free trial limitations.
![]()
The steps to export ProRes 422 for FCP using Pavtube Media Magician for Mac
Step 1: Import Sony Alpha NEX AVCHD MTS clips into Media Magician for Mac
There are two ways available to import source media files:
1) Import from camera
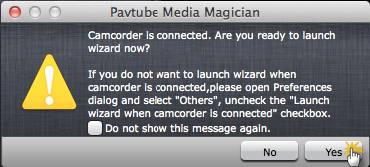
Connect your camera with your Mac computer and run Pavtube Media Magician for Mac. This camcorder companion tool will detect your camera automatically and ask “Camcorder is connected. Are you ready to launch wizard now?” Click “Yes” to confirm.

In the mean time, you are allowed to backup MTS footage directly from camera to local computer. Also, you can click the camera icon to load camcorder videos as well.

2) Import from local computer
If you already have stored MTS clips taken by your Sony Alpha NEX camera on your computer’s HDD, you can choose to “Import Media Files” or “Import Media Folder” to browse and load your source files from computer.
Step 2: Drag and drop mts shootings captured by a Sony Alpha NEX camera onto Timeline
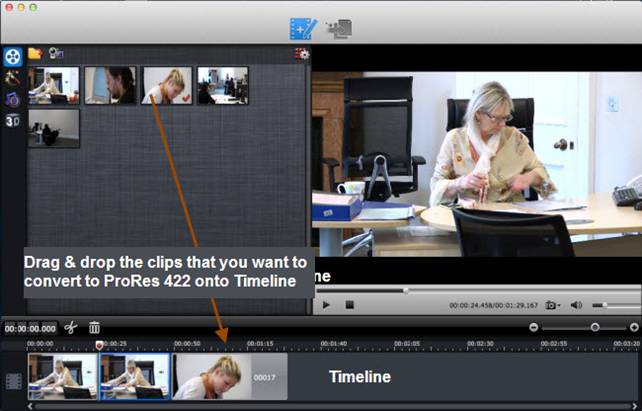
After source MTS clips are imported into the Media Magician for Mac program, you need to drag and drop the clips that you want to encode to Apple ProRes 422 onto timeline.

Step 3: Split/Cut/Reorder/Merge MTS clips (Optional)
If you would like to cut off unwanted parts of your MTS clips, rearrange them in your wanted order, or merge them into one file, you can use the control buttons on timeline to do this.
The control buttons on timeline help you locate frames accurately so that you can cut, trim, delete, and merge video clips in a much easier way.

Control buttons on Timeline
1. Time Display Controller: Move your mouse cursor on timeline, the opposite time point will be displayed here. Once you entered a time point into the time display box and click enter, the Preview Window and Timeline will switch to the frame of this time point. This helps to locate to the accurate frame that you want.
2. Zoom in and Zoom out: Drag the bar on top-right of timeline to Zoom in or out for better view.
3. Preview: Highlight a clip on timeline and click Play button, you can preview. Double click on a clip can also begin preview.
4. Trim: Put your cursor to the start or end point of a clip on timeline until it changes to trimmer. Drag the trimmer and you can trim off unwanted starting or ending.
5. Cut: Drag the pointer to the right place; Put your cursor to process bar under preview window and select the right frame; Click the Scissors button and you can cut the clip. And then you can rearrange order or delete.
6. Delete: Highlight the unwanted clip on timeline, and click Delete button. You can also delete it with right-click menu.
7. Rearrange order: Drag and hold a clip to the right place until the place line shows. Drop the clip and it will be placed right there.
8. Merge and join: All files placed on timeline will be output as one file. So if you want to merge and join several clips, just drag them to timeline in right order.
Step 4: Transcode Sony AVCHD MTS files to Apple ProRes 422 for Final Cut Pro 6/7/X
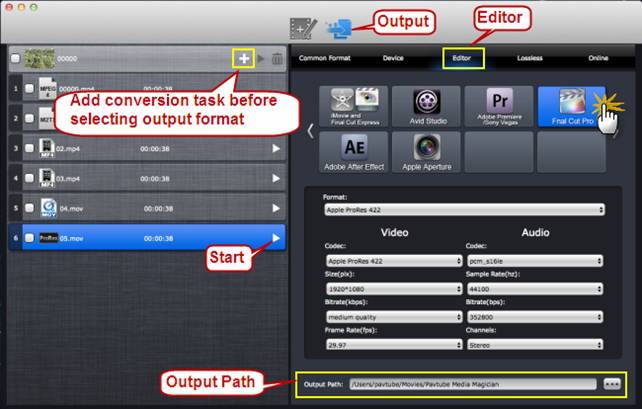
Choose “Output” in the main interface, and click “Plus” icon to add conversion task before selecting output format. Then switch to “Editor” > “Final Cut Pro” and click “Start” to begin changing Sony MTS to Apple ProRes 422 for FCP without losing visible quality.

This Sony camera companion software will specify a default folder to save the converted videos. If you’d like to change the output location (output path), please click ![]() to navigate to the folder you’d like to save videos to.
to navigate to the folder you’d like to save videos to.
When conversion task finished, you can right click on the task list and check “Find Target” to get the exported Apple ProRes 422 MOV files for using within Final Cut Pro 6/7 or FCP X.
Launch Final Cut Pro 7/FCP 6/FCP X, choose File > Import > Files…, and browse to where you saved the generated ProRes 422 files to. Choose the videos that you’d like to add.

Useful Tips
- Import footages/videos/projects into Final Cut Pro X without rendering
- Convert Panasonic MXF Footages to FCP as ProRes for Editing
- Workflow for Importing HX-WA20 MP4 to FCP (X) on Mac
- Edit MediaPortal TS Files in FCP X/Avid/iMovie and Burn to DVD on Mac
- Convert Panasonic TM900 MTS Videos to ProRes 422 for Editing on FCP
- MKV to FCP---Convert MKV to Apple ProRes 422 MOV for Final Cut Pro


 Home
Home Free Trial Media Magician for Mac


