To import AVCHD footage from a Sony NEX-5R camera correctly, iMovie requires the directory structure of the AVCHD footage must be the same as when it was recorded to the card. If you’ve copied your footage onto a hard drive or other storage media and only kept part of the file structure you’re going to be presented with an unsupported media error message.

Also, AVCHD clips may not import if the folder structure written by the camera to the card is altered, so avoid manually moving files away from the locations to which the camera wrote them originally. Leave the folder structure on the card as the camera wrote it. Plus, iMovie does not support footage recorded in 1080-60p from Sony Alpha NEX-5R camera.
What to do if you only have some separate MTS clips without an AVCHD file structure, or your MTS clips were shot in 1080p50/60 mode? How can you import them into iMovie 8/9/11 for further editing? In our experience, you might consider transcoding these MTS clips from Sony Alpha NEX-5R camera into a codec that is best suited for iMovie editing, such as Apple InterMediate Codec (AIC).
How to transcode MTS clips from Sony NEX-5R Camera to AIC for iMovie on Mountain Lion 10.8?
What you need?
Pavtube Media Magician for Mac
The steps to convert Sony NEX-5R MTS clips to AIC MOV for iMovie 8/9/11 on Mac OS 10.8
Step 1: ![]() Free download Media Magician for Mac Trial Version, install and launch it
Free download Media Magician for Mac Trial Version, install and launch it
Notes: The free trial version of Pavtube Media Magician for Mac has the following limitations:
1. It will add Pavtube logo watermark in output file(s).
2. Lossless output has a file size limit of 5 minutes.
If the free trial version does what you want, you can click Buy Now button below to purchase its full version to bypass the above mentioned free trial limitations.

Step 2: Add Sony NEX-5R AVCHD MTS files into Media Magician for Mac
There are two ways available to import source media files:
1) Import from camera/camcorder
Connect your camera with your Mac computer and run Pavtube Media Magician for Mac. This Sony camcorder companion tool will detect your camera automatically and ask “Camcorder is connected. Are you ready to launch wizard now?” Click “Yes” to confirm.
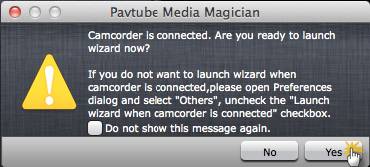
In the mean time, you are allowed to backup Sony MTS footage directly from camera to local computer. Also, you can click the camera icon to load camcorder videos as well.
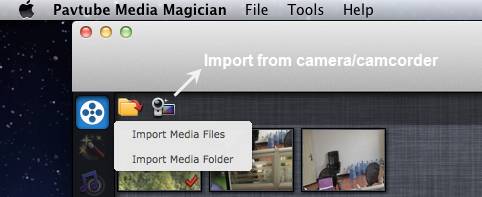
2) Import from local computer
If you already have stored MTS clips shot by your Sony NEX-5R camera on your computer’s HDD, you can choose to “Import Media Files” or “Import Media Folder” to browse and load your source files from computer.
Step 3: Drag and drop mts shootings captured by a Sony NEX-5R camera onto Timeline
After source MTS clips are imported into the Media Magician for Mac program, you need to drag and drop the clips that you want to encode to Apple InterMediateCodec (AIC) onto timeline.
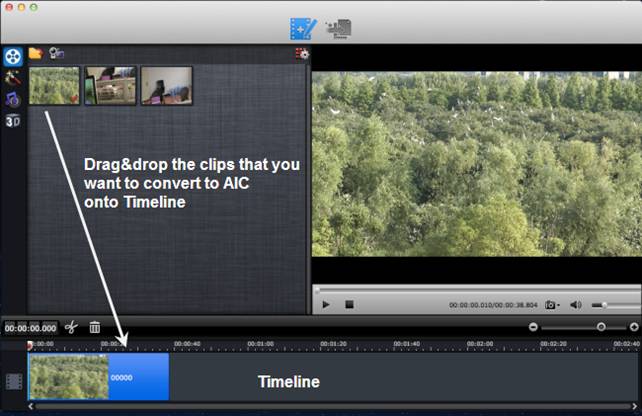
Step 4: Split/Cut/Reorder/Merge MTS clips (Optional)
If you would like to cut off unwanted parts of your MTS clips, rearrange them in your wanted order, or merge them into one file, you can use the control buttons on timeline to do this.
The control buttons on timeline help you locate frames accurately so that you can cut, trim, delete, and merge video clips in a much easier way.

Control buttons on Timeline
1. Time Display Controller: Move your mouse cursor on timeline, the opposite time point will be displayed here. Once you entered a time point into the time display box and click enter, the Preview Window and Timeline will switch to the frame of this time point. This helps to locate to the accurate frame that you want.
2. Zoom in and Zoom out: Drag the bar on top-right of timeline to Zoom in or out for better view.
3. Preview: Highlight a clip on timeline and click Play button, you can preview. Double click on a clip can also begin preview.
4. Trim: Put your cursor to the start or end point of a clip on timeline until it changes to trimmer. Drag the trimmer and you can trim off unwanted starting or ending.
5. Cut: Drag the pointer to the right place; Put your cursor to process bar under preview window and select the right frame; Click the Scissors button and you can cut the clip. And then you can rearrange order or delete.
6. Delete: Highlight the unwanted clip on timeline, and click Delete button. You can also delete it with right-click menu.
7. Rearrange order: Drag and hold a clip to the right place until the place line shows. Drop the clip and it will be placed right there.
8. Merge and join: All files placed on timeline will be output as one file. So if you want to merge and join several clips, just drag them to timeline in right order.
Step 5: Transcode Sony MTS files to AIC for iMovie 8/9/11 on Mac Mountain Lion
Choose “Output” in the main interface, and click “Plus” icon to add conversion task before selecting output format. Then switch to “Editor” > “iMovie and Final Cut Express” and click “Start” to begin encoding NEX-5R MTS to AIC MOV for iMovie 8/9/11.
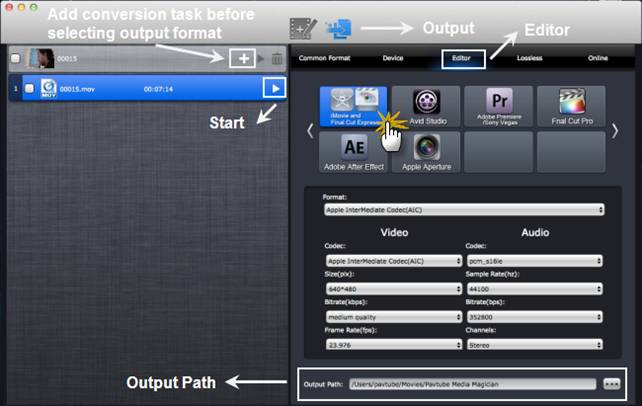
This Sony camera companion software will specify a default folder to save the converted videos. If you’d like to change the output location (output path), please click ![]() to navigate to the folder you’d like to save videos to.
to navigate to the folder you’d like to save videos to.
When conversion task finished, you can right click on the task list and check “Find Target” to get the exported AIC MOV files for editing use with iMovie 8/9/11. (Also read the solution to import Sony Alpha NEX camera recorded MTS clips to Final Cut Pro)
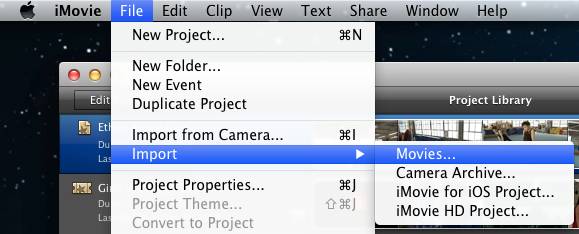
Launch iMovie, choose File > Import > Movies…, and browse to where you saved the generated AIC files to. Choose the videos that you’d like to add.
Useful Tips
- Import/Edit/Transcode Sony NEX-5N/NEX-7/A57/A65/A77 1080 50/60P AVCHD to iMovie on Mac
- Transcode TiVo Shows to AIC for Editing in iMovie and FCE
- Import Canon Rebel T4i (EOS 650D) MOV to iMovie for Editing – H.264 MOV to AIC Conversion
- Best Way to Import Nikon H.264 MOV to iMovie for Editing and Playing
- How to Convert QuickTime File to iMovie?
- Convert Sony AVCHD MTS/M2TS to AIC MOV for iMovie


 Home
Home Free Trial Media Magician for Mac


