
 Home
HomeFinal Cut Pro X, or known as Final Cut Pro Ten, is one of the most common professional video production suites for Mac users. Comparing with its predecessor Final Cut Express and Final Cut Pro 6/7, it adds native support for MXF files from Sony, Panasonic and Canon, and also includes XAVC files from Sony F5/F55 series. This new features immensely enhanced user operational feasibility so that we can import video from camera to Final Cut Pro X without log and transfer.
But still there are lots of videos that cannot be imported for that it’s not the supported formats by Final Cut Pro, for example, AVCHD files from Canon XA series/Panasonic AG/Sony HDR, H.264 MOV from Nikon, etc. So here comes the problem:
How to import videos into Final Cut Pro X without rendering?
Follow this step-by-step guide to quick import MOV/MTS/AVCHD/MXF/MKV/AVI/VOB to Final Cut Pro X.
Step 1. Launch Final Cut Pro X; connect your camera to Mac.
Here we test with Final Cut Pro X v10.0.7. Use a USB cable to connect your camera to Mac and keep it on.
Step 2. Import videos from camera to Final Cut Pro X
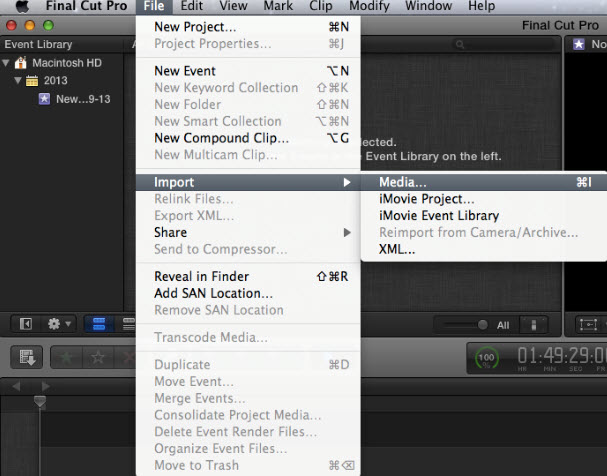
Click File>Import>Media, it will pop up an import window;
Besides, we can see Final Cut Pro X supports import from camera, iMovie Project, iMovie Event Library; but FCP 6/7 projects are not supported.
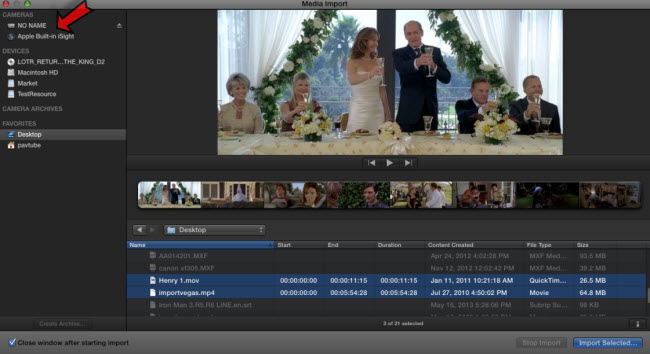
Find your camera on top left, hit Command and click the clips you want to import.
Step 3. Create new event for this importing or add them to existing event.
After checking all the clips you want to import, hit return and free choose to create new event for FCPX or add to existing event. It offers several options to let you optimize video as FCPX prefers, enable Remove silent channels and so on. Check them as your own needs, and then hit return.

Step 4. Edit clips in Timeline.
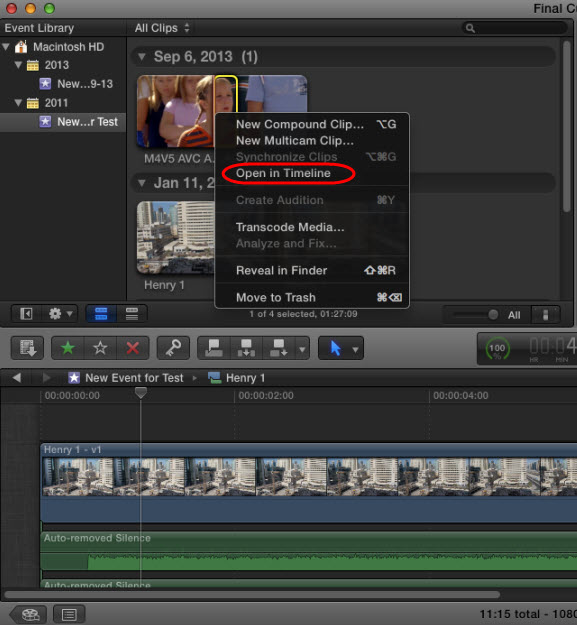
After last hit you will find the clips are showed on the left “All Clips” area. Sliding your cursor to trim out a small part in these clips and hit Shift-Y to add them in timeline; or you can right click it and choose “Open in Timeline”.
Check the keyboard shortcuts for editing in Final Cut Pro X.
Ok now you successfully import videos from camera to Final Cut Pro, new skills get!
Trouble Shooting:
Well, all the work flow is based on the assumption that your camera/camcorder is recognized by FCPX. What if it doesn’t go through as above?
If your camera or device isn’t recognized; unsupported video formats?
If you’ve connected your camera/camcorder to Mac but the Media Import window doesn’t open, or Final Cut Pro X Can’t control your camera/camcorder, here are some steps that you are suggested to try:
1. Your camcorder or camera should be compatible with Final Cut Pro X. Follow this page to track Final Cut Pro X supported video cameras.
2. You should ensure the camera/camcorder on and well connected to Mac.
3. If you are importing from flash memory devices or from Mac HDD directly, please ensure the files format is MPEG-2, MPEG-4 or AVCHD which are compatible with Final Cut Pro X.
Hereby if we want to edit video from a camera that FCPX doesn’t recognize, at least we need to transcode the videos to formats that FCPX likes, so that we can still import them into FCPX use a card reader. How to do the conversion? Is that reliable?
You may want to read this:
How to convert AVCHD/MTS/MXF/AVI/MKV/WMV/Tivo to Apple ProRes for FCPX?
 Free Trial HD Video Converter for Mac

Useful Tips
- Import footages/videos/projects into Final Cut Pro X without rendering
- Convert Panasonic MXF Footages to FCP as ProRes for Editing
- Workflow for Importing HX-WA20 MP4 to FCP (X) on Mac
- Edit MediaPortal TS Files in FCP X/Avid/iMovie and Burn to DVD on Mac
- Convert Panasonic TM900 MTS Videos to ProRes 422 for Editing on FCP
- MKV to FCP---Convert MKV to Apple ProRes 422 MOV for Final Cut Pro


