
 Home
HomeiMovie importing avi files issue
For Mac users who have downloaded AVI files from Internet or recorded AVI footage with your Canon, Samsung or Panasonic cameras or camcorders, you may encounter problem to import AVI to iMovie or find there is no sound when viewing the AVI files on iMovie just as below:
"Im using iMovie and try to import a .avi file, 730.5MB. But iMovie keeps saying that "None of the selected files or folders can be imported. Change the selection and try again. Small .avi files created by my camera are able to be imported, but the 730.5MB one cannot, which was downloaded from Internet. Why can't it be imported? Is it because of its size too large?"
"I have an avi file that I can not get into Imovie. I have downloaded the divx converter, and player. Now the movie will play in divx, or quick time, but I still can not get it to imovie. Can someone please help."
"The problem is I have some video avi files that I want to import into imovie. I don't have a problem importing the video it is just there is no sound with it. when I play the clips using quicktime the audio is fine but when I import it to imovie the sound disappears completely from all the clips."
If are you facing the same issue when loading AVI files into iMovie, you have come the right place, the following article will illustrate this issue for you and offer the simple workaround to fix this issue with just few steps.
Why can't impor AVI files into iMovie?
The main reason that causes the importing problems lies in the fact that some codecs used in the AVI file (a multimedia container format that supports multiple streaming audio and video) are not supported by iMovie, which by far only supports to load MPEG-4, QuickTime Movie, MPEG-2, AVCHD, DV & HDV file formats.
To address this problem, the most simple and efficient way is converting AVI to iMovie supported formats listed above. Here is a professional solution called Pavtube HD Video Converter for Mac (best HD Video Converter for Mac review), which can assist you to convert AVI files encoded with various different video codec to one of iMovie supported file formats listed above. If you wish to get a fast and high quality workflow of AVI files in iMovie, you can use this program to encode AVI to iMovie best editing format - Apple Intermedia Codec, a less processive intensive format for use with all HD workflows in iMovie.
Before importing AVI to iMovie, you can also do some simple editing with the program's built-in editing functions. You can flip video horizontally or vertically, roate video clockwise or counter-clockwise to let it display in the right angel, trim or cut video to remove unwanted parts or segments, crop video to cut off the black borders or the unwanted area, add image/video/transparent text watermark to video, remove/replace audio in video or add external srt/ass/ssa subtitle to video.
Why iMovie plays AVI with no sound?
This article artile solve iMovie no sound will assist you to fix iMovie no audio issue.
Besides AVI, this powerful tool also faciliates you to convert other unsupported file formats such as MP4, WMV, MKV, MOV, FLV, VOB, H.265, etc to iMovie readable file formats with just few clicks.

Step by step to Import and Edit AVI Files with iMovie
Step 1: Add unsupported AVI files into the program.
Run the program on your Mac computer and click "File" > "Add Video/Audio" or "Add from folder" to add unsupported AVI files into the program.

Step 2: Select output file format.
Click "Format"bar, from its drop-down list, output one of iMovie supported editing file formats such as "MOV - QuickTime(*.mov)" under "Common Video" drop-down list.

For less processor intensive HD video workflow in iMovie, you are recommended to output "Apple Intermediate Codec(AIC)(*.mov)" under "iMovie and Final Cut Ex..." drop-down list.

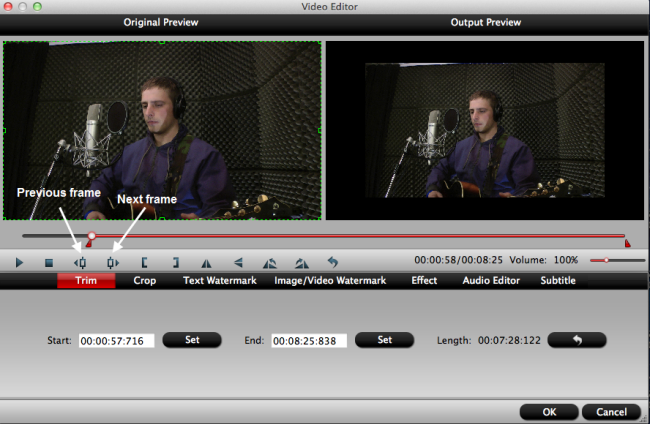
Step 3: Edit AVI video.
Select an item on the main interface to open the "Video Editor" window, here you can trim video length, crop video black borders, add video/imag/watermark, adjust video color effect, remove/replace audio in video, add external srt/ass/ssa subtitles to video.
Step 4: Start the conversion process.
Go back to the main interface, click the right-bottom "Convert" button to begin the conversion from AVI to iMovie supported file formats conversion.
When the conversion is completed, click "Open Output Folder" on the main interface to pop out the folder with converted files. You will then have no problem to import video to iMovie editing no MacOS Sierra.
 Free Trial HD Video Converter for Mac

Useful Tips
- How to Convert MPG to AVI Easily?
- Play AVI on Xbox One S from USB Drive or DLNA Server
- Windows Media Player Won't Play AVI Files, Solved!
- How to Get AVI Files Played on VLC Media Player?
- iMovie Not Import AVI or iMovie Plays AVI with No Sound Solved
- How to Import and Edit AVI Files with FCP X on Mac El Capitan/Sierra?


