
 Home
HomeWhat is the best solution for editing AVCHD and AVCHD Lite MTS/M2TS footage in Final Cut Pro? This is a frequently asked question by FCP users. AVCHD is an HD video format jointly developed by Sony and Panasonic that uses Advanced Video Coding (AVC) compression (also known as MPEG-4 part 10 or H.264) to achieve high-quality images and low data rates. Generally speaking, AVCHD footage is usually saved in MTS or M2TS container format, which are widely used by Sony, Panasonic, JVC, Canon camcorders. However, AVCHD files are not natively supported by Final Cut Pro and must be transcoded to FCP friendly codecs such as QuickTime movie and Apple Intermediate Codec before importing to FCP. To lower the quality loss during transcoding, Apple introduced in 2008 the Apple ProRes family to help Final Cut Pro works more efficiently with HD contents. By transcoding/converting AVCHD to Apple ProRes codec, the possible best quality is retained in post-production workflow and you can then edit the resulting media files just as you would edit in QuickTime Movie format. Besides, the rendering time is saved as Apple ProRes codecs are natively supported by FCP. The following guide tells you how to convert AVCHD/AVCHD Lite to Apple ProRes 422 codec for use in your Final Cut Pro sequence.
About the software: This is an AVCHD/AVCHD Lite transcoding tool for Mac OS X only. The Mac MTS/M2TS to ProRes Converter deals with AVCHD footage straightly from Sony, Panasonic, JVC and various other camcorders and exports HD contents encoded in various codecs for editing and playing back. The FCP best editing codecs includes Apple ProRes family (ProRes 422, ProRes 422 LT, ProRes 422 HQ, ProRes 422 Proxy, ProRes 4444), DVCPRO, HDV, Apple Intermediate codec, etc. With this little gadget, you can easily import Panasonic TM900 MTS recordings to FCP, convert Panasonic GH2 MTS to ProRes, import Sony NEX-5N/NEX-7/A57/A65/A77 1080 60p AVCHD to FCP, load Panasonic SD900 MTS Videos to FCP, edit 50p/60p AVCHD in FCP (X) and convert AVCHD Lite MTS to ProRes for FCP.


How to Convert AVCHD/AVCHD Lite Footage to Apple ProRes 422 for Final Cut Pro X?
Step 1. Run Pavtube MTS/M2TS Converter for Mac.
Click"Add" button and browse to the AVCHD footages either from scratch disk or cam HDD for loading to the converter. Or you can click those two icons to load your files.
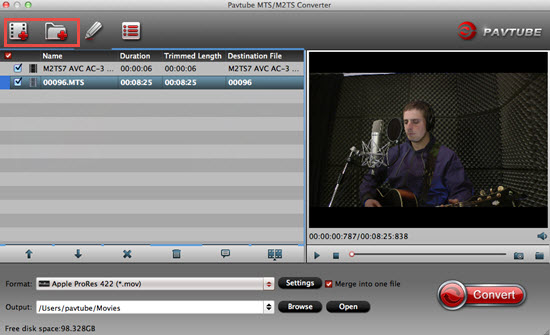
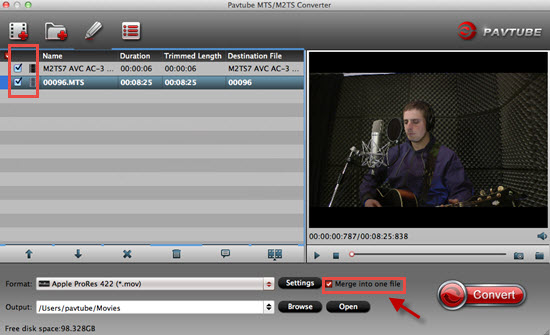
Step 2. Click on"Format" bar and set a FCP friendly format in dropdown-list
You are advised to"Follow Final Cut Pro" template and"Apple ProRes 422 (*.mov)" format.
AVCHD has a much higher compression ratio than Apple ProRes, so the ingested files are significantly larger than the original files. For example, a 2-minute native AVCHD file is about 200–300 MB. After transcoding MTS to the Apple ProRes 422 codec, the file size can be as large as 2 GB. If you prefer smaller file size, choose"Apple ProRes 422 (LT) (*.mov)" instead. The"Apple ProRes 422 (Proxy) (*.mov)" format offers file size at SD levels and is recommended for 480i/p and 576i/p shootings.

Tips:
Differences among Apple ProRes codecs can help newbie to choose the most suitable format.
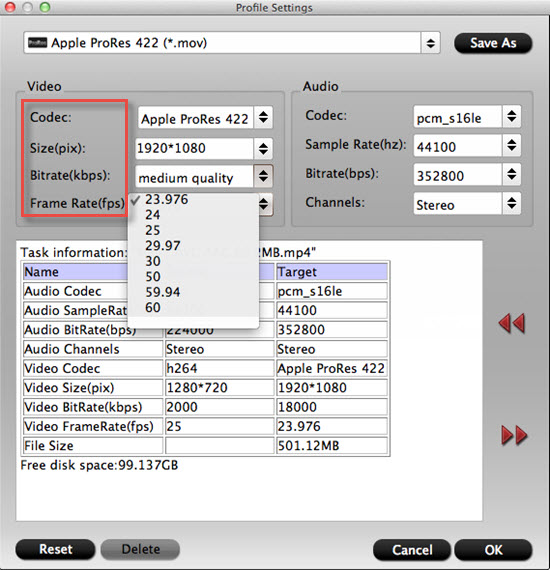
Step 3. Click the"Settings" button and customize proper video/ audio parameters if necessary.
Video size, bitrate and fame rate are flexible and can be adjusted as you like. E.g. Set video size to 1920*1080 when you feel like to keep 1080p as the source file features. Or set smaller bitrate to further cut down export file size. You may skip this step as well.
Tips:
If there is no proper format you want to choose, then you can type them in the following box as you want.
Step 4. Click"Browse" button to set a location on your HDD for the output video file
As I mentioned above, the generated file size could be huge, so make sure there are enough disk space.
Step 5. Click"Convert" to start transferring AVCHD to Apple ProRes 422 codec
The conversion process may take long time due to huge file size but trust me-- this Mac MTS/M2TS Converter is faster than most other AVCHD transcoding tool. And it will not bother to render the converted files in FCP. After conversion just click the "Open output folder" button to locate converted video files for FCP post-production seamlessly.
Additional Tips and Tricks for the Mac MTS/ M2TS Converter app:
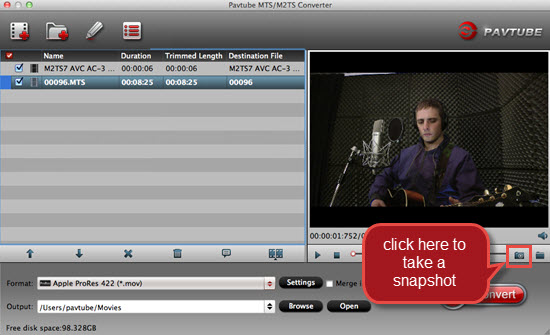
1. Thumbnail- click"Snapshoot" button when previewing the video. Click"Option" to set the image format of screenshots.
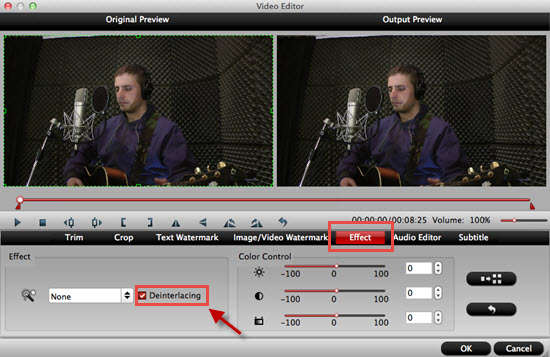
2. Deinterlace- click"Editor", switch to"Effect" tab, find"Deinterlacing" box, and check it to eliminate interlacing lines.
3. Combine files together- check the files to be merged in file list and check"Merge into one" box beside"Settings" button.
4. Trim a section of the movie- click"Editor", switch to"Trim" tab, and input time point in start and end box.
5. Auto shutdown- click"Option" menu and check"Shut down the computer after conversion" before conversion starts.
6. How to transfer files into FCP X, click here to learn the detailed steps.
Related software recommendation:
Pavtube HD Video Converter for Mac, which supports AVCHD/AVCHD Lite conversion as well as various other source medias like MOV, AVI, MXF, AVI, MP4, WMV, TS, TiVo, etc. and exports HD video with Apple ProRes 422 codec for Final Cut Pro.
 Free Trial MTS/M2TS Converter for Mac

Useful Tips
- How to convert AVCHD MTS/M2TS to MKV?
- Convert AVCHD (MTS/M2TS) Videos for Playing on iPhone
- Convert AVCHD/AVCHD Lite Footage to Apple ProRes 422 Encoded Files for Final Cut Pro
- Sony M2TS to Windows Movie Maker Converter
- Canon Vixia MTS to Windows Movie Maker Converter
- Convert 1080p MTS Videos to Windows Movie Maker


