
 Home
Home“I have some .MTS video clips that downloaded from my digital camera on my Mid-2012 11" MacBook Air running Mac OS Mountain Lion 10.8.2. I am trying to upload some of them onto YouTube. The thing is that these video clips are quite long, and I only need some parts of them to be uploaded. So my question is: is there a one-stop Mac app to help me do the following:
1) Trim out unwanted parts of the video;
2) Join the clips together after splitting;
3) Directly upload generated files onto YouTube.”
To upload camera videos onto YouTube, first of all, you should have a YouTube account. Open YouTube's website. Create a free account, if you do not have one, by clicking on the "Create Account" link. Provide your email address and date of birth, and then create a username and password. You must have an account to upload a video. Then Pavtube Media Magician for Mac will do the rest work for you.
How to cut/trim/split long videos from camcorder/camera to YouTube?
Step 1: Add source media into Media Magician for Mac
There are two ways available to import source media files:
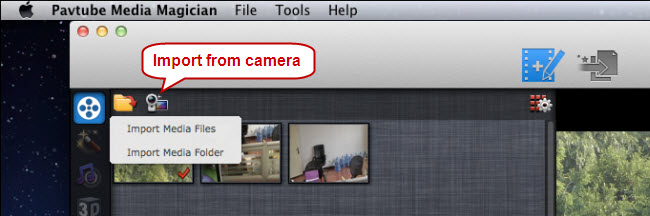
1) Import from camera
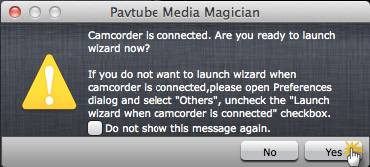
Connect your camera with your Mac computer and run Pavtube Media Magician for Mac. This MTS Cutter for Mac program will detect your camera automatically and ask “Camcorder is connected. Are you ready to launch wizard now?” Click “Yes” to confirm.
In the mean time, you are allowed to backup videos directly from camera to local computer. Also, you can click the camera icon to load camcorder videos as well.
2) Import from local computer
If you already have your camera footage on your Mac’s hard disk drive, you can choose to “Import Media Files” or “Import Media Folder” to browse and load your source videos from computer.
Step 2: Add your long video clips into Timeline for cutting/splitting/trimming
Drag and drop the video clips you want to cut and combine together into Timeline.
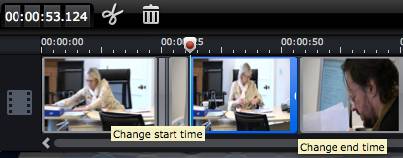
* To trim out unwanted parts of a video, do the following:
Put your cursor to the start or end point of a clip on Timeline until it changes to trimmer. Drag the trimmer and you can trim off unwanted starting or ending.
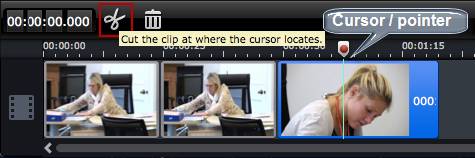
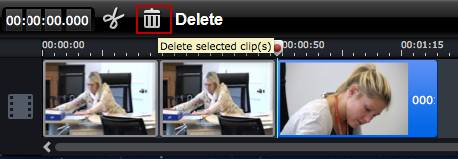
* To split a video clip and delete unwanted parts, do the following:
Drag the cursor/pointer to the right place and click the Scissors button to cut off the clip (This would split a clip into two parts). After that you can delete unwanted clips or rearrange order of the preserved clips.
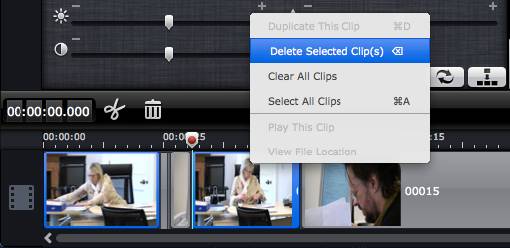
To remove clips, select one or more clips in the sequence and press “Delete”.
You can also delete selected clip(s) with right-click menu shown as below.
Tips:
Keep in mind that all the clips in the timeline will be joined together when exporting. So if you want to merge and join several clips, just drag them to timeline in right order.
Step 3: Upload videos onto YouTube directly
Choose “Output” in the main interface, and click “Plus” icon to add conversion task before selecting output format. Then switch to “Online” window and enter your user name and password of your YouTube account. Click “Start” to begin exporting the output file onto YouTube directly.
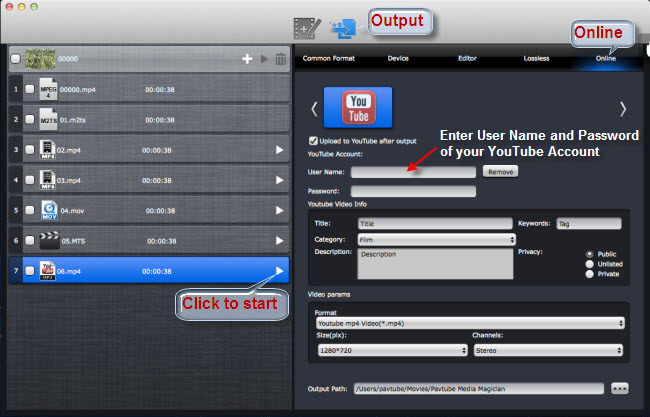
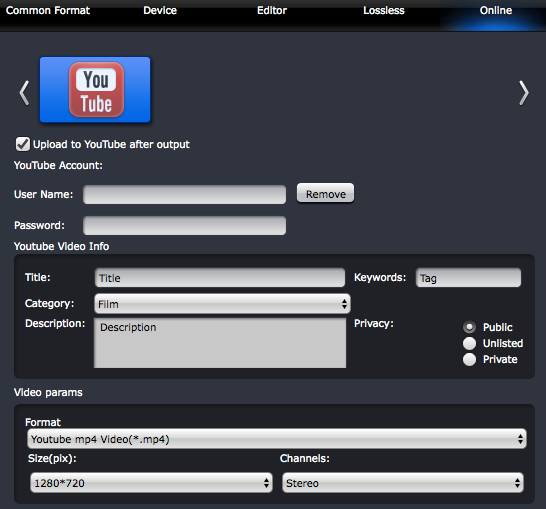
Before uploading onto YouTube, you can add Title, Category, Keywords, and Description to your video or choose Privacy for it. You can also custom video parameters like video format, resolution and audio channels.
 Free Trial Media Magician for Mac

Useful Tips
- How to convert AVCHD MTS/M2TS to MKV?
- Convert AVCHD (MTS/M2TS) Videos for Playing on iPhone
- Convert AVCHD/AVCHD Lite Footage to Apple ProRes 422 Encoded Files for Final Cut Pro
- Sony M2TS to Windows Movie Maker Converter
- Canon Vixia MTS to Windows Movie Maker Converter
- Convert 1080p MTS Videos to Windows Movie Maker


