
 Home
HomeThe Christmas holidays for 2012 are officially over. How about your Christmas holidays? Involved holiday traveling, a lot of eating and shopping? If you had a wonderful holiday spent with family and friends, what was most memorable for you? Now it’s time to work with the adorable video shootings captured by your camera during the holiday season. In this article, we concern two things, one is how to lossless merge video footage from various camcorders on Mac, the other is how to burn camera footage to a DVD on Mac. Here is how-to.
How to lossless merge and edit Christmas video footages from various camcorders on Mac?
Required software: Pavtube Media Magician for Mac
The steps:
Step 1: Add camera clips into Media Magician for Mac
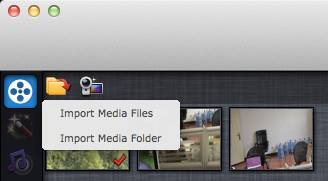
1) Import source files from hard drive
If you have already stored camera footage on your HDD, you can import video files from hard drive to Media Magician for Mac by processing either way below:
a. Drag and drop source files to source area directly;
b. Click folder button to choose Import Media Files, or Import Media Folder.
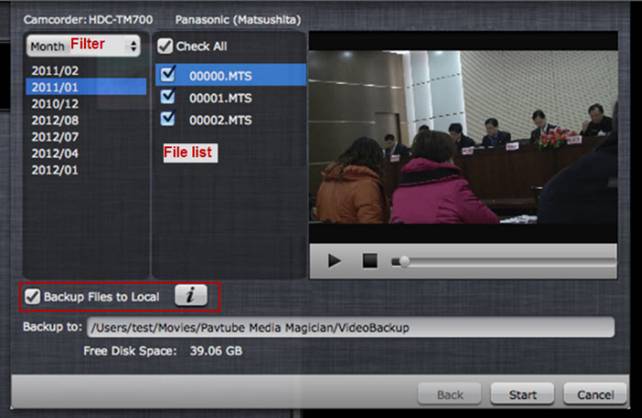
2) Import source files from camcorder
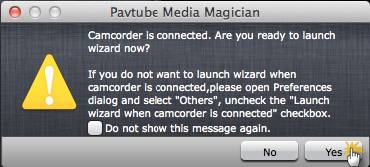
Connect your camcorder with your Mac computer and run Pavtube Media Magician for Mac. This camera video joiner program will detect your camera automaticallyand ask “Camcorder is connected. Are you ready to launch wizard now?” Click “Yes” to confirm.
Important Tips:
1. If you need to add video clips from multiple cameras, you’d better choose “Backup Files to Local”. “Backup Files to Local” will archive the checked clips onto the HDD of your Mac computer as lossless backups, and videos will be imported from local after backup completes.
2. Otherwise videos will be imported directly from your camera/camcorder. This requires the camera/camcorder must be kept connecting in the whole import and output process. Unexpected disconnection will cause unpredictable results.
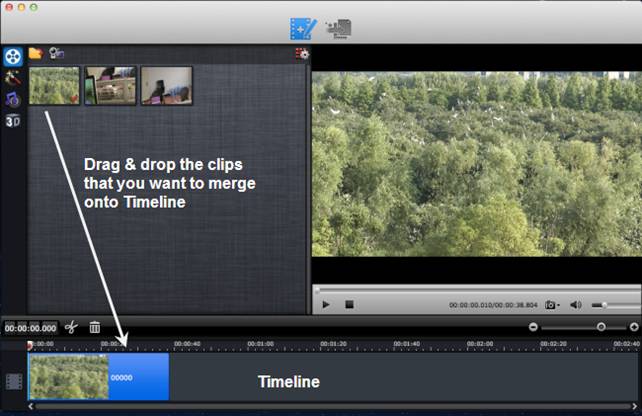
Step 2: Drag and drop the clips you want to merge onto Timeline
After source clips are imported into the Media Magician for Mac program, you need to drag and drop the clips that you want to merge onto timeline.
Step 3: Split/Cut/Reorder/Merge source clips (Optional)
If you would like to cut off unwanted parts of your camera clips, rearrange them in your wanted order, or merge them into one file, you can use the control buttons on timeline to do this.
The control buttons on timeline help you locate frames accurately so that you can cut, trim, delete, and merge video clips in a much easier way.
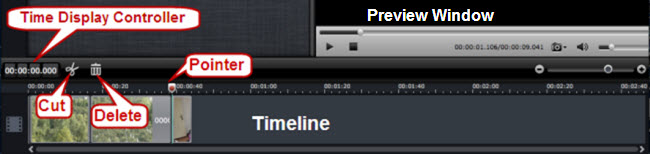
Control buttons on Timeline
1. Time Display Controller: Move your mouse cursor on timeline, the opposite time point will be displayed here. Once you entered a time point into the time display box and click enter, the Preview Window and Timeline will switch to the frame of this time point. This helps to locate to the accurate frame that you want.
2. Zoom in and Zoom out: Drag the bar on top-right of timeline to Zoom in or out for better view.
3. Preview: Highlight a clip on timeline and click Play button, you can preview. Double click on a clip can also begin preview.
4. Trim: Put your cursor to the start or end point of a clip on timeline until it changes to trimmer. Drag the trimmer and you can trim off unwanted starting or ending.
5. Cut: Drag the pointer to the right place; Put your cursor to process bar under preview window and select the right frame; Click the Scissors button and you can cut the clip. And then you can rearrange order or delete.
6. Delete: Highlight the unwanted clip on timeline, and click Delete button. You can also delete it with right-click menu.
7. Rearrange order: Drag and hold a clip to the right place until the place line shows. Drop the clip and it will be placed right there.
8. Merge and join: All files placed on timeline will be output as one file. So if you want to merge and join several clips, just drag them to timeline in right order.
Step 4: Lossless merge Christmas footage from different Camcorders
Choose “Output” in the main interface, and click “Plus” icon to add conversion task before selecting output format. Then switch to “Lossless” column. In Lossless output, you can choose keep original format or lossless output to MKV.
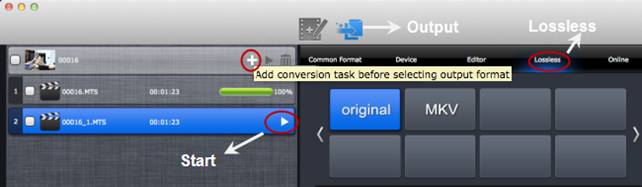
For example, if you have shot many MTS files in AVCHD folder, you can use this “lossless output to original” to join the individual MTS files into one file still keeping MTS format. This is Lossless Merge.
Finally, click “Start” to begin lossless merging. When finished, you can right click on the task list and check “Find Target” to get the exported file.
Important Tips: Please pay attentions to the limitations of the lossless output.
1). The “Lossless Output” only handles MTS, M2TS, MOD, and TOD formats;
2). Video files on timeline must have the same format, codec and A/V parameters; otherwise the lossless merge will fail.
3). Any editing effects (such as Effect, Audio, 3D) will be ignored when output.
How to burn Christmas camera clips to DVD on Mac?
Required software: Pavtube DVD Creator for Mac
The steps:
1. Download and run Pavtube DVD Creator for Mac, connect your DVD Writer and insert a blank DVD. Pavtube DVD Creator for Mac is compatible with DVD+R, DVD-R, DVD+RW, DVD-RW. Both single layer DVD-5 and double-layer DVD 9 can be used as target disc.
The Free version of Pavtube DVD Creator for Mac helps you burn common videos (MKV, AVI, MP4, WMV, MOV, TiVo, etc) to DVD with customized Menu and soundtrack. If you have higher requirements like making DVD from MXF, AVCHD (MTS, M2TS, TS) videos, DVD folder or ISO, burning Slider Show DVD, you can upgrade to the retail version. It will give you the enhanced features for burning.


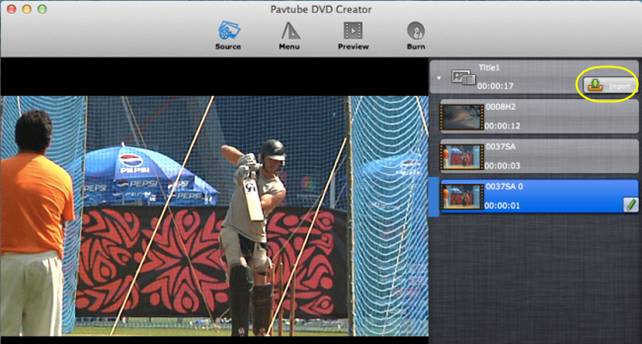
2. Add your Christmas camera shootings into the DVD Creator for Mac program
Click the “import” button to load your Christmas camera shootings, or just drag and drop your source files to the source screen.
3. Custom DVD menu and edit it for your personalized DVD
To get started, just click "Menu" tab and choose a favorite menu style, and then personalize it with your background image, background music, etc. You can go to Free DVD menu templates page to download a DVD menu in Christmas theme. You can also make a DVD without menu.
4. Preview and start burning Christmas video shootings to DVD on Mac
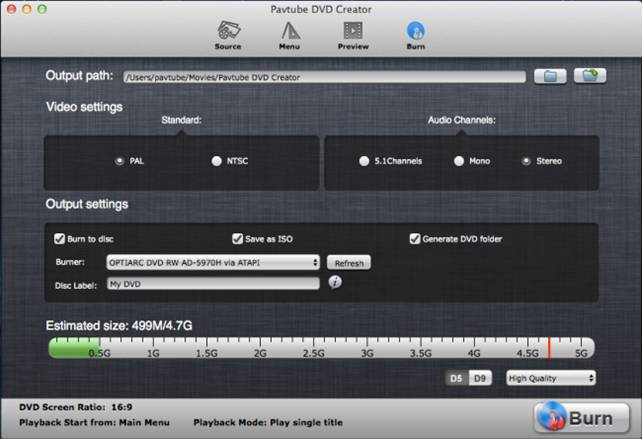
Switch to “Preview” tab to have a look at the final playback effect of your DVD. If anything needs to be changed, go back to the former steps to do modification. Once you are satisfied, go to “Burn” tab to set settings like video standard (PAL or NTSC), audio channels (5.1 channels, Mono, Stereo), output settings, disc label, and DVD drive (please insert a blank DVD disc into your selected DVD writer). Press “Burn” button and the Mac DVD authoring program will start creating DVD from your Christmas source files automatically.
 Free Trial Media Magician for Mac

Useful Tips
- How to convert AVCHD MTS/M2TS to MKV?
- Convert AVCHD (MTS/M2TS) Videos for Playing on iPhone
- Convert AVCHD/AVCHD Lite Footage to Apple ProRes 422 Encoded Files for Final Cut Pro
- Sony M2TS to Windows Movie Maker Converter
- Canon Vixia MTS to Windows Movie Maker Converter
- Convert 1080p MTS Videos to Windows Movie Maker


