
 Home
HomeApple Aperture is a photo editing and management program that developed for Mac OS X.The software handles a number of tasks common in post-production work such as importing and organizing image files, applying corrective adjustments, displaying slideshows, and printing photographs. Features of Apple Aperture include non-destructive editing, organization of photographs by keyword, faces, and places, brushes for applying effects, and exporting to several popular websites, including Facebook, SmugMug, Flickr and Apple's defunct MobileMe service.
On January 6, 2011, Apple announced its availability on the Mac App Store. Aperture 3.4, the latest version of the software, was released on September 19, 2012 and runs on Intel-based Mac computers.
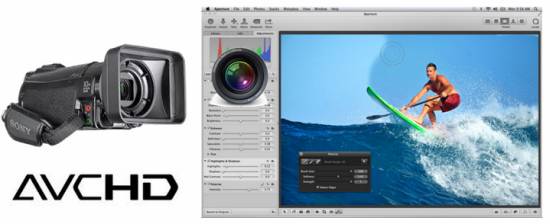
Aperture claims to have AVCHD support such as importing, viewing and trimming AVCHD video captured on many popular cameras, but users still have failure issues while trying to import AVCHD footage into it. So you might consider using a program like Pavtube MTS/M2TS Converter for Mac (also known as an AVCHD to Aperture Converter) to convert AVCHD MTS to Apple ProRes 422 before loading to Aperture. Here is a step-by-step instruction.
![]() Download AVCHD to Aperture Converter
Download AVCHD to Aperture Converter
How to convert AVCHD footage to Aperture editable file format?
Step 1: Load source media into the Pavtube MTS Converter application
Run Pavtube MTS Converter for Mac as the best MTS to Apple Aperture Video Converter. Click “Add video” or “Add from folder” button to load your source media files directly from your camera or from the file folder that contains the source AVCHD mts clips stored on your computer’s hard disk drive.
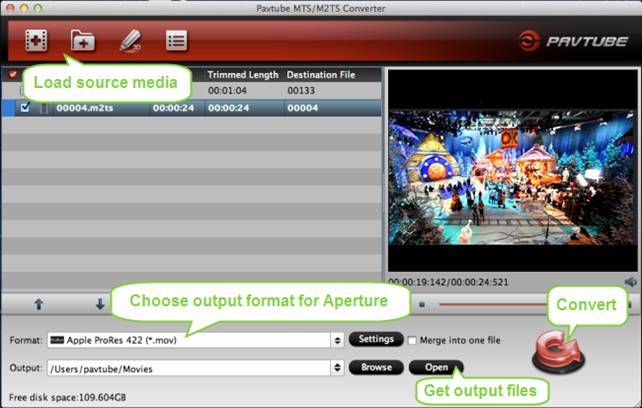
Step 2: Choose “Apple ProRes 422 (*.mov)” as target format for Apple Aperture
Move your cursor to “Format” menu and choose “Apple ProRes 422 (*.mov)” as output format for Aperture from “Final Cut Pro” column.
Step 3: Start AVCHD to Aperture Conversion
Click “Convert” button and the program will start converting AVCHD MTS to QuickTime for Aperture immediately.
Step 4: Get output files
Once the conversion task finished, you can click “Open” button to get the generated MOV files and import to Aperture for editing.
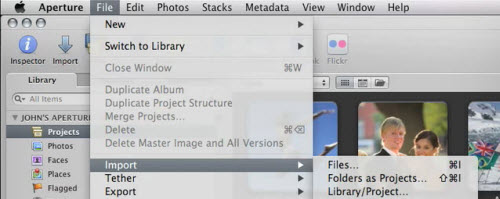
How to import the converted AVCHD files to Aperture?
Launch Apple Aperture, choose File > Import > Files…, and browse to where you save the converted videos to. Choose the videos that you’d like to import.
Additional Info - Burn MOV from FCP X to DVD using Free DVD Creator for Mac
If you need to burn QuickTime movies that exported from FCP X to a blank DVD on Mac, the following guide is worthy reading.
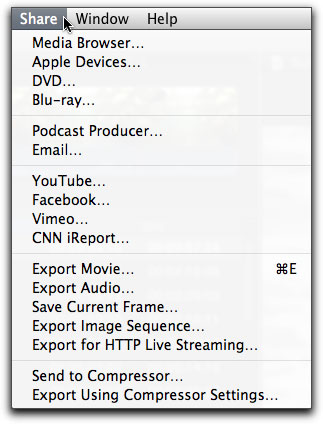
Before starting up Pavtube Free DVD Creator for Mac, you should export Final Cut Pro X project to QuickTime MOV files in advance. When finished editing in Final Cut Pro X, export directly from FCP X under ‘Share > Export Movie…’ and use the codec of ‘Current Settings’.
FCP MOV to DVD burning process in Pavtube Free DVD Creator for Mac
Step 1 - Import QuickTime movie to the Free DVD Creator for Mac
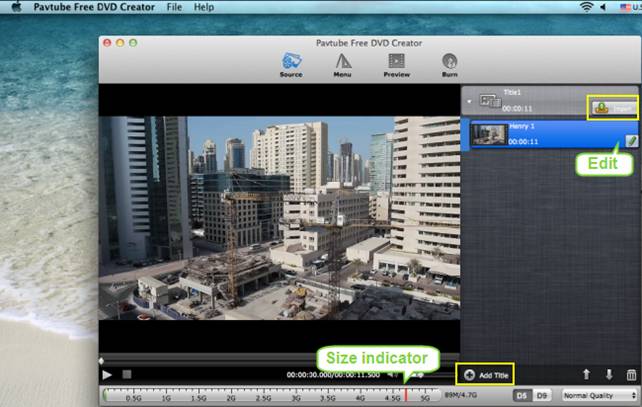
Start up Free Pavtube DVD Creator for Mac, click “Import” tab to browse your hard drive and load the FCP X exported MOV files into the program. Or you can just drag & drop the MOV files into it for burning.
To create another Title, click the "Add Title" button and add more source videos. Please notice the size indicator at the bottom, if it exceeds the red line, you are suggested change to DVD9 or remove some videos.
Step 2 - Author DVD menu
Free Pavtube DVD Creator for Mac enables you to custom a DVD menu to fully access your Final Cut Pro X QuickTime videos on DVD disc. There are three built-in DVD menu templates under “Menu” tab for you to choose from. If you don’t want a menu, you can choose no menu. After selecting a menu template, you can change menu buttons, thumbnails, add text, background music and background images to author a personalized DVD menu.
Step 3 - Preview and burn MOV files to DVD on Mac
Switch to “Preview” tab to have a look at the final playback effect of your DVD. If anything needs to be changed, go back to the former steps to do modification. Once you are satisfied, go to “Burn” tab to set settings like video standard (PAL or NTSC), audio channels (5.1 channels, Mono, Stereo), output settings, disc label, and DVD drive (please insert a blank DVD disc into your selected DVD writer). Press “Burn” button and the Free Mac DVD authoring program will start creating DVD from FCP X MOV source files automatically.
Pavtube DVD Creator for Mac also comes with a Retail version, which can do more than the free version. The bonus features of DVD Creator for Mac Full Version:
- One-click to quick Burn DVD ISO file and DVD folder structure to a blank DVD
- Directly creating playable DVDs from AVCHD MTS/M2TS and MXF footage
- Offering more menu templates for users to choose from
- Burning slide show DVDs from still image files
 Free Trial MTS/M2TS Converter for Mac

Useful Tips
- How to convert AVCHD MTS/M2TS to MKV?
- Convert AVCHD (MTS/M2TS) Videos for Playing on iPhone
- Convert AVCHD/AVCHD Lite Footage to Apple ProRes 422 Encoded Files for Final Cut Pro
- Sony M2TS to Windows Movie Maker Converter
- Canon Vixia MTS to Windows Movie Maker Converter
- Convert 1080p MTS Videos to Windows Movie Maker


