
 Home
HomeMore than uploading unlimited Photos & Traffic, the Power Member and Pro Member of SmugMug have the permission to upload unlimited number of videos in Full HD (up to 1080p in quality and 20 minutes in length). The maximum file size allowed for any video is 3GB. SmugMug accepts videos in just about any video format, such as .mov, .avi, most mpeg formats, h.264, and .m4v.
As for Macintosh users, Apple’s Aperture is an ideal app to handle camera images as well as video clips. People usually import camera footage into Aperture for simple editing, and export video file out of Aperture, then load them to SmugMug. Everything goes well except the slowing uploading process.
Symptom
I switched to a Canon EOS 7D camera and it is somewhat new for me. I just started using it capturing videos for my son’s baseball. I use SmugMug and this is what I want to ultimately upload the recordings to.
My Workflow:
* Export .mov clips from the memory card of Canon 7D to my Mac > to Aperture > to desktop
* Slowly load Aperture video to SmugMug
But, there has to be a faster and easier way to upload the Aperture output onto SmugMug.
Solution
99% of the time SmugMug can convert from whatever you upload to the ever-so-cool h.264 format which works on iPods, iPhones, Apple TV, PlayStations, and many other consumer devices. But what comes off your camera could be bloated and take a long time to upload. So you might consider using a program like Pavtube HD Converter for Mac to convert to h.264 before uploading. Here is a step-by-step instruction:
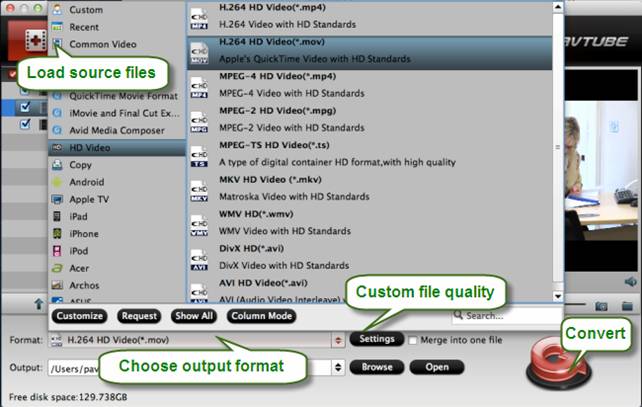
Open Pavtube HD Video Converter for Mac and load your video file into the main windows of the program. You can import source files from “Add video”/ “Add from folder” or directly drag and drop your video files into the HD Video Converter for Mac application.
![]() Download HD Video Converter for Mac Free Trial
Download HD Video Converter for Mac Free Trial
In HD Video Converter, choose Format -> HD Video -> “H.264 HD Video (*.mov)”. You'll see this:
Click “Settings” button and go to “Profile Settings” window to custom file quality for uploading onto SmugMug. The video resolution, bit rate, frame rate, sample rate, and audio channels are all available to reset.
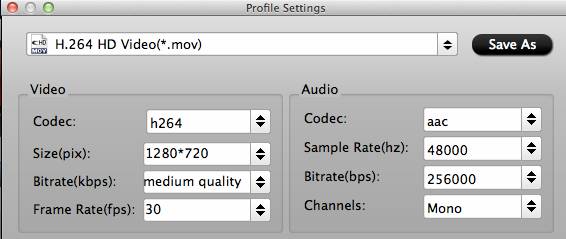
Be sure to input the data rate as follows depending on the resolution size of your video:
* Full HD (1080p) 1920x1080 - 8.0 Mbps
* Hi-Def(720p) 1280x720 - 3.2Mbps
* Mid-Def 960x540 - 1.8Mbps
* iPod/DVD 640x480 - 1.2Mbps
* Web 320x240 - 512Kbps
Click the “Convert” button at the bottom right and when it's finished, you'll have a video file ready for SmugMug.
How to share your video onto SmugMug?
1. Visit the SmugMug website.“Login” with your Smugmug Account.
2. Click “My Homepage” at the top of the page. Click the “Upload” tab and select an Existing Gallery to upload your videos to.
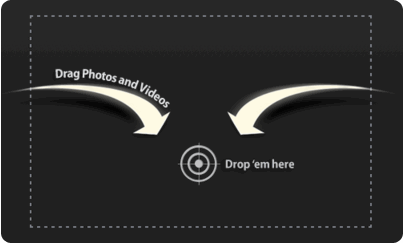
3. Drag and drop videos from your computer to the “Drop ‘em here” icon.
4. Click “I’m Done Uploading”.
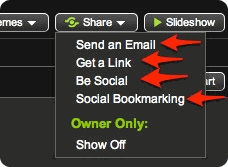
5. Click the video you wish to share from your gallery. Click the “Share” tab.
6. Select whether to share your video via email, via a SmugMug URL, or a social network or bookmarking website.
Tips:
1. You can add captions and keywords to a video by selecting it within your gallery and clicking the “add caption” or keywords: “Add” link underneath the video thumbnail.
2. When sharing videos or photos on SmugMug with other social networking and bookmarking services, you will typically be required to have an account with the third-party service you are sharing with.
 Free Trial HD Video Converter for Mac

Useful Tips
- Play MOV Files on Windows 10
- Best Way to Fix iMovie Won't Import MOV Files Issues
- Transcode Canon 5D Mark III MOV to iMovie AIC for Editing
- Import/Convert Canon EOS-M Camera H.264 MOV to iMovie AIC Codec on Mountain Lion
- Import and edit Nikon D3200 MOV video in Adobe Premiere
- Convert Canon 60D MOV to 1080p AVI/WMV for Editing and Playback


