
 Home
HomeThere have been a lot of questions about opening MTS and M2TS AVCHD files natively in some non-linear video editing apps, both on Windows and Mac platforms. In this situation, people often need to transcode those AVCHD files into an intermediate codec that is suitable for editing with their editor programs. The key point people concern a lot when converting AVCHD footage is which format is best to use without loosing image quality. Actually, nearly all video editing programs have their own preferred editing codec. For example, Final Cut Pro prefers Apple ProRes codec, and iMovie loves Apple InterMediate Codec (AIC).
In this article, we show you the best workflow for AVCHD (MTS, M2TS) based cameras, including 1080i AVCHD workflow on Windows and 1080i AVCHD workflow on Mac.


Part I : 1080i AVCHD workflow on Windows
This part chiefly shows how to make 1080i AVCHD footage workable with video editing software running on Windows platform, like Sony Vegas, Adobe Premiere and Pinnacle Studio.
Here we take rewrapping 1080i MTS to Sony Vegas for example.
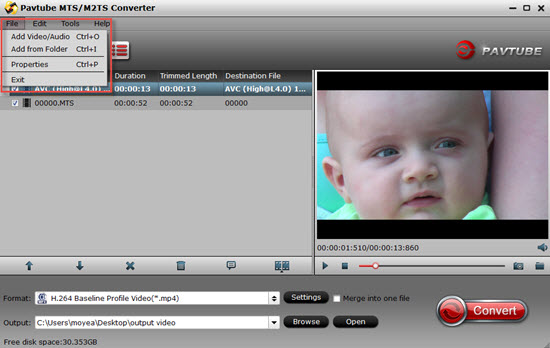
Step 1. First off, start up Pavtube 1080i AVCHD to MPEG2 Converter for Vegas.
Click "Add video" button to load MTS clips captured by AVCHD based cameras.
Step 2. Choose "MPEG-2 (*.mpg)" as output format from "Adobe Premiere/Sony Vegas" profile list.

Step 3. Click "Convert" button to start AVCHD to Sony Vegas Conversion.
When the conversion is done, click "Open" button to get the generated MPEG-2 .mpg files for editing with Vegas Pro.
Tips:
If you are using Adobe Premiere or Adobe After Effects, you can choose the same "MPEG-2 (*.mpg)" as output format for using in your editing programs.
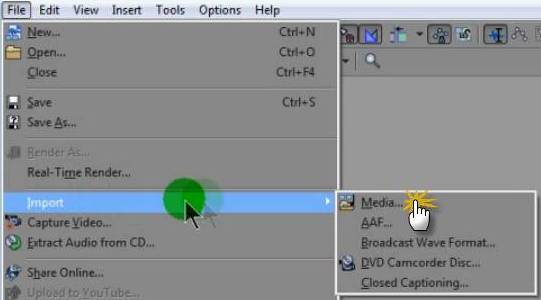
After that, you are ready to import the converted 1080i AVCHD files in .mpg format to Sony Vegas. Follow File > Import > Media… to browse and load the transcoded MTS/M2TS footage to Sony Vegas Pro for post-production.
* Tips for Pinnacle Studio users
If you are using Pinnacle Studio to edit your 1080i AVCHD files, you are suggested to convert .MTS into AVI for furthering using. This requires you to choose "AVI HD Video (*.avi)" as target format from "HD Video" option in Step 2 using Pavtube 1080i AVCHD Converter.
Part II : 1080i AVCHD workflow on Mac
This part mainly displays how to encode/compress 1080i AVCHD footage to editable format for using with Final Cut Pro, iMovie, and Avid Media Composer.
Here we take transcoding 1080i MTS to Final Cut Pro for instance.
Step 1. Run Pavtube 1080i MTS Converter for Mac
Click "Add video" button to load your 1080i AVCHD files.

Step 2. Click format menu to choose "Apple ProRes 422 (*.mov)" as target format from "Final Cut Pro" option.

Step 3. Click "Convert" button to start 1080i MTS to Apple ProRes 422 conversion.
If you want to do the batch conversion, you can check all the files you want to convert in the Main UI before hitting the "Convert" button
Step 4. Click "Open" button to get the generated Apple ProRes 422 files for using in FCP (X).
(Learn to import video files to FCP X)
* Tips for iMovie, FCE and Avid Media Composer users
1. Whether you are using iMovie or Final Cut Express, you are recommended to choose "Apple InterMediate Codec (AIC)(*.mov)" as target format under "iMovie and Final Cut Express" dialogue.

2. If you are attempting to get 1080i AVCHD into Avid MC without further quality loss, you can select "Avid DNxHD (*.mov)" as output format beneath "Avid Media Composer" option.
This is the best 1080i AVCHD workflow that Pavtube Studio provides for you. Now you can edit your 1080i AVCHD footage with your NLE apps either on a Mac or Windows based computer smoothly.
 Free Trial MTS/M2TS Converter for Mac

Useful Tips
- Import footages/videos/projects into Final Cut Pro X without rendering
- Convert Panasonic MXF Footages to FCP as ProRes for Editing
- Workflow for Importing HX-WA20 MP4 to FCP (X) on Mac
- Edit MediaPortal TS Files in FCP X/Avid/iMovie and Burn to DVD on Mac
- Convert Panasonic TM900 MTS Videos to ProRes 422 for Editing on FCP
- MKV to FCP---Convert MKV to Apple ProRes 422 MOV for Final Cut Pro


