
 Home
HomeXAVC/XAVC-S/L which is a Sony recording format. For getting better video, most user want to edit XAVC/XAVC-S/XAVC-L in Windows Movie Maker, however user try to work with some XAVC S footage into Windows Movie Maker on Windows 10, it’s a no-go. Obviously, Windows Movie Maker can't support XAVC/XAVC-S/XAVC-L. How to edit the XAVC/XAVC-S/XAVC-L in Windows Movie Maker, this article will provide you the best suggestion and way.
How To Edit XAVC/XAVC-S/XAVC-L in Windows Movie Maker?
From above information, the direct and simple way is to transcode XAVC/XAVC-S/XAVC-L to Windows Movie Maker supported video format with a Windows Movie Maker Converter. Best suggestion is to transcode XAVC to WMV, which is a friendly format supported by Movie Maker.
Pavtube Video Converter is a professional XAVC to Windows Movie Maker Converter software which can solve all the problems that import XAVC to Windows Movie Maker, this software allows you to convert any XAVC to Windows Movie Maker supported formats, for example: XAVC to WMV, AVI, MPEG-1, MP4 etc, which are all acceptable by Windows Movie Maker. User can watch the video at the preview window.
Except edit XAVC in Windows MovieMaker, other NLE, such as: XAVC for Adobe Premiere Pro, Sony Vegas Pro, Pinnacle Studio, iMovie, etc. With this Windows Movie Maker Video Converter, user can edit XAVC with efficiency and quality and do the master of video. By the way, this software is also a good video editor, user can adjust the video effects, like: video background, video brightness, video length, etc. Also user can add the subtitles, watermark in video. More editing features are waiting for you.
This software is stable and allows user to do the batch video conversion without any interruption. What's more, Mac user can download Mac version. Following provides you the download link, user can download the trial version which is free. If you want to know more about the excellent Windows MovieMaker Converter? this article may be useful.


How to Use the XAVC to Windows Movie Maker Converter?
Step 1. Load XAVC to Windows Movie Maker Converter
Install and launch XAVC to Windows MovieMaker Converter on your computer, click "File" > "Add Video/Audio" to load XAVC files that has been transferred from your other video storage to computer local drive to the program. You can click the "Folder" button to batch load multiple XAVC files into the program.

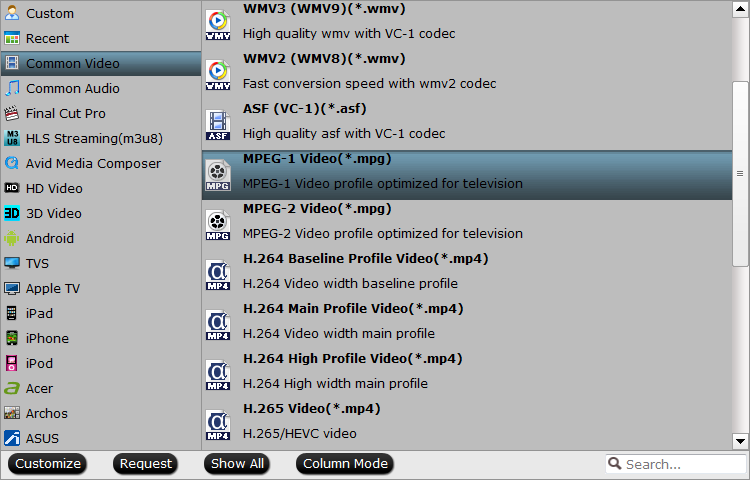
Step 2. Choose XAVC to Windows Movie Maker supported format
Click "Format" bar, from its drop-down list, select XAVC to Windows Movie Maker supported format, from Windows Movie Maker official websites, WMV is the best format for Windows Movie Maker, you can also choose other video formats which is supported by Windows MovieMaker according to your own needs, like: MPEG-1, AVI, etc.
Step 3. Edit XAVC to Windows Movie Maker Supported Codec
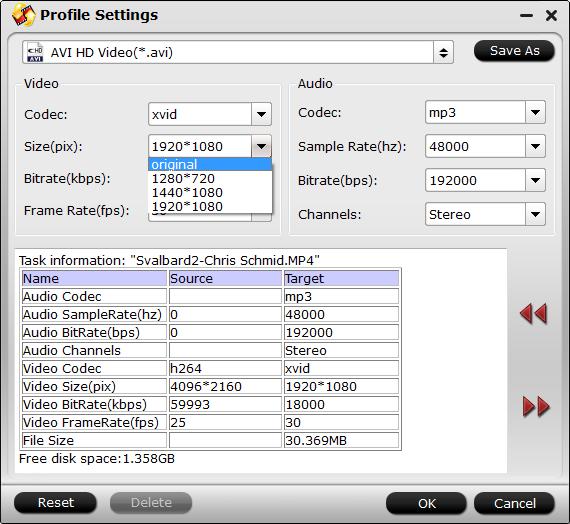
Sometimes, user can't still import WMV to Windows Movie Maker due to the video and audio codec incompatibility, except to convert XAVC to Windows MovieMaker supported video format, user also can can enter the "Setting" menu to set the video and audio codec to Windows Movie Maker best supported codec. In addition, other video and audio parameters you can adjust too, like: Video frames, video bitrate, audio sample rate, audio channels, etc.
Step 4. Begin XAVC to Windows Movie Maker Supported Format Process
After all the format and codec settings are done, go back to main interface, hit right-bottom "Convert" button to start XAVC to Windows Movie Maker supported format process Just wait for a while, you can get a brand new video file.
How to Import Converted XAVC to Windows Movie Maker From PC
Step 1. In the Task pane on the left side of the screen, click "Capture Video", at the drop-down list, choose the "Import video" section.

Step 2. Windows MovieMaker will navigate to the folder that contains all the components of your XAVC. Click the converted XAVC video to Windows Movie Maker.
Step 3. After you choose the video, on the navigate right window, click the "Import" to start to import converted XAVC to Windows Movie Maker.
This powrful Windows Movie Maker Converter also can help user to edit other video in Windows Movie Maker, such as: H.265 to Windows MovieMaker | MXF to Windows MovieMaker | MOV to Windows Movie Maker | H.264 to Windows Movie Maker and so on. User don't worry about the video compatibility issue any more wthi this Windows Movie Maker Converter.
TIP: Understand XAVC Well
| XAVC-L HD | XAVC-I HD | XAVC-L 4K | XAVC-I 4K | XAVC-S | ||
| Wrapper | MP4 |  |
||||
| MXF | |
|
|
|
||
| Bit Depth | 8bit | |
|
|
|
|
| 10bit | |
|
|
|
||
| 12bit | No cameras currently use XAVC 12-bit | |||||
| Frame Size | SD | |
||||
| HD | |
|
|
|||
| 2K | |
|
||||
| 4K | |
|
|
|||
| Color Sampling | 4:2:0 | |
|
|
|
|
| 4:2:2 | |
|
|
|
||
| 4:4:4 | No cameras currently use XAVC 4:4:4 | |||||
| Framerates | up to 60p | up to 180p1 | up to 60p | up to 60p | up to 120p | |
| Bitrates | up to 150mbps | up to440mbps | up to 720mbps | up to 960mbps | up to 100mbps | |
| H.264 Profiles | Main Profile, High Profile, High 4:2:2 Profile, Level 4 or more | High 10 Intra Profile, High 4:2:2 Intra Profile, Level 4 or more | High Profile, High 4:2:2 Profile, Level 4.2 or more | High Profile, High 4:2:2Intra Profile, Level 4.2 or more | Main Profile, High Profile, Level 2.1 to 4.2 | |
| Inter/Intraframe | LongGop | Intraframe | LongGop | Intraframe | LongGop | |
| Supporting Cameras (partial list) | PXW-X70 PMW-400 PMW-300 PXW-Z100 |
PMW-F5 PMW-400 PMW-300 PXW-Z100 |
PXW-FS7 PMW-F5 PXW-Z100 |
PXW-FS7 PMW-F5 PXW-Z100 |
A7s FDR-AX1 DSC-RX100vIII FDR-X1000V |
|
 Free Trial Video Converter for Mac

Useful Tips
- MOV to M4V: How to Convert MOV to M4V on Mac OS (macOS High Sierra Included)
- How to Play AVI Videos on MacBook(Air, Pro, iMac)?
- How to Import Android Videos to iMovie for Editing?
- How to Play a WMV File on Mac Computer
- Play H.265 Files with QuickTime Player on Mac
- Convert YouTube to MPG/MPEG with Easiest Way


