
 Home
HomeCan Premiere Pro CC work with XAVC/XAVC S?
As the redesigned successor to Adobe Premiere, the new version 8.2.0 of Adobe Premiere Pro CC has native support to work with 4K or HD in XAVC or XAVC S. Import and edit XAVC content is direct, without rewrapping or transcoding. The flexible structure of XAVC allows you to browse clips using the Media Browser and organize them using camera metadata. You can edit directly from the SxS card via the camcorder, or a card reader, or use the Media Browser to transfer the content to hard disk for better performance.

However, if you are using the previous version of Premiere Pro CC 8.2.0 (Adobe Premiere Pro CC 2014.2.0 version) such as Premiere Pro CS4, CS5, CS6 or CC7 or other versions, you will fail to proceed the editing workflow.
Transcode XAVC/XAVC S for Premiere Pro CC7/CS6/CS5/CS4
To wok XAVC/XAVC S with Premiere Pro CC7/CS6/CS6/CS4, you will need to transcode XAVC/XAVC S to Premiere Pro supported file formats. Here, you can complete the work with our best XAVC/XAVC S Converter for Mac - Pavtube HD Video Converter for Mac/Windows, which helps to directly convert Sony XAVC/XAVC S to Premiere Pro CC7/CS6/CS5/CS4 specially optimized MPEG-2 file formats so that you can direct load and import the files into Premiere Pro for fast and fluid post-production.
Trim/Merge/Crop/Split/Watermark XAVC S
Want to do some basic video editing work before proceeding to the professional post-production workflow with Avid? You can done that job with our program with ease. With the "Trim" function you can easily cut off unwanted parts or segments form your video, the "Merge" tool helps to combine all the separate video clips into single one file, the "Split" option facilitates you to split large files into small parts by file size, length or count and the "Crop" tool enables you to cut off unwanted edges around the video.
Besides generating Premiere Pro CC optimized file format, the program also facilitate to convert XAVC/XAVC S to Prores for FCP 7 or AIC for iMovie or Final Cut Express or DNxHD for Avid Media Composer.
How to Transcode Sony XAVC/XAVC S to Premiere Pro CC7/CS6/CS5/CS4?
Step 1: Transfer XAVC/XAVC S footage from camera to computer.
The XAVC S format products are recorded on the fastest SD cards(SDXC), the recorded footage can be transferred to you computer in the following 3 ways:
1. Directly connect the camera/camcorder to the computer via a USB cable.
2.Remove the SDXC card from the camera/camcorder and then plug it into the computer.
3.Fit the computer via the SDXC media adaptor.
Step 2: Load Sony XAVC/XAVC S files.
Click the "Add Video/Audio" or "Add from folder" option to add the Sony XAVC/XAVC S files that have been transferred from your camera/camcorder to your Mac hard drive.

Step 3: Output Premiere Pro optimized file format.
Click the "Format" bar and switch to "Adobe Premiere/Sony.." option and select "MPEG-2(*.mpg)" as the output format for non-linear post work-flows in Premiere Pro CC.

Step 3: Edit XAVC/XAVC S files.
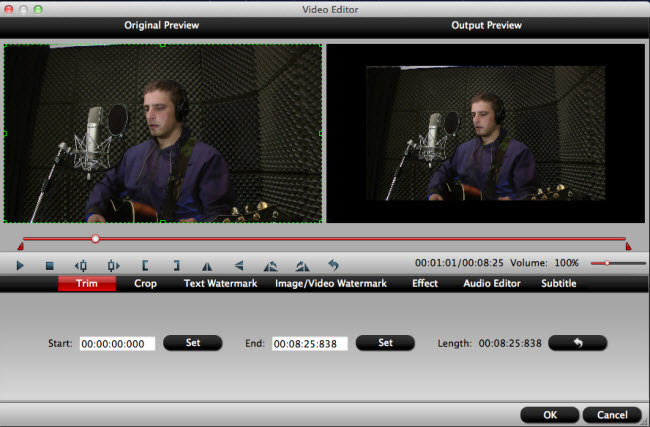
Select an item on the main interface to activate the "Video Editor" function, in the opened "Video Editor" window, you can play and preview the original video and output effects. Also you can flip video, trim, crop, add watermark, apply special effect, insert subtitles, reset and adjust volume.
Step 4: Start the conversion process.
Go back to the main interface, hit right-bottom "Convert" button to start to encoding XAVC/XAVC S to Premiere Pro CC native supported MPEG-2 file formats.
When the conversion is completed, feel free to import video to Premiere Pro CC for professional post-production workflow.
 Free Trial HD Video Converter for Mac

Useful Tips
- Review of 5 Best HD Video Converter for Mac (macOS Sierra Included)
- Import DJI Mavic Pro 4K video to iMovie for Editing
- Import DivX to iMovie (iMovie 11 Included)
- How to Convert ASF to iMovie (iMovie 11 Included) on Mac?
- Superior iMovie Alternatives for Mac (MacOS Sierra)
- 2017 Top 5 Best HD Video Converters for Mac OS X El Capitan/Yosemite/Mavericks


