
 Home
HomeSony MiniDV has already become the favourite video recording tool among amateurs ,not only for its compact structure but also for not bad video quality. But one thing makes users annoying is that the items that used for storage. The cassettes, of course, it do has its own advantages but the storage and not so much large storing memory may become the main reason for stopping continue using.
The default record format is AVI which may keep the good quality of the video itself , but on the other hand , the file size will occupy too much local space if you transfer your videos on your computer. So is there any way to reduce the file size while keeping the good quality of the AVI MiniDV? What's more, some users may like to build their own media server which can share videos with others and in case of the lost and damage of cassettes.

Pavtube Video Converter will be the best solution to free users from this dilemma, it will reduce the file size while converting the AVI MiniDV videos, and H.265/HEVC option will allow you to maintain the good quality or even higher it. If you want to transfer files to the media server, H.264 MP4 will also be the most compatible format to select.
Some users who may not very family with the MiniDV or just don't know how to deal with cassettes, may wonder how to transfer files on their PC, here is a brief guide to help you before the conversion.


How to compress AVI MiniDV to upload on media server while keeping good quality?
Step 1. Download the best MiniDV AVI Converter on your PC
Download this converter on your PC and have a quick installation. You may wonder if this one will contain some virus or unnecessary bundle apps. No worry about that, what's more, using time limitation has nothing to do with the trail version.
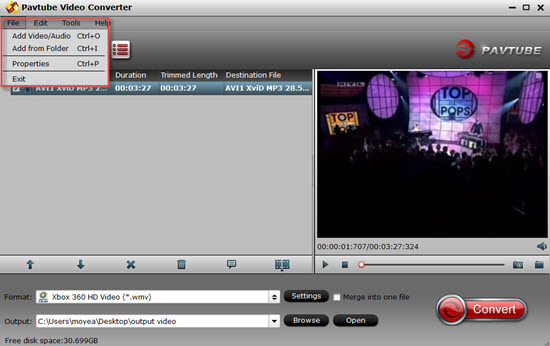
Step 2. Choose H.264 MP4 for transferring via media server
Go to the "Format" option to choose "HD Video">"H.264 HD Video (*.mp4)", this will be the most compatible format on various play platforms, no matter you want to playback on some Android Tablets, or IOS devices, or Windows surface, etc. Streaming them on smart TV can also be allowed if you connect to the server.

Tips:
All options under "HD Video" encoded by H.264 will output as H.264 High Profile.
If you want to store your videos on local PC or hard disk, then H.265 will be the best choice. It will shrink the file size to half compared with H.264 MP4 format.
Step 3. Adjust Bit rate , Frame rate if you need
The original HD videos are very good that you may no need to adjust the parameters. But if you want to lower the file size for uploading online like YouTube or Vimeo, then the downsize step may be the necessary one.
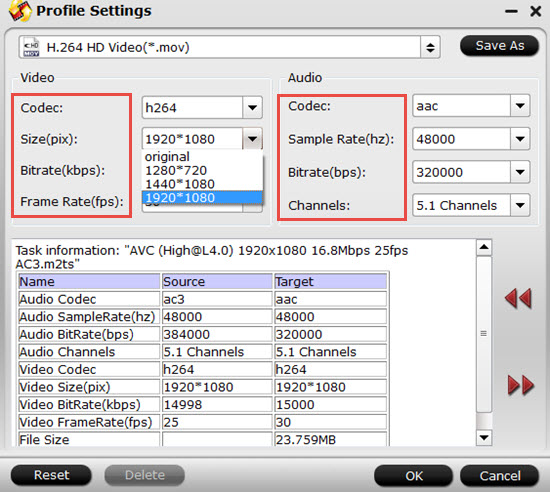
Tips:
You can see the generated file size in the "Task information" which may help you to the adjustment better.
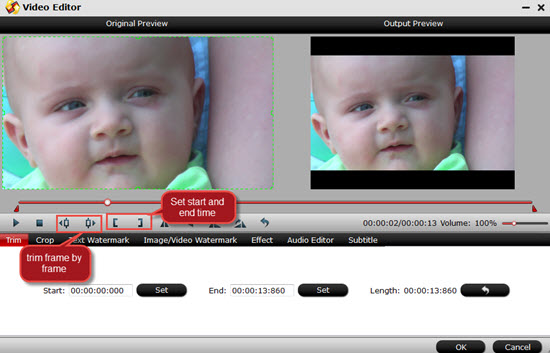
Step 4. Simple edits to create your very own videos (optional)
You may want to do some simple edits before uploading, to cut off some parts or want to add the subtitles or watermark for fun. If you accidently shot the videos on the wrong angle, then you can just use the "rotate" function to make things right.
Step 5. Start to convert AVI to H.264 MP4 videos for uploading
After all have been settled, you can back to the main UI and set the file store location by clicking "Browse". Then click the "Convert" to start your conversion.
If you have bunch of files, you can do the batch conversion, but the maximum number of the converting files are four.
After the conversion, you can check the converted files by clicking "Convert" button to open your file location. If you forget to set the location, click "Open output folder" to find them in the default location.
With those compatible while small file size videos, you can upload them on your media server, no matter the NAS or DLAN, just connect to the net then you will enjoy your videos on various platforms or sharing with your family and friends.
Here offer you one article about how to build a free home server.
 Free Trial Video Converter


