The 4K video shot with you DJI Mavic Pro Platinum looks great on your computer but when you try to direct upload them to the popular video sharing sites - YouTube, you may be frustrated and disappointed by the long uploading process and bad quality results when showing on YouTube. How to fast post Mavic Pro Platinum 4K video to YouTube with clear and beautiful look, the following article will discuss this issue with great details.
Best 4K video uploading settings for YouTube
To achieve a smooth uploading process and high quality uploading results, you should be clear of the best 4K uploading formats and settings for YouTube listed below:
Container: MP4
Video codec: H.264
Progressive scan not interlacing
High Profile
2 consecutive B frames
Closed GOP. GOP of half the frame rate.
CABAC
Variable bitrate, no bit rate limit required, though we offer recommended bit rates below for reference,
Chroma subsampling: 4:2:0
Audio codec: AAC-LC
Channels: Stereo or Stereo + 5.1
Sample rate 96khz or 48khz
Compatible Frame rate and bit rate for 4K video uploading
|
Resolution |
Video Bitrate, Standard Frame Rate |
Video Bitrate, High Frame Rate |
|
2160p (4k) |
35-45 Mbps |
53-68 Mbps |
Aspect ratio
YouTube uses 16:9 aspect ratio players. If you're uploading a non-16:9 file, it will be processed and displayed correctly as well, with pillar boxes (black bars on the left and right) or letter boxes (black bars at the top and bottom) provided by the player.
Time and file size limitations for YouTube video upload
Size: Make sure you're using an up-to-date version of your browser so you can upload files greater than 20GB. The maximum file size you can upload to YouTube is 128GB.
Length: By default, you can upload videos that are up to 15 minutes long, but you can upload longer videos by following the steps below to verify your account.
1. go to the upload page at youtube.com/upload.
2. At the bottom of the page, click Increase your limit. You can also go directly to https://www.youtube.com/verify.
3. Follow the steps to verify your account. You can choose to receive a verification code through a text message on a mobile phone or an automated voice call.
4. Once you've verified your account, you can upload videos that are longer than 15 minutes long
Specific video recording modes of DJI Mavic Pro Platinum
|
Container format |
Video Codec |
Resolution and Frame Rate |
Maximum Bit rate |
|
MP4 or MOV |
MPEG-4 AVC/H.264 |
C4K: 4096×2160 24p |
60Mbps |
Share Mavic Pro Platinum 4K on YouTube with best settings
From above table, we can see that the recording container file formats and bit rate don't match with the best uploading settings for YouTube. It would be essential to wrap the MOV container to MP4 container and lower the bit rate of DJI Mavic Pro Platinum to a range between 35-45Mbps.
Here, you can get the job easily done by downloading Pavtube Video Converter(get Mac version), the program not only assists you to wrap DJI Mavic Pro Platinum 4K MOV H.264 to YouTube best favorable 4K MP4 H.264, but also gives you the chance to change the output video bit rate from 60Mbps to a value between 35-45 Mbps.
Related article: Import Mavic Pro 4K to iMovie | Play Mavic Pro 4K on iPad Pro | DJI Mavic Pro Review
Trim/Split DJI Mavic Pro 4K video
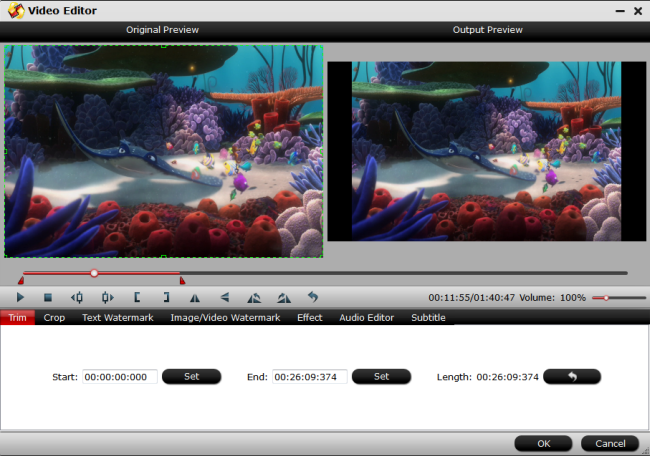
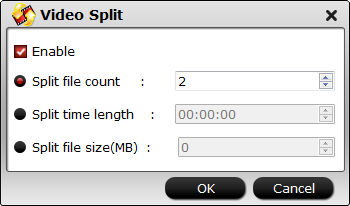
If the Mavic Pro Platinum 4K video you try to share on YouTube is longer than 15 minutes, you can take good advantage of the video trimming function offered by the program to shorten the video length. If the video file size exceed the maximum uploading file size, just use the video splitting function offered by the program to split the large video into smaller by file size, count or length with no quality loss.
How to Transcode Mavic Pro Platinum 4K to YouTube with Best Uploading Settings?
Step 1: Load DJI Mavic Pro Platinum 4K video into the program.
Start the program on your computer, click "File" menu and select "Add Video/Audio" or "Add from folder" to import DJI Mavic Pro Platinum 4K video.

Step 2: Output Youtube best uploading format.
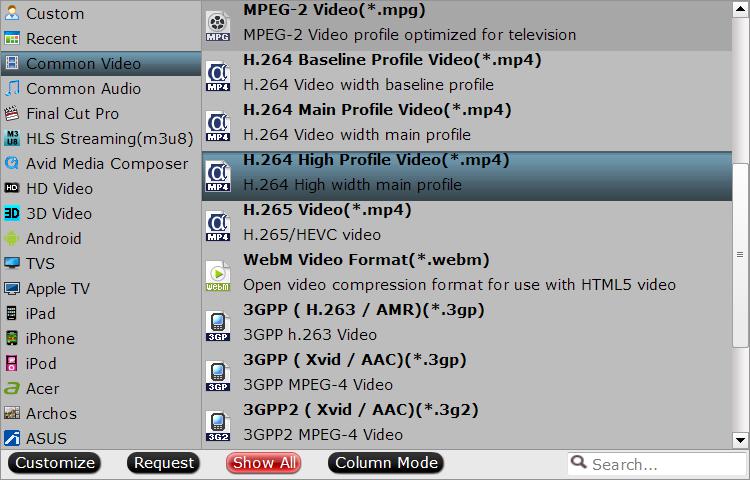
Click "Format" bar, from its drop-down options, choose YouTube best compatible uploading format from "Common VIdeo" > "H.264 High Profile Video(*.mp4).

Step 3: Tweak output video bit rate.
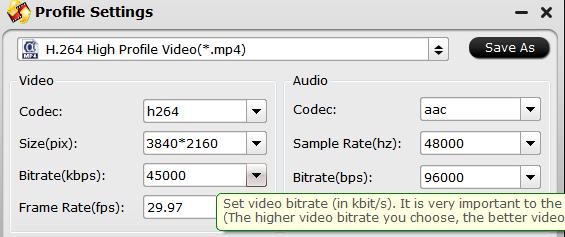
Click "Hit "Settings" to open the "Profile Settings" window, in video section, from "Bitrate(kbps)" drop-down list, select YouTube accepted bit rate range between 35-45 Mbps. You can also tweak other settings according to your own needs.

Step 3: Trim/Split video.
Trim video length
In the video editor window, choose the "Trim" tab and this tab is selected by default when the editing window appears. You can use the trim function to cut off unwanted parts from start and end. You can either drag pointers on the process bar or set exact time point in Start and End boxes to set to reduce video length to no more than 15 minutes for YouTube uploading.

Split large file into small pieces
Click the split button on the file list to launch the Video Split window. Ticking "Enable" option, you can split the file by file count, time length, or file size.

Step 4: Start the conversion process.
After all settings are done, click right-bottom "Convert" button to begin to convert Mavic Pro Platinum 4K video to YouTube best uploading formats and settings.
When the conversion is completed, you can smoothly upload and share DJI Mavic Pro Platinum 4K video on YouTube smoothly with perfect quality.


 Home
Home Free Trial Video Converter


