
 Home
HomeMany people like to record their screen video then upload them to socal media to get the spotlight. Camtasia Studio is a powerful software application that allows you to record your computer screen and you also can make some simple editing with this software. After edited the video, you can directly upload Camtasia video to YouTube but can't post Camtasia video to Instagram.
To upload Camtasia video to Instagram, you need to produce Camtasia video in Instagram supported video format. Then share Camtasia video on Instagram. Therefore, you need to know what video format Camtasia export and what video and codec Instagram supports.
Camtasia Supported Export Video Formats and Containers
The file formats you can save with in Camtasia include: AVI, Macromedia Flash (SWF), Windows Media (WMV), QickTime, Macromedia Flash (FLV), RealMedia (RM), Camtasia for RealPlayer (CAMV), and GIF animation.
Instagram video specifications
Size: maximum width 1080 pixels (any height)
Frame Rate: 29.96 frames per second
Bit rate: 3,500 kbps video bitrate
Audio: AAC (Advanced Audio Coding). 128kbps is the best for Instagram
Video length: 3 secs - 60 secs.
Filesize: 15MB. If your video is larger than 15MB, you need to compress the video file size, trim or split it to separate parts.
Best video codec: H.264. Instagram accepts H.264 video compression.
Best video format: MP4 and MOV. Instagram supports MP4 and MOV container format.
Our recommendation going forward to hit all channels is to work within a square sized 1080px video using a 30fps frame rate. This will ensure anything you create can be used on Facebook, Twitter and Instagram without any issues. The best video format for Instagram upload is MP4 with H.264 codec and AAC audio, 3,500 kbps video bitrate.
Part 1: Export Camtasia Videos
Once you have decided on a file format to use, you can start to produce your video.
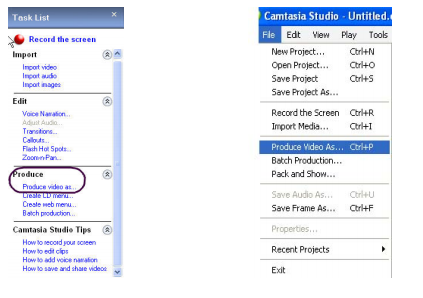
To start producing select ‘Produce Video As’ under the task list menu or go to the file menu and select ‘Produce Video As’.
You will see a new window called the production wizard. The production wizard will help walk you through the production process.
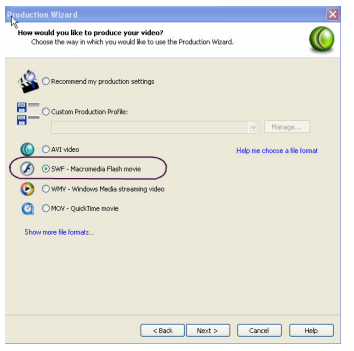
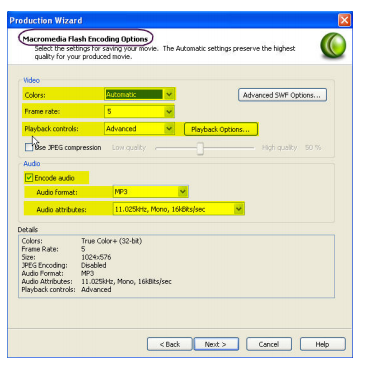
The first window allows you to select which file format you are going to use. As an example, SWF movie file has been selected. After selecting the appropriate file format, this window will allow you to select the encoding options; including video colors, frame rate, playback controls, encode audio, audio format, and audio attributes.
In the produce video window you will need to choose a file name and folder to save your produced video. Once you have selected a file name and folder click finish to begin production.
Part 2: Convert Camtasia Video to Instagram Compatible Video
As stated, Camtasia outputs AVI,Windows Media (WMV), QickTime, Macromedia Flash (FLV), RealMedia (RM), Camtasia for RealPlayer (CAMV) file. When you export an Instagram unsupported video, you need use an instagram video converter to transcode Camtasia video to Instagram playable video format with compatible codec, frame rate, bitrate, etc.
Pavtube Video Converter is such as video converter. It can convert all these Camtasia video files into Instagram favorite MP4 file. In the conversion process, you can adjust video size from 1080p to 720p, video bit rate to 5,500 kbps or 3,500kbps, video frame to 29.96 frames per second or 30fps and adjust audio codec to AAC, audio bitrate to 128kbps to meet all the specs of Instagram.
Since Instagram limits video length, you also can use Pavtube Video Converter to trim video footage, crop black bar, split video to several video clips in 50MB for Instagram. For Mac users, Pavtube Video Converter for Mac is the equivalent Camtasia to Instagram converter for macOS High Sierra.


Step by Step to Convert Camtasia Videos to Instagram
Step 1: Load Camtasia video files into the program.
You can directly drag and drop the video files with audio into the program or click "File" > "Add Video/Audio" or "Add from Folder" to load Camtasia video files into the program.

Step 2: Output Instagram best uploading format.
Click "Format" button to open drop-down list and there you can choose MP4 format. You can choose MP4 format for Instagram in "Common Video" and "HD Video" categories.

Step 3: Set videos more compatible with Instagram
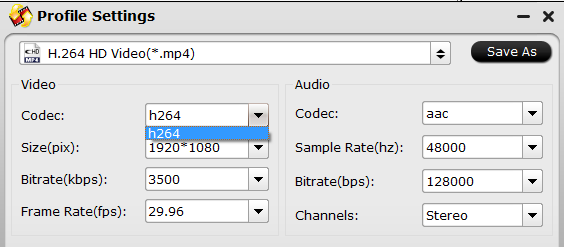
Now, click "Settings" on the main interface to start to adjust video and audio parameters to fit in Instagram according to the below specs.
|
Video Size: 1080p Video Bitrate: 3,500 kbps Video Frame Rate: 29.96 fps |
Audio Codec: AAC Audio Bitrate: 128kbps |
You can choose the right settings in this window. When you can't find the settings you want, you can simply tap it in.
Step 4: Start Camtasia to Instagram conversion process.
After all setting is completed, hit right-bottom "Convert" button to begin the Camtasia video to Instagram best compatible uploading settings conversion process. After the conversion, you can click Open output folder to popup output directory with the converted files. Then you can smoothly upload the Camtasia video to Instagram for sharing.
How to Upload Camtasia video to Instagram from computer?
As the Instagram app is limited to mobiles only, here are many desktop applications that can fill this gap. Among those computer Instagram videos uploading tools, we recommend you Gramblr (or Bluestacks). This Instagram video uploading works seamlessly on Windows (10), Mac and Linux, allowing users to upload to Instagram from PC/Mac directly without the need of a smartphone! (Instagram doen’t allow third-party uploader, so use it on your own risks) The process to upload videos from computer to Instagram with it is quite simple:
1. Download Gramblr and run it. Sign in to Instagram.
2. Choose the video/photo you would like to upload to Instagram.
3. Gramblr will redirect you to “Caption.” Add a caption if you wish.
4. Click Upload.
 Free Trial Video Converter


