
 Home
HomePavtube Media Magician for Mac is a Mac HDcam assistant tool which helps video editors process simple editing on their camera footage before importing them into nonlinear editing applications like Final Cut Studio, Avid Studio, iMovie, Final Cut Express, Adobe Premiere, and Sony Vegas for post-production. On the Timeline of Media Magician for Mac, you can cut/split a video clip into individual parts at your specified time point, so that you can delete or reorder them basing on your requirements. You can also trim out unwanted parts of a clip by resetting the starting and ending time. Plus, with enhanced frame accurate seeking capability, Media Magician for Mac enables you to use its Frame Selection Controller to seek to the corresponding frame of the current image, or seek the previous frame/next frame for locating desired frames accurately, so that you can easily find out the desired frame of a video clip to split, cut or trim.
How to do timeline editing and using frame selection controller?
The contents below demonstrate the details of control buttons in Timeline as well as the frame selection controller in Media Magician for Mac. To have a better understanding of this frame accuracy cutting tool for Mac, you can try it now:
![]()
The free trial version of Pavtube Media Magician for Mac has the following limitations:
1. It will add Pavtube logo watermark in output file(s).
2. Lossless output has a file size limit of 5 minutes.
If the free trial version does what you want, you can click Buy Now button below to purchase its full version to avoid the above mentioned free trial limitations.

Control buttons on the Timeline of Media Magician for Mac
The control buttons on timeline help you cut, trim, delete, reorder and merge video clips in a much easier way.
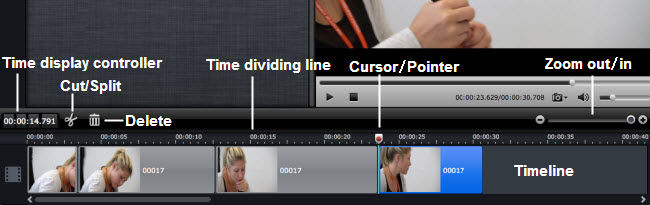
1. Time Display Controller: Move your mouse cursor on timeline, the opposite time point will be displayed here. Once you entered a time point into the time display box and click enter, the Preview Window and Timeline will switch to the frame of this time point. This helps to locate to the accurate frame that you want.
2. Zoom in and Zoom out: Drag the bar on top-right of timeline to Zoom in or out for better view.
3. Time dividing line: This displays the corresponding time points of a clip.
4.Trim: Put your cursor to the start or end point of a clip on timeline until it changes to trimmer. Drag the trimmer and you can trim off unwanted starting or ending.
5. Cut: Drag the pointer to the right place; Put your cursor to process bar under preview window and select the right frame; Click the Scissors button and you can cut the clip. And then you can rearrange order or delete.

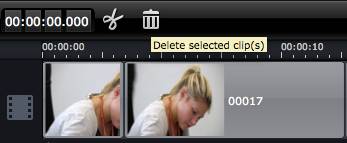
6. Delete: Highlight the unwanted clip on timeline, and click Delete button. You can also delete it with right-click menu.
7. Rearrange order: Drag and hold a clip to the right place until the place line shows. Drop the clip and it will be placed right there.
8. Merge and join: All files placed on timeline will be output as one file. So if you want to merge and join several clips, just drag them to timeline in right order.
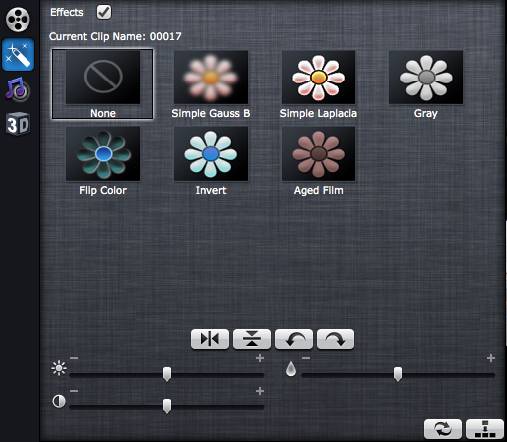
Furthermore, you can add 3D effects, special effects (e.g. Simple Gauss Blur, Flip Color, Invert, Aged Film, and Gray), or adjust volume, contrast, saturation, brightness of selected clips. You can also flip video horizontally, vertically, and rotate clockwise and counter-clockwise as you like.
Warnings:
Keep in mind that any editing effects (such as Effect, Audio, 3D) will be ignored when processing Lossless Output.
Frame Selection Controller Media Magician for Mac
On the preview window, you can use Frame Selection Controller to seek to the corresponding frame of the current image, or seek the previous frame/next frame for locating desired frames accurately.
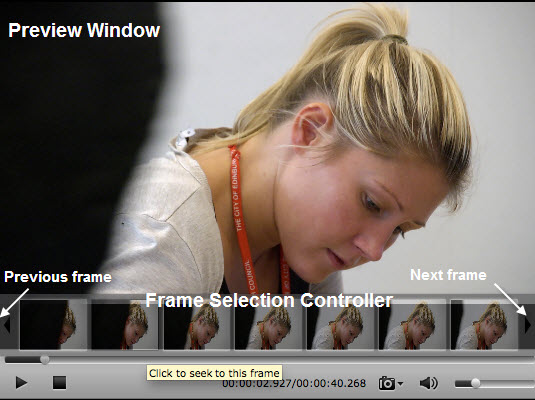
After the desired frame selected, the preview window and the timeline will switch to this frame simultaneously. By then you can click “Cut” button on timeline to split/cut/divide the clip at a very precise point. You can also highlight the clips you want to delete from the timeline, and click the “Delete” button next to the “Cut” button to remove the unwanted parts.
Notes: The Frame Selection Controller assists users to process frame accurate splitting on Timeline, but this function is available only when applying Lossless Output.
 Free Trial Media Magician for Mac

Useful Tips
- 2017 Top 5 Apps to Split or Merge Video Files on Mac
- Merge/Join Hard Drive Camera MTS Files with No Quality Loss on Mac
- [Mac Solution] Trim/Cut and convert Canon Elph 530 footage for streaming to SmartTV
- How to Import XAVC Video Footage to iMovie/FCE for editing on Mac
- Batch Manage Camcorder AVCHD MTS/M2TS Footage at One Time on Mac
- Sony Cyber-shot TF1 workflow on Mac: import and edit MJPEG AVI with FCP X, iMovie, Avid, FCE, and Premiere Pro


