
 Home
HomeThere are some MTS converters that can convert my m2ts media from hard drive camera in mp4 file as I read, but it will definitely lose a lot of details doing it and it usually takes a long time encoding the H.264 contents. Also, it can't join my m2ts files together.
To fast organize and join .MTS/.M2TS files without encoding, the Pavtube Media Magician for Mac is a best choice. Its "Lossless Output" option provides a jointless MTS/M2TS/TOD merging and rewrapping solution. Using the software, you can join m2ts/mts clips into one without encoding. Not only the processing time is greatly shortened, but also you get the original HD quality. I have used Pavtube products for about 6 years now. And I have already purchased this program for a PC and a Mac. I was surprised by its amazing speed and high qualtiy video output. Below is a guide I share for your reference.
To remux camera videos to MKV/M2TS, you need to use "Lossless Output" in Media Magician for Mac. There are some things you need to pay attention to while using "Lossless Output":
1. Currently the "Lossless Output" only handles MTS, M2TS, MOD, and TOD formats, thus you are limited to do the following rewrapping without conversion:
- Remux MTS to MTS
- Remux M2TS to M2TS
- Remux TOD to TOD
- Remux MOD to MOD
- Remux MTS to MKV
- Remux M2TS to MKV
- Remux TOD to MKV
- Remux MOD to MKV
2. The format and codec of video files on timeline should be substantially the same;
3. Any editing effects (such as Effect, Audio, 3D) will be ignored when output.
Step by step to Join/Merge MTS Files Losslessly on Mac
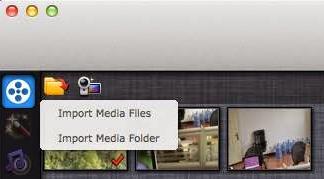
Step 1: Import source files into Media Magician for Mac
Run Pavtube Media Magician for Mac, load source videos into it.
Step 2: Drag and drop hard drive camera m2ts recordings to timeline
In the Timeline panel of Pavtube Media Magician for Mac, you can copy a video clip by "Duplicate This Clip" in the Timeline. You can also change the start time and end time of a clip to trim/cut off unwanted parts in a movie clip. To remove clips, select one or more clips in the sequence and press "Delete". You can also change the order of clips once they are there in the Timeline. If you would like to split a clip into two parts, you can drag the cursor/pointer to the right place and click the "Cut" button to cut off the clip.

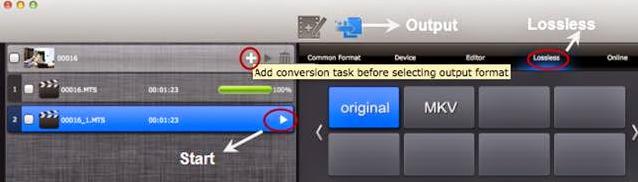
Step 3: Remux hard drive camera recored MTS videos with no conversion on Mac
Choose "Output" in the main interface, then switch to "Lossless" > "original" or "Lossless" > "original". Click "Plus" icon to add conversion task, and click "Start" to begin merging and remuxing hard drive camera MTS recordings without recompression on Mac.
Soon after the rewrapping task is finished by Media Magician for Mac, you can add the generated MTS file to your Mac media server and play hard drive camera recored M2TS video over Wi-Fi. Enjoy it now!
 Free Trial Media Magician for Mac

Useful Tips
- 2017 Top 5 Apps to Split or Merge Video Files on Mac
- Merge/Join Hard Drive Camera MTS Files with No Quality Loss on Mac
- [Mac Solution] Trim/Cut and convert Canon Elph 530 footage for streaming to SmartTV
- How to Import XAVC Video Footage to iMovie/FCE for editing on Mac
- Batch Manage Camcorder AVCHD MTS/M2TS Footage at One Time on Mac
- Sony Cyber-shot TF1 workflow on Mac: import and edit MJPEG AVI with FCP X, iMovie, Avid, FCE, and Premiere Pro


