
 Home
HomeGoogle Nexus 10 Review
Bottom Line
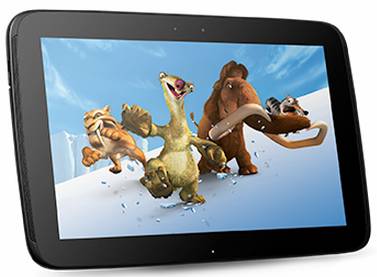
The Nexus 10 might not have quite the same teensy price as its smart phone sibling, but it offers a lot to get excited about. The stunning, crisp screen and lightning-fast performance, together with the great software tweaks in 4.2 Jelly Bean make it possibly the best 10-inch slate if you don't want an Apple logo on it.
Pros
* Super-sharp screen /Great high-resolution screen - 2,560x1,600
* Powerful processor/Excellent performance from a dual-core chip
* Only 10-inch tablet currently available with Android 4.2
* Relatively affordable price
Cons
* Buggy
* Real-life performance doesn't match up to hardware specs
* Difficult to find good apps
* Uninspiring design
* No microSD card slot
If you're in the market for a 10-inch tablet, the Nexus 10 is definitely a superb option and well worth your consideration. The astounding 2,560x1,600-pixel resolution makes it ideal for watching movies, reading e-nooks, browsing internet, playing games on the go. If you intend to play Blu-ray movies with Nexus 10, you need a third-party program (e.g. Pavtube Blu-ray Ripper for Nexus 10) to help you rip bluray movies to a format that is compatible with your device. The guide below will shed you some lights on this.
Before we start, you can download a proper version of Pavtube Blu-ray Ripper for Nexus 10 to have a try:


The step-by-step instruction:
How to rip 1080p Blu-ray movies to Nexus 10 playable files on Mac by using Pavtube Blu-ray to Nexus 10 Converter for Mac?
Step 1: Run Pavtube Blu-ray Ripper for Mac as the best Mac Blu-ray Ripper for Nexus 10. Click “Blu-ray disc” icon to load Blu-ray movie files directly from a Blu-ray drive or click “Blu-ray folder” icon or “IFO/ISO” icon to load source Blu-ray files from a Blu-ray folder or ISO file stored on your Mac’s hard disk drive. Notice that a built-in or an external Blu-ray drive is required to rip Blu-ray movie directly from a Blu-ray disc.
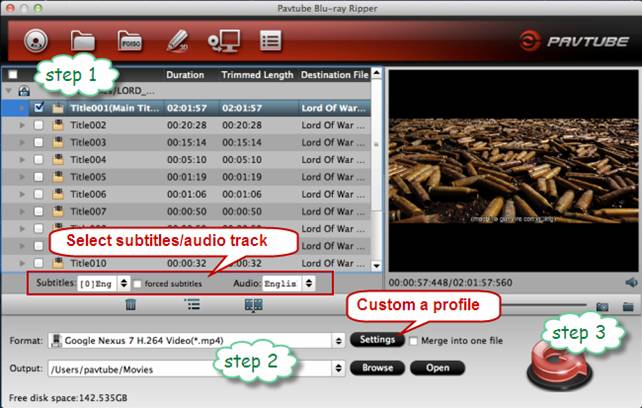
Step 2: Choose “Google Nexus 7 H.264 Video (*.mp4)” as target format for Nexus 10 tablet
Pavtube Blu-ray to Nexus 10 Converter enables users to custom an optimal profile for Nexus 10. First of all, choose “Google Nexus 7 H.264 Video (*.mp4)” as target format from “Android” catalogue. Then click on "Settings" button to enter "Profile Settings" panel, and customize video and audio settings for your target format. From the "Profile Settings" dialog box, select the desired option from the drop-down list boxes.
The best settings for Nexus 10
Video
Codec: h264
Size (pix): 1280*720
Bitrate (kbps): 2000
Frame Rate (fps): 24
Audio
Codec: aac
Sample Rate (hz): 44100
Bitrate (bps): 128000
Channels: Stereo
If you would like to save this profile for future use, you can click "Save As" tab to save the profile. To avoid confusing with other profiles, you are allowed to rename the profile as you needed. Afterwards, click "OK" to confirm. Learn to customize a suitable profile for your portable devices with Pavtube Mac software
Step 3: Click “Convert” button to start backing up 1080p Blu-ray titles to MP4 for viewing on Google Nexus 10 tablet. Once the Blu-ray to Nexus 10 ripping task is finished, you can click “Open” button to get the generated files for playing with Nexus 10. Learn to transfer videos and music to Google Nexus 10.
Additional info:
How to select your desired subtitles and audio track when rip Blu-ray to Nexus 7 on Mac?
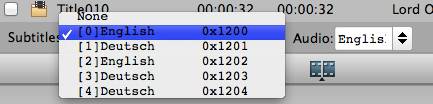
1) Select subtitles
Click the drop-down list of “Subtitles”, then all the subtitles info in the Blu-ray title will be shown clearly, including language and stream ID, so you can select your needed language as subtitles to be preserved in the generated MP4 files for Nexus 10 playback freely.
Plus, Pavtube Blu-ray to Nexus 10 Ripper for Mac also offers an option called “Forced Subtitles”. When you check “Forced Subtitles”, you will see subtitles only when actors are speaking another language that is not your mother tongue. For instance, if you specify English (your mother tongue) as your subtitles, and meanwhile tick off “Forced Subtitles” option, then when actors are speaking English, no subtitles will show up, but when they are talking with each other in French, the English subtitles will appear accompanying with the French.
2) Select audio track
Click the pull down menu of “Audio”, and then the pop-up list will give you the detailed information of audio tracks, including language, audio codec, and stream ID. TrueHD audio and DTS-Master Audio are both supported.

 Free Trial Blu-ray Ripper for Mac

Useful Tips
- How can I Play Flash Video (FLV, F4V) on Kindle Fire HD?
- Connect Kindle Fire HD to Computer (Windows/Mac) for Files Transfer
- Enable Surface RT & Pro Tablet to Play MKV/AVI/MPG/TiVo/VOB Files Effortlessly
- How to Play VOB on Kindle Fire without any Hassle ?
- Enable Microsoft Surface RT/Pro Tablet to Play Flash FLV/F4V Videos
- Samsung Galaxy Tab AVI – put and play AVI on Galaxy Tab


