
 Home
HomeSolution 1: Copy BD/DVD disc to hard drive in .m2ts, .vob, or other formats
Solution 2: perfect 1:1 copy with lossless quality
Solution 3: Burn Blu-ray movie from disc to disc
Solution 4: Burn a Blu-ray from a file on computer hard drive
Solution 1: Rip or copy an original Blu-ray or DVD disc to computer hard drive while maintaining the original .m2ts or .vob format or using a variety of other formats
Required software: Pavtube Blu-ray Ripper
Pavtube Blu-ray Ripper comes with “Full Disc Copy” function to allow users directly copying a Blu-ray or DVD movie to computer hard drive while keeping the original .m2ts or .vob format. More than that, it also offers a variety of other format presets, such as MKV, MP4, MOV, WMV, AVI, TS, FLV, etc. to meet your different requirements.
Part 1: Copy Blu-ray or DVD disc to computer hard drive in .m2ts or .vob format
Step 1: Run Pavtube Blu-ray Ripper, and click “BD/DVD Disc” icon to load your Blu-ray disc or DVD. Note that a built-in or an external BD drive is required for loading Blu-ray disc.
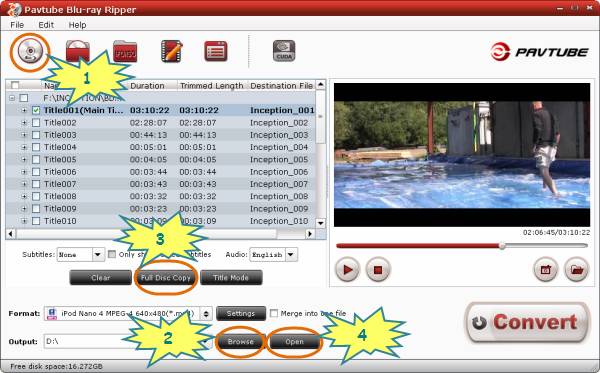
Step 2: Click “Browse” button to specify a destination folder for the output .m2ts/.vob files.
Step 3: Click “Full Disc Copy” to start copying Blu-ray to .m2ts files, or copying DVD to .vob file. Factually, “Full Disc Copy” function preserves the entire structure of an original Blu-ray or DVD disc, so it contains the .m2ts or .vob streams.
Step 4: As soon as the copying task finished, you can click “Open” button to get the output .m2ts or .vob files with ease.
To get Blu-ray .m2ts files, just enter “BDMV” > “STREAM”:

To get DVD .vob files, just enter “VIEDO_TS” folder:

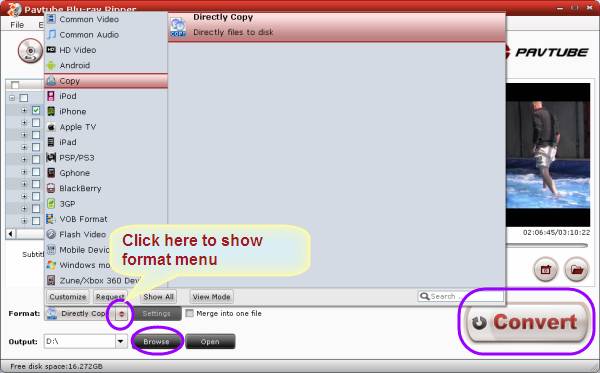
In case you just wanna do “Movie-only copy”, you can choose “Copy” > “Directly Copy” from the format menu to copy the .m2ts or .vob files only. After that, do remember clicking “Convert” button to do “Movie-only copy”. When the copying work is done, you are able to click “Open” button to get the output .m2ts or .vob files without any other extra contents.
Part 2: Rip Blu-ray or DVD disc to a variety of other formats
Step 1: Run Pavtube Blu-ray Ripper, and click “BD/DVD Disc” icon to load your Blu-ray or DVD disc.
Step 2: Select output format from format menu.
Pavtube Blu-ray DVD Ripper features numerous format presets, including SD video, HD video, as well as video formats specialized for certain devices, such as iPad, iPhone, PS3, Android phones, etc. You can freely select any one of them to fit your different end uses.
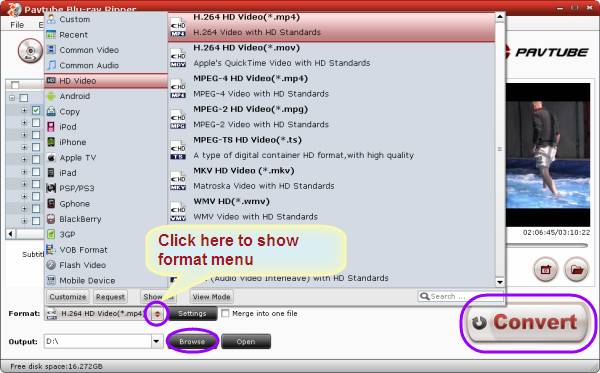
Step 3: Click “Browse” button to specify a storage path for the converted files.
Step 4: Click the big button “Convert” to start Blu-ray or DVD ripping.
When the ripping task is completed, simply click “Open” button to get the converted files.
Solution 2: Backup a Blu-ray or DVD disc to MKV container with all audio tracks and subtitles streams preserved (perfect 1:1 copy with lossless quality)
The Pavtube ByteCopy software is developed for Blu-ray and DVD movie collectors to protect their collections by decrypting and backing up Blu-ray and DVD Disc to MKV container with all subtitles and audio tracks included. To save your time and efforts, lossless Blu-ray to MKV backup is shorted into 2 simple steps.
You may download a trial version of Pavtube ByteCopy and follow the short guide below to backup Blu-ray or DVD Disc to MKV with flawless quality.
Step 1: Run Pavtube ByteCopy, and click “DVD/BD Disc” icon to import movie files from copy-protected DVD/Blu-ray Disc.
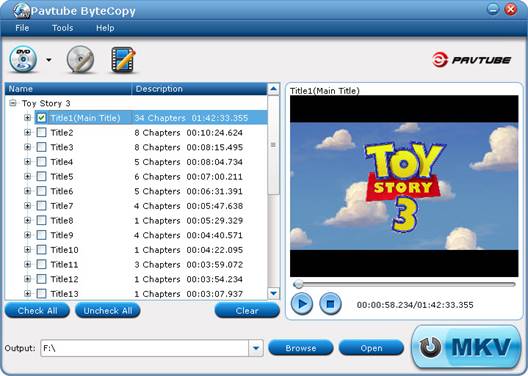
Note that when loaded a Blu-ray disc, only the main title (main movie) is checked by default, while loaded a DVD disc, nothing is checked by default, so you need make sure you have ticked off all the files you want to backup before copying.
Step 2: Click the “Convert MKV” button to start backing up Blu-ray/DVD movie to MKV files with all audio tracks and subtitles included.
In this way Pavtube ByteCopy extracts the movie title you checked with all subtitles and audio tracks from disc and packages the contents into MKV container without transcoding, which means you get perfect 1:1 copy with lossless quality in MKV format. After the copying task finished, you may click “Browse Export Path” to find generated MKV files with ease.
Solution 3: Burn Blu-ray movie from disc to disc
ImgBurn (freeware)
Copy Blu-ray directory to the hard drive of your PC
Step 1: Insert the disc your want to copy into your BD drive (a built-in or an external BD drive is necessary for copying a Blu-ray disc). Then launch Pavtube Blu-ray Ripper and click “BD disc” icon to load the Blu-ray movie from your BD drive.
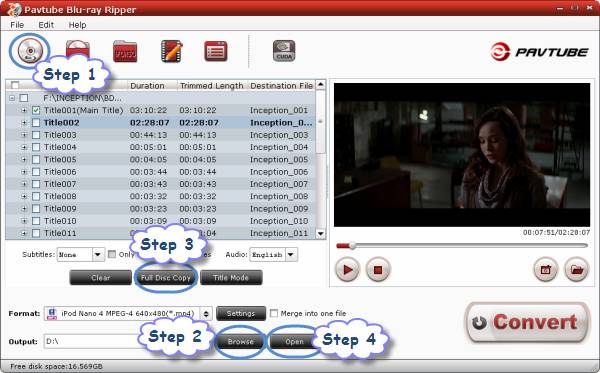
Step 2: Click “Browse” button to specify a destination folder for the output files. Please make sure you have enough spaces on your PC.
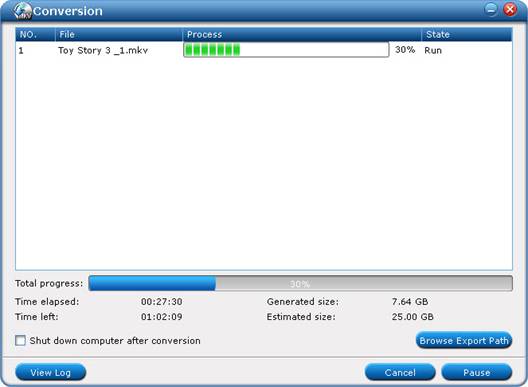
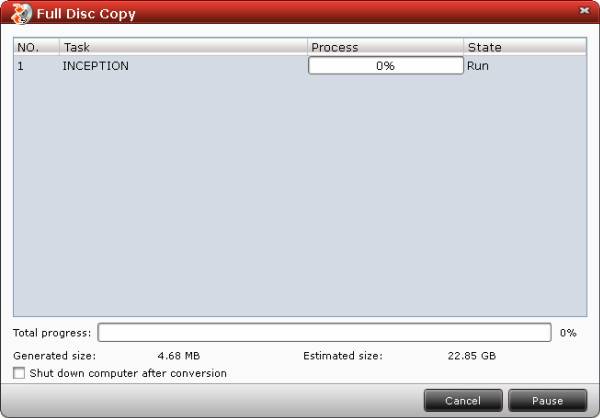
Step 3: Click “Full Disc Copy” button to start backing up the Blu-ray disc to the hard drive of your PC. The following “Full Disc Copy” window shows you the copying progress clearly, including generated size and estimated size. Basically, the whole contents of the disc, including the main movie, commentary, sidelights, trailer, etc, will be copied to PC within an hour.
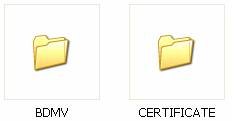
Step 4: When the copying process completed, click “Open” button to get the generated Blu-ray directory. The output directory contains two folders, “BDMV” and “CERTIFICATE”, which are ready for Blu-ray burning.
Burning the contents to Blu-ray disc
A Blu-ray burner, a BD-R (Blu-ray Disc Recordable) or a BD-RE (Rewritable) disc are required for burning. Make sure the disc has enough space for saving the whole contents.
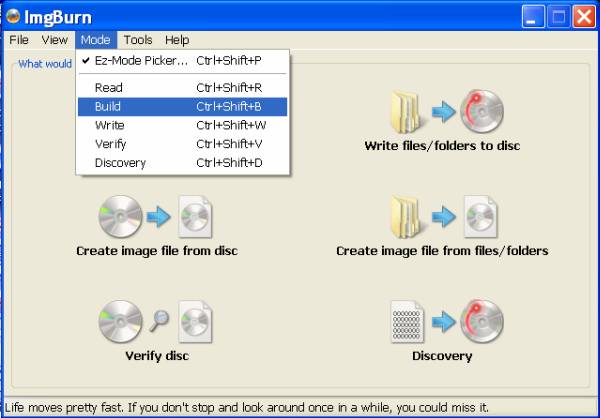
Step 1: Open ImgBurn in Build Mode - click on the Mode drop down menu and select Build mode.
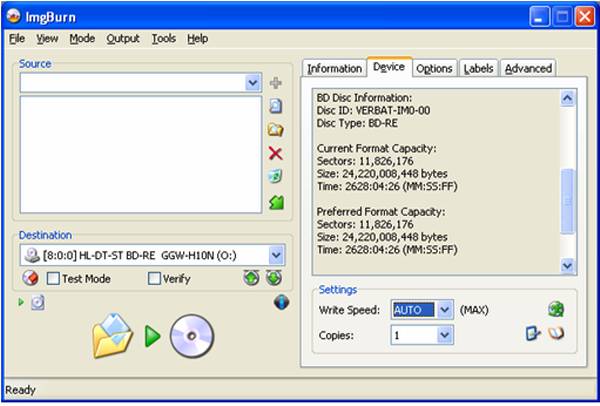
On the “Device” tab, you can see useful Disc Information like “Disc ID”, “Disc Type”, “Size”, etc. ( See screenshot as shown)
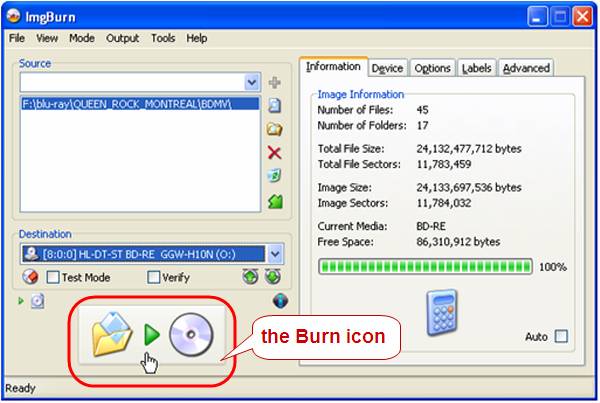
Step 2: Add “BDMV” folder (simply drag and drop) created by Pavtube Blu-ray Ripper into the program. The latest ImgBurn will automatically create a CERTIFICATE folder so that you will only need to add a BDMV folder to the burning project. When “BDMV” folder is loaded, you can click the “Burn” icon to start blu-ray burning. Note that once you clicked “Burn” icon, three prompt windows would pop up one by one, just click “Yes”, “Yes” and “OK” button to confirm each of them.
Step 3: Blu-ray burning
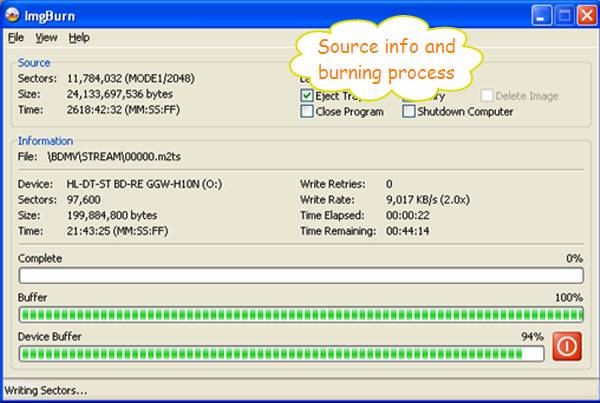
As soon as “Step 2” is done, the Blu-ray burning process is starting off immediately. IMGBurn will display a burning window as below:
When the burning process is completed, you can check your BD-R or BD-RE disc to see if the Blu-ray movie files are correctly on the disc. If no problems, you can then use a standard Blu-ray player or your PS3 console to enjoy the Blu-ray movie with the newly burned disc freely. Enjoy!
Solution 4: Burn a Blu-ray from a file on computer hard drive
TsMuxeR (Freeware)
ImgBurn (freeware)
First off, let’s have a brief understanding of TsMuxer supported codecs and formats. If your video files are not in the following category, you may need a Video Converter tool to do format conversion in advance.
Supported videocodecs:
* H.264
* Microsoft VC-1;
* MPEG-2.
Supported audiocodecs:
* AAC;
* AC3 / E-AC3 (DD+);
* Dolby True HD (for streams with AC3 core only);
* DTS/ DTS-HD;
* LPCM.
Supported subtitle types:
* M2TS Presentation graphic stream.
* SRT text subtitles
Supported containers and formats:
* Elementary stream;
* Transport stream TS and M2TS;
* Program stream EVO/VOB/MPG;
* Matroska MKV/MKA;
* MP4/MOV
Part 1: Use tsMuxeR to author a Blu-ray disc
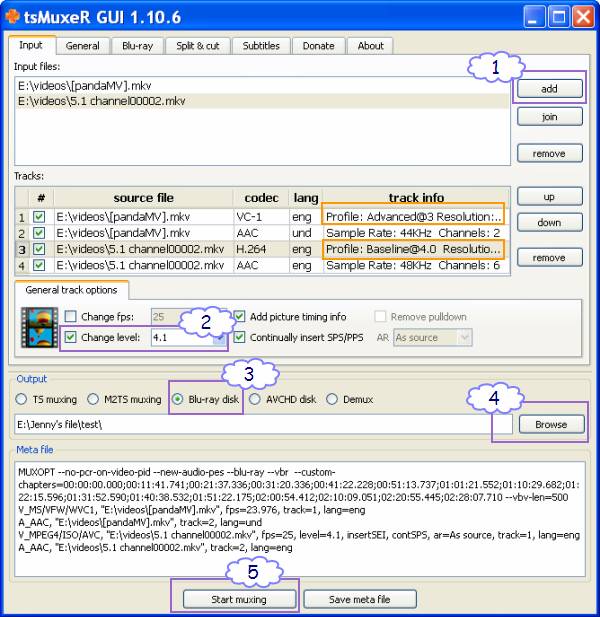
Perform the following steps:
Step 1: Open a video file using the “Add” button
Step 2: Observe the track info for AVC profile information. If it shows a value higher than 4.1, then use the “Change level” function to adjust it down to 4.1
Step 3: Choose “Blu-ray disk” as Output
Step 4: Click “Browse” button to choose location path for the output file
Step 5: Click “Start muxing” to begin
When Blu-ray authoring task is done, click “Browse” button to get the output files. You will see a Blu-ray structure folder as below, which is ready for Blu-ray burning.

Part 2: Burning the contents to Blu-ray disc with ImgBurn
This part is the same as Solution 3, so just go back to check it.
Hope the above complete Blu-ray/DVD Backup Solutions would be of some help for you.
 Free Trial Blu-ray Ripper

Useful Tips
- How to make full copy of blu-ray disc in fastest and easiest way?
- The best Blu-ray backup method: Blu-ray to M2TS or Blu-ray to MKV?
- Complete lossless Blu-ray to MKV backup in 2 steps
- How to Make a DVD Photo Slideshow with Transitions and Music on Mac
- How to copy Blu-ray movies to Synology DS411slim NAS Server
- Keep both English and French audio tracks for ripping Blu-ray to MKV


