
 Home
HomeNVIDIA's ShadowPlay offers easy gameplay recording, live streaming, and even an FPS counter overlay. ShadowPlay makes it a lot easier for youtubers to capture footage of PC games. Shadowplay uses the H.264 codec for video and the AAC codec for Audio; it stores the video and audio streams in a MP4 container. Generally, Shadowplay's H.264 MP4 should be able to imported into Premiere Pro (CC, CS6, CS5, CS4) for editing but the truth is that many guys can't import and edit their Shadowplay video in Premiere Pro.
The user reported that when they import Shadowplay video to Premiere Pro, their Premiere Pro fails to handle the audio well, throwing it way out of sync. Adobe Premiere Pro doesn’t handle ShadowPlay’s export video well at all, and the reason boils down to variable framerates. ShadowPlay produces a variable frame rate export. Premiere does not like variable frame rate footage though that usually manifests itself as not being able to play at all.
Solutions to Fix Shadowplay video Out of Sync in Premiere Pro (CC, CS6, CS5, CS4)
The common way to fix this issue is to convert set Shadowplay to constant framerate. But recently, Adobe itself fix this in this latest Promiere Pro. On a high-end computer, the video audio out of sync issue can be avoided in the latest Premiere Pro. So if you can't edit ShadowPlay video in Premiere Pro, try to update it. Not guaranteed to fix problem but removes a suspect.
Then, if it fails, you can try tosimply re-encode ShadowPlay video to a constant framerate file with Pavtube Video Converter for Mac. This top-notch video converter can convert ShadowPlay video to a constant framerate keeping H.264 video codec, AAC audio codec and MP4 container for Premiere Pro (CC, CS6, CS5, CS4). It also can transcode ShadowPlay video to MPEG-2, DV AVI and other Premiere Pro compatible formats. You can configure the video and audio encoder codec, video frame rate, video bitrate, video resolution, audio channel, audio sample rate, audio bitrate to make your output video most compatible with PrPro.
Besides Shadowplay, it also can convert OBS video, Action! recording, Bandicam recording, XSplit Gamecaster recording, D3DGear recording, Dxtory files, Fraps files, WM Capture files, Tivo recordings, Use Windows 10 Game Bar files to Premiere Pro CC, Pro CS6, Pro CS5, Pro CS4, etc. Pavtube Video Converter for Mac is designed for Mac users. For Windows users, please use Pavtube Video Converter. Now download the right version below to start to convert ShadowPlay recordings to Premiere Pro 2017, CC, CS6, CS5, CS4.


Getting Started to Convert Shadowplay video to Premiere Pro (CC, CS6, CS5, CS4)
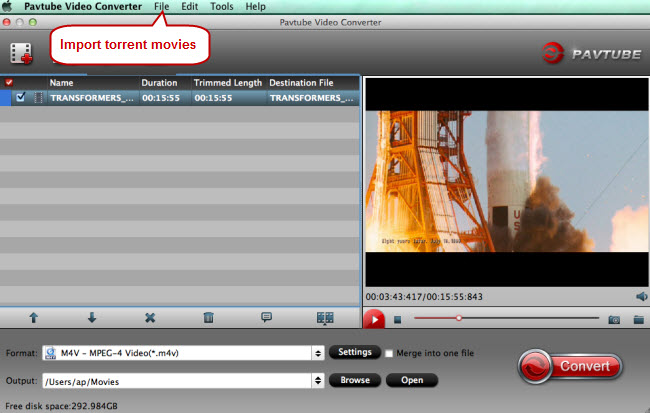
Step 1: Load Shadowplay video files
Install and launch Pavtube Shadowplay to Premiere Pro Video Converter on your Mac and load source Shadowplay MP4 clips to it. You can import ShadowPlay clips to the program through "Add Video" button or "Add from folder" button. "Drag-and-Drop" feature and batch conversion is also supported.
If you use Tivo to record video and want to convert Tivo files for editing in Premiere Pro, you need to open "Option" window and switch to "Tivo' to enter Media Access Key by logging into your Tivo account at Tivo and clicking the "Media Access Key" link on the right side of the screen.
Step 2: Choose Premiere Pro preferred format
Click “Format” pull down list to select Adobe Premiere/Sony Vegas> MPEG-2(*.mpg) as the best video format for Premiere Pro. WMV, MOV, MP4 formats are the good choice as well. You also can choose DV NTSC AVI video, or DV PAL AVI video in "DV" category for Premiere Pro.
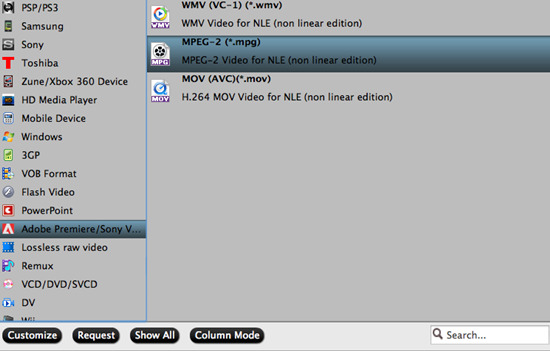
Tip - click Settings: You can adjust the video codec, size, frame rate, bit rate as well as the audio codec, bitrate, number of channels, sample size to make the output video totally compatible with your Premiere Pro CC, Pro CS6, Pro CS5, etc.
Step 3: Start converting Shadowplay to Premiere friendly video format
Click "Convert" button to start transcoding ShadowPlay video to MPEG-2 files for importing to Premiere Pro CS4/CS5/CS6/CC. When the conversion task is finished, click "Open" button to get the exported files.
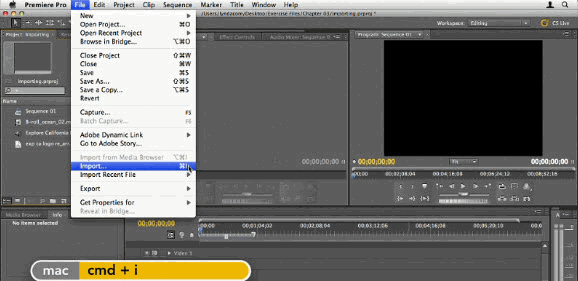
Import converted Shadowplay files into Premiere Pro
When you get converted Shadowplay files in output folder, ycan import the files to Premiere Pro. Launch Premiere Pro on your Mac, choose "File > Import to import any file. If you prefer to use keyboard shortcuts, press Command+I to open the standard Import dialog.
What Else Can Pavtube Video Converter for Mac Help You?
HEVC to Premiere Pro: Convert HEVC/H.265 video to make you edit H.265/HEVC in Premiere Pro CC/CS6/CS5/CS4.
H.264 to Premiere Pro: Make Premiere Pro CC/CS6/CS5/CS4 accept all H.264 codec video files.
DNxHD MXF to Premiere Pro: Convert DNxHD MXF video files to compatible with Premiere Pro CC/CS6/CS5/CS4.
XDCAM MXF to Premiere Pro: Enable people to import and edit XDCAM MXF files in Premiere Pro CC/CS6/CS5/CS4.
FLV/F4V to Premiere Pro - Teach you how to Re-encode or Rewrap FLV/F4V to Premiere Pro CC/CS6/CS5/CS4.
DivX/XviD to Premiere Pro - Re-encode DivX, XviD encoded AVI to Premiere Pro (CC, CS6, CS5, CS4) supported DV AVI.
M4V to Premiere Pro - Reformat M4V video to Premiere Pro (CC, CS6, CS5, CS4) for importing and editing.
AVI to Premiere Pro - Change DivX AVI, XviD AVI, AVC MPEG-4 AVI to Premiere Pro supported DV AVI or MPEG-2.
 Free Trial Video Converter for Mac

Useful Tips
- MOV to M4V: How to Convert MOV to M4V on Mac OS (macOS High Sierra Included)
- How to Play AVI Videos on MacBook(Air, Pro, iMac)?
- How to Import Android Videos to iMovie for Editing?
- How to Play a WMV File on Mac Computer
- Play H.265 Files with QuickTime Player on Mac
- Convert YouTube to MPG/MPEG with Easiest Way


