
 Home
HomeDivX & Xvid uses temporal compression which is not suitable for editing in Premiere Pro (CC, CS6, CS5, CS4). Using DivX/XviD files as source clips will cause you a lot of grief. Normally, if you want to edit Divx/Xvid in Premiere Pro (CC, CS6, CS5, CS4), there are two ways: 1. Convert DivX/XviD to “uncompressed AVI” or “DV AVI” before importing them into Premiere Pro; 2. Install divx and xvid codecs.
In the latter way, there are CODEC's that are basically used to play a file, and then those that play, plus allow editing in Premiere Pro. DivX and Xvid, are in the former group. Some have gotten very lucky, once the CODEC is installed, they can edit the DivX/XviD source in Premiere Pro CC/CS6/CS5/CS4/CS3. But usually one looses either the Video, or the Audio. In some cases, where it worked, OS issues were almost always present.
Therefore, the former way is recommended which converting DivX/XviD to DV AVI for Premiere Pro (CC, CS6, CS5, CS4). You can Google for DivX/XviD converters. Or you can use the suggested Pavtube Video Converter for Mac.
Why Choose Pavtube Video Converter for Mac to Convert DivX/XviD to Premiere Pro?
Pavtube Video Converter for Mac can convert DivX/XviD video to DV AVI, MPEG-2, MOV, MP4, ProRes for Premiere Pro (CC, CS6, CS5, CS4). Of course, this DivX/XviD converted files also can be used in FCP X/6/7, iMovie, Sony Vegas and other NLE software. Besides DivX/XviD video, Pavtube Video Converter for Mac also can convert H.264, TS, VRO, M2T, H.265, MKV, AVCHD, XAVC, M4V, MXF, M2TS, TS, AVI to Premiere Pro (CC, CS6, CS5, CS4) supported video and audio with compatible codec.
In addition, Pavtube Video Converter for Mac not only can change PrPro unsupported video/audio to the supported one, it also can only adjust video/audio codec, bitrate, frame rate, resolution, frame rate to get more compatible video and audio for Premiere Pro. Before output the right format video, you also can do some simple editing with the built-in video editor. You can trim a video length. crop the unwanted black area, flip/rotate video, add subtitles, remove/replace audio in video, etc.
For Windows users, please use Pavtube Video Converter. Now download the right version below to start to convert DivX/XviD to Premiere Pro CC, CS6, CS5, CS4.


Getting Started to Convert DivX/XviD to Premiere Pro (CC, CS6, CS5, CS4)
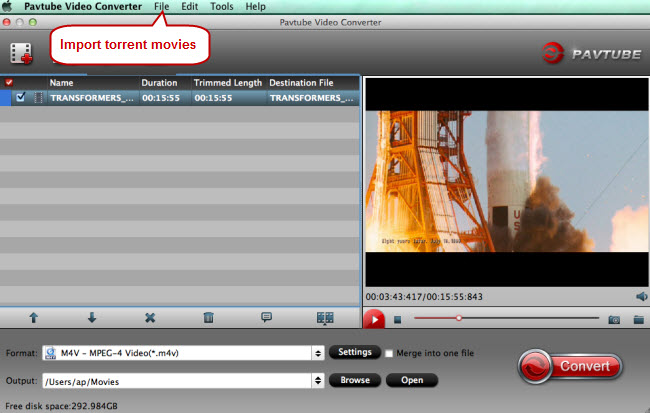
Step 1: Import DivX/XviD clips
Download DivX/XviD to Premiere Converter for Mac and load source DivX , XviD files to it. You can load multiple DivX/XviD files at a time cause this video converter supports batch conversion. If you like, check the “Merge into one” box to join DivX/XviD clips together.
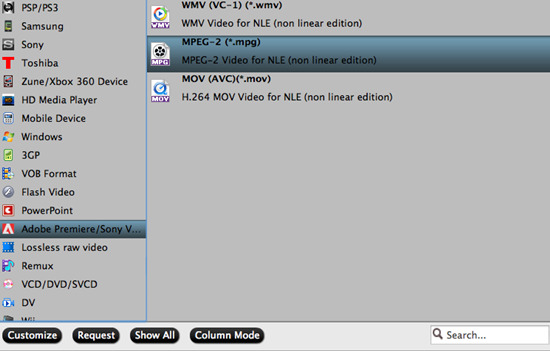
Step 2: Choose Premiere Pro preferred format
Click “Format” pull down list to select Adobe Premiere/Sony Vegas> MPEG-2(*.mpg) as the best video format for Premiere Pro. WMV, MOV, MP4 formats are the good choice as well. You also can choose DV NTSC AVI video, or DV PAL AVI video in "DV" category. You can click Settings to adjust video and audio parameters to get the best quality video for Premiere Pro.
Step 3: Start DivX/XviD to Premiere Pro conversion
Click “Convert” button to start converting DivX/XviD to MPEG-2(.mpg) for Adobe Premiere Pro on Mac OS X. When the DivX/XviD to Adobe Premiere Pro conversion task is finished, click “Open” button to get the exported files for transferring to Premiere Pro with easy playback or editing.
Note: Just import DJI Phantom 4K video, MXF, DJI Osmo 4K in the step 1, then you can convert these video files to DV AVI, MPEG-2, Prores for Premiere Pro CC, CS6, CS5, CS4, etc.
How to Export Premiere Pro to XviD, DivX
The first way to export DivX/XviD from Premiere Pro is to export your Premiere Pro project to an “uncompressed AVI” or “DV AVI” file and then use other software to encode to DivX. Pavtube Video Converter can easily convert videos to DivX/XviD.
Another possibility is to install Frameserver plugin (Debugmode Frameserver) and frameserve to another program, such as VirtualDub. One would File->Export->Movie and choose Frameserve as output format. This approach saves disk space (no need for an extra large file).
Here is step-by-step guide provided by Uri L Blumenthal:
You install "Debug Frameserver" plugin. See DebugMode Web site
When you export to movie, you select Frameserver as video type, set whatever else you need (but not the video compression yet!), and click OK (or whatever - try it and you'll see).
It will prompt you for a file name - you give it a new (temporary) file name (it will not take much space on disk anyway). A dialog pops up, with the option to "Stop Serving".
You start VirtualDub (installed from VirtualDub Web site), and do "Open Video File" opening the file you've created during the previous step of this instruction (32 bit VirtualDub needed!)
You go to Video->Compression and set it to DivX, Xvid or whatever you want.
You go to Video and set "Recompress" (Fast or Normal, I usually use Normal) or "Full Processing mode" (if you ned to change other parameters of the video, not just compression codec).
Set whatever else you need (reading the manuals and FAQs helps).
You do File->Save as AVI, and pick a new file name where you want the resulting encoded video to be.
 Free Trial Video Converter for Mac

Useful Tips
- MOV to M4V: How to Convert MOV to M4V on Mac OS (macOS High Sierra Included)
- How to Play AVI Videos on MacBook(Air, Pro, iMac)?
- How to Import Android Videos to iMovie for Editing?
- How to Play a WMV File on Mac Computer
- Play H.265 Files with QuickTime Player on Mac
- Convert YouTube to MPG/MPEG with Easiest Way


