
 Home
Home"I have tried 3 times to convert my TiVo program to play on my dvd player (Toshiba) with no results. The dvd will play on my computer beautifully but not on my dvd player so I can see it on my TV. Please help as I would like to purchase this."
Like many other consumer electronics companies, TiVo observes various forms of copy protection as required by several industry authorities. To make TiVo recordings available for playback on multiple devices you need a TiVo protection removal converter which is capable of getting rid of TiVo copy protection and convert it to Toshiba DVD Player acceptable format like DVD MPEG-2.
After googling the keyword "TiVo to DVD", Pavtube Tivo Converter pops up and it fulfills both requirements, TiVo copy protection free and output optimized video files for Toshiba DVD Player.
For transferring TiVo recordings to NAS device for playing through Roku or WD TV Live, just refer to: How to put TiVo to NAS device for playing through Roku or WD TV Live?
Before start conversion process, you need transfer TiVo recordings to local PC.
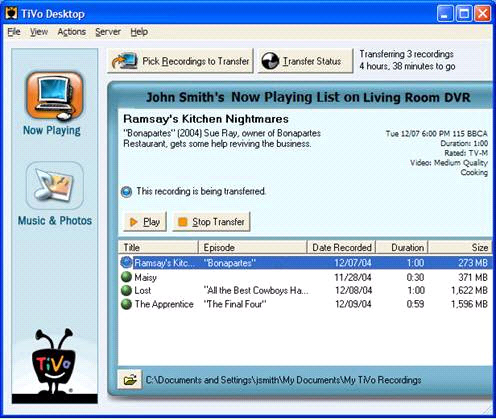
Transferring TiVo recordings to PC is easy and straight-forward. All you need is a freeware by TiVo--- the TiVo Desktop (download the latest version v2.8.3). Connect the TiVo box with your home network, and run TiVo Desktop. Click on "Pick Recordings to Transfer". Check the box next to the title of the show (or shows) you want to transfer and click on "Start Transfer". Transfer times vary, but may be as long as the show"s duration to complete the transfer.
Preparations are done and you can start TiVo to DVD conversion process.
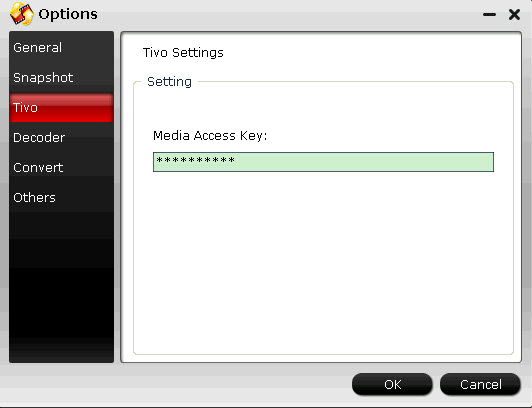
1. Input Media Access Key.
Launch Pavtube Video Converter, Click on the "Option" button, switch to TiVo tab, and enter your Media Access Key. Click "OK" to confirm.
2. Import TiVo files for copying TiVo to Toshiba DVD Player.
Now click "Add" to import all .tivo files, or you may drag and drop the *.tivo files to the window of Pavtube TiVo to DVD Converter.
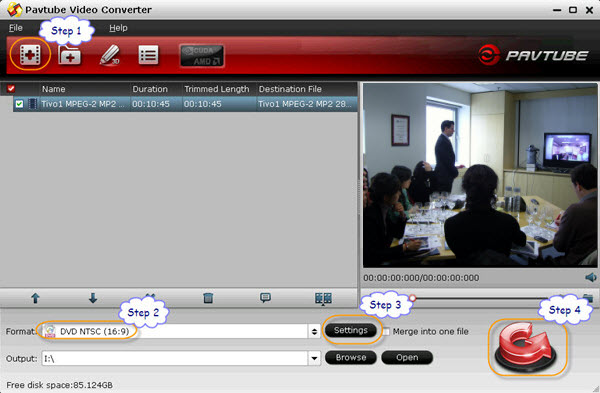
3. Select an output format for burning TiVo recordings to DVD playing on Toshiba Player.
Click on the pull down menu of "Format" to select output format. I used to select "CVD/DVDSVCD -> DVD NTSC (16:9) MPEG-2", and then click "Settings" button to adjust audio and video parameters. The following picture shows detailed settings:
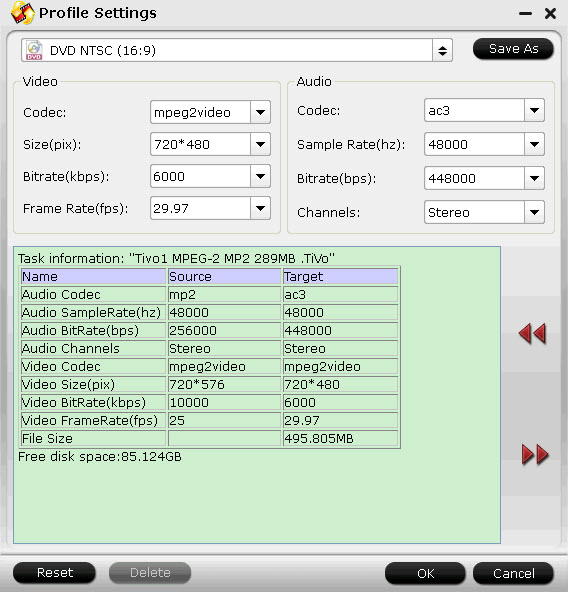
You may choose profile "DVD NTSC (4:3)" or "DVD PAL (4:3)" or just change the video "Size" to 720*576 provided that your source video is 4:3 and you don"t want outstretched image. If you"d like to keep Dolby Digital 5.1 sound, you got to change the Audio Codec to "ac3" and Channels to "5.1 Channels". Other optional formats are *.asf, *.avi, *.wmv. The TiVo to DVD Converter displays the estimated file size and other information in the textbox. If you find the file size very huge, just set a smaller value in Video Bitrate box.
4. Start converting TiVo for burning DVD.
Click "Convert" button and the TiVo Converter will generate videos that are compatible with Toshiba DVD Player. After conversion you can click the "Open" button next to output path to find converted recordings.
Additional tips - edit the TiVo recordings to keep proper length and size.
Pavtube TiVo to DVD Converter helps edit your TiVo recordings to get rid of unwanted commercials, trim video clips, and cut off black edges.
I. Cut unwanted black edges
Switch to Crop tab to cut unwanted edges. You can crop the video by adjusting the crop frame (drag the green dotted green square frame to circle the part you want to retain) or setting values (Left, Top, Width and Height) of crop area.
II. Trim out bothering commercial ads
Under "Trim" tab you are allowed to cut out unwanted part of selected clip. To trim the video, simply type in desired time value in "Start" and "End" box and click "Set" button. Or you can click left square bracket and right square bracket to set start and end time when playing the video.
III. Pavtube Tivo Converter for Mac is available for Mac users.
 Free Trial Video Converter


