-
How to use Pavtube iMedia Converter for Mac?
The tutorial aims to give you a general idea about how to use Pavtube iMedia Converter for Mac before getting started. The iMdedia Converter for Mac is specially designed for Mac users to enjoy the videos, DVD and blu-ray movies on Mac and multiple mobile devices.
Basically, Pavtube iMedia Converter helps you to directly backup DVD and blu-ray movies from disc and folder to hard drive, rip DVD ISO image file to desired video and audio formats, convert HD footages such as MTS (M2TS, M2T), TOD, MOD and MOV files to desired formats for editing and playing back, convert DVR TiVo files to lossless MPEG files and other desired formats, and convert among other common videos such as flash videos, Quicktime videos, CD files, digital video files, Matroska files, etc. and extract audio tracks from the source discs and clips. Besides, the converter features editing facilities such as trimming, cropping, watermarking, flipping, etc.
To learn more information about this app, you may visit iMedia Converter for Mac or download the free trial of iMedia Converter and try it out. Please note that the trial version output video with a watermark on the screen and the Disk Copy option is restricted to use three times only.
Now let’s see how to use the powerful iMedia Converter for Mac.
1. Import source disc/ folder/ file
2. Preview and Snapshoot
3. Back up DVD and blu-ray disc
4. Set Output Settings
5. Edit video clips
I. Trim Video
II. Crop Video
III. Image/ Video Watermark
IV. Text Watermark
V. Set Effect
VI. Replace audio
6. Convert Movie
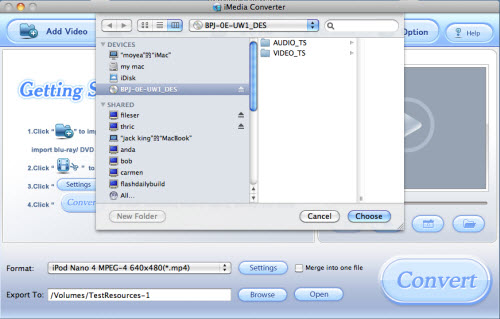
1. Import source disc/ folder/ file
Accepted sources includes blu-ray disc, blu-ray folder, DVD, DVD folder, DVD ISO image file, and Video clips. For ripping blu-ray disc you need to connect an external BD drive with your Mac. To add video files, please click ‘Add Video’ button and browse to source video files or drag and drop the files in the ‘Getting Started’ area. To load blu-ray disc, DVD, blu-ray folder, DVD folder, please click ‘DVD/ BD Folder’ and browse to the disc or directory. To import DVD image file, please click ‘IFO File’ and browse to the file you’d like to convert.
The file list is composed of five columns: Check box, Name, Duration, Trimmed Length, and Destination File.

Check Box: Click to check/ uncheck all files in the list.
Destination File: The name of the converted file. By default it is same with the original file. If you’d like to specify a different name for output file, double-click it in Destination File column and type in favorable name.
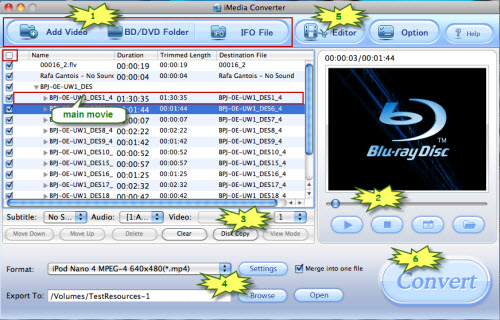
Common video files are listed for you to organize; the blu-ray or DVD movie shows up as a directory. Expand the directory and you will find all the chapters are in numerical sequence. You can convert the whole disc to movie collection or select single chapter for conversion.
For blu-ray movie, there are Title Mode and File Mode. By default the files are listed in Title Mode, all the chapters are in numerical sequence for you to check individually. For checking the subordinate chapters of certain sequence, please click its plus sign. Generally, ‘Title001’ contains the main movie, and other Titles are commentary, menus, titles and ads. By default all the Titles are selected for editing and ripping. If you want to rip the main movie and nothing more, do uncheck other sequences. If you would like to retain everything in the blu-ray disc, simply use the default settings. If you’d like to switch to file mode, please select the blu-ray movie directory and click ‘ViewMode’. And you can check and preview each individual segment. In File mode all the m2ts files in file list are checked by default. If you want to select but the main movie, a fast way is to right-click and choose ‘Uncheck All’ in shortcut menu and then check the main movie (longest m2ts file). Or simply check the small box in the title bar of the file list to check/ uncheck all.
When a blu-ray or DVD movie is loaded, you can find the Subtitle and Audio option under the file list are activated.

Subtitle: Click to view available subtitles of selected chapter and set desired subtitle from drop-down list. Note that some chapters have no subtitles at all. And you can specify subtitle of different languages for different chapters.
Audio: Click to view available audio tracks selected chapter and set desired audio from drop-down list.
2. Preview and Snapshoot
Double-click on a file to preview when you would like to preview it.
You are allowed to take snapshots when previewing the movie.
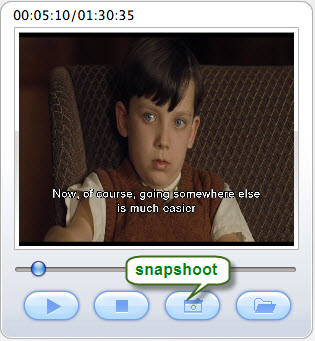
Simply click ‘Snapshoot’ button. To locate the thumbnails, please click ‘Open folder’ button. To set image format, location and size of thumbnails, please click ‘Option’ menu. In the preview window you can check the Subtitles and Audio track as well.
3. Back up DVD and blu-ray disc

iMedia Converter provides an easy and quick backup option for DVD and blu-ray disc. Protected DVDs and blu-ray discs can be cracked and copied bit-to-bit onto your hard drive in the shortest time by using ‘Disk Copy’ facility. The whole contents on the source disc will be copied to your hard drive, including the menus, titles, trailers, etc. Since the original DVD/ blu-ray structure is retained, you can burn a backup disc with the structure.
After the process completed, you may click ‘Open’ button to locate the DVD/ blu-ray directory. There should not be any quality degradation. To check the video streams, please open VIDEO_TS folder (from DVD directory) or BDMV-> STREAM folder (for blu-ray directory). The m2ts movie clips can be played with VLC player.
Finally note, blu-ray movie bites much space (generally 20Gb at least), and make sure there is enough space on your hard drive for blu-ray backing up.
4. Set Output Settings
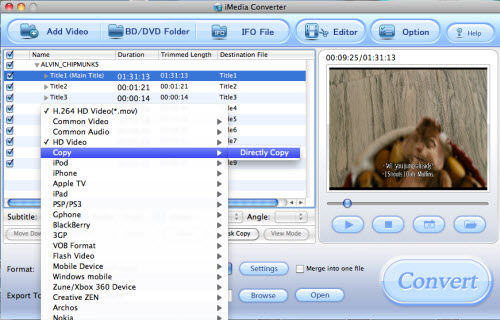
I. Set output format and location
The program allows you set the output file format and the saving position. Choose the output files format under the list of Format. If you only want to copy all the video streams in DVD or blu-ray disc, please select Copy-directly copy as output format.
Then click the browse button![]() to specify an output folder on your Mac.
to specify an output folder on your Mac.
II. Set advanced A/ V parameters
The button![]() is designed for the experienced users to do the advanced settings.
is designed for the experienced users to do the advanced settings.
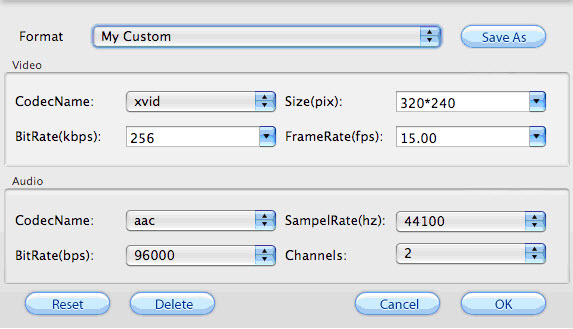
Save as: click to input the name when you want to rename this file, you can input whatever you want. After renamed the file, please click ‘OK’ to save. Then you could find this format under Custom group in profile list.
Video Section: You can set Codec Name, Bit Rate, Video Size, and Frame Rate to optimize the quality of the video.
Audio Section: You can set Codec Name, Bit Rate, Sample Rate, and Channels. Some formats have the option of 6 channels.
5. Edit video clips
You can click Editor button ![]() to customize the video before converting videos, DVD and blu-ray movie. Six tabs are available: Trim, Crop, Text Watermark, Image/Video Watermark, Effect, and Audio Replace.
to customize the video before converting videos, DVD and blu-ray movie. Six tabs are available: Trim, Crop, Text Watermark, Image/Video Watermark, Effect, and Audio Replace.

I. Trim Video
Pavtube iMedia Converter for Mac can record and convert exactly your favorite section of the video by trimming function.
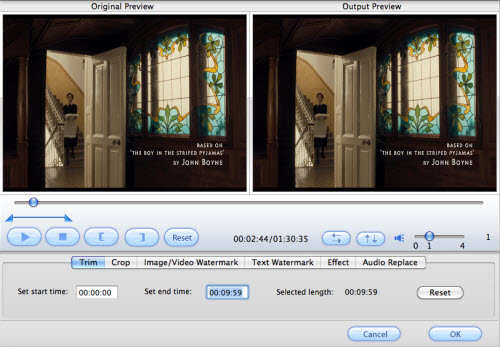
To trim a video, please follow any of the following methods:
- Drag the control strip (slider) to cover the segment you want to remain.
- When previewing the video, click the left square bracket
 to set start point, and click the right square bracket
  to set end point.
 - Input specific value in Set start time and Set end time.
II. Crop Video
Pavtube iMedia Converter helps you to get rid of the black edges and unwanted part by the cropping function.
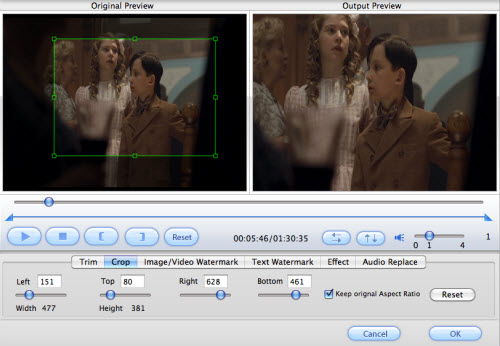
Follow either of the below methods to crop selected video:
a. Crop by dragging and dropping the crop frame
The cropping frame is a dashed line around the video. You can movie your mouse cursor onto an adjusting box and drag the dashed frame.
b. Crop by setting values
There are four crop values on the bottom of the crop window: Left, Top, Width and Height. You can inpput values to crop your video to be constricted in different area and size.
By checking Keep Original Aspect Ratio box, the output file will derive its aspect ratio from the parameter of cropped area. And this feature takes effect only when the aspect ratio of cropped part is inconsistent with the target profile settings. So, if you want to keep the cropped aspect ratio, you should not select ‘Original’ size when you set the parameter of output profile in ‘Settings’.
III. Image and video watermark
Pavtube iMedia Converter allows you to add image and video as watermark. Click ‘Image/Video Watermark’ tab when you’d like to set image or video watermark.
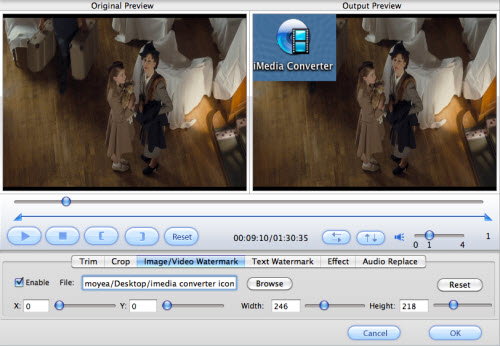
Find steps for adding Image/ Video Watermark below.
- Check option ‘Enable’ box.
- Click ‘Browse’ button to specify the image or video file you want to use.
- When the image/ video is added, set its position by dragging the slider bar of ‘X’ and ‘Y’ options and set its size by dragging the slider bar of ‘Width’ and ‘Height’ options. Or you may input specific numerical values into the ‘X’, Y’, ‘Width’ and ‘Height’ fields to set the position and size.
IV. Text watermark
You may also add text watermark to selected video. Please switch to ‘Text Watermark’ tab if you would like to add text watermark.

Find steps for adding Image/ Video Watermark below.
- Check option ‘Enable’ box.
- Type in text you want to use as watermark in Text area.
- Select the text content by using composite key ‘Command+A’. Then click ‘Fonts’ button to set the font of the text and ‘Color’ button to set the color of the text.
- Set the position of text by dragging the slider bar of ‘X’ and ‘Y’ or enter specific numerical values into ‘X’ and ‘Y’ fields.
V. Set Effect
The ‘Effect’ facility helps you to customize the output effect. You can switch to ‘Effect’ tab to adjust the Brightness, Contrast and Saturation of selected clip.
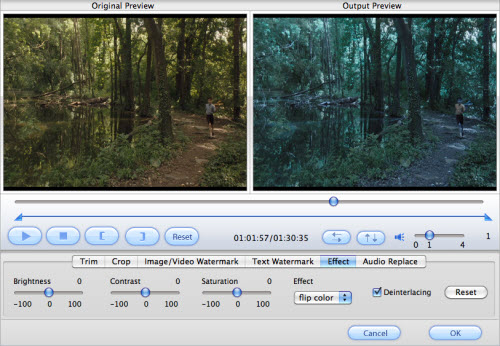
Deinterlacing: Check this box to eliminate the interlacing lines (strips) to make a better image. It works well with interlaced DVD movies and HD footages.
Effect: Choose a special effect from the Effect drop-down list for the video. Available choices includes Simple gauss blur, Simple laplacian sharpen, Aged film, Flip color, Invert and None.
VI. Audio Replace
The ‘Audio Replace’ option enables you to add audio to target video file so that you can replace the original audio track with favorite melody.
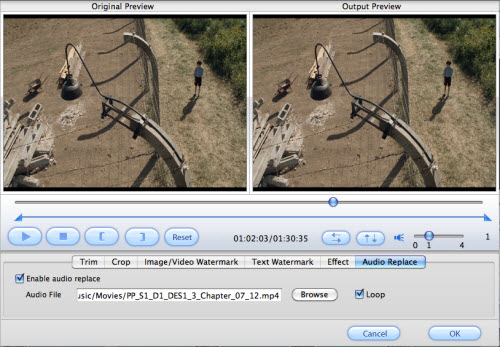
Find steps for replacing audio below.
- Check the box of ‘Enable audio replace’.
- Click ‘Browse’ button and select the audio file you’d like to add.
- If the audio is not as long as the video file, you may check ‘Loop’ to make it repeat again and again to fit for the video.
6. Convert Movie
After every thing necessary was selected, you can click the convert button 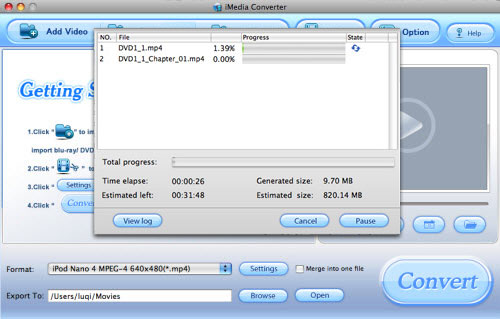 to start the conversion. Soon you will see the window below:
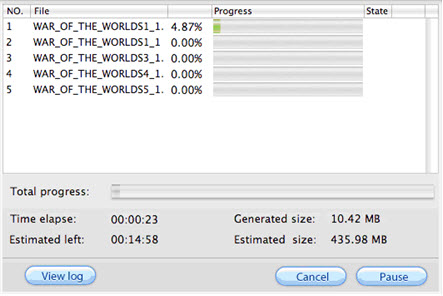
The app displays the progress information, including Time elapse, Generated size, Estimated leaving time, and Estimated size. You can suspend or cancel the conversion at half way. The consuming time is up to the size of generated file. When ripping blu-ray disc, it cost much longer than standard DVD.
Guide
- Convert MOD to MPEG
- Convert MOD to MP4
- Convert MOD to WMV
- Convert MOD to WAV
- Convert MOD to AVI
- Convert AVCHD to AVI
- Convert AVCHD to iPod
- Convert AVCHD to SD
- Convert AVCHD Video
- Blu-Ray to 3GP
- Blu-Ray to Blackberry
- Blu-Ray to DVD
- Blu-Ray to iPod Nano
- Blu-Ray to iPod Touch
- Copy Blu Ray to Hard Disk
- DVD to Apple TV
- DVD to AVI
- DVD to Blackberry
- Convert M2TS to HD MP4
- MTS/M2TS to Apple TV
- MTS/M2TS to iPhone
- MTS/M2TS to iPod
- Blu-Ray to Divx
- Blu Ray to Xvid AVI
- Capture Blu-Ray Screenshot
- Extract MP3, WMA from Blu-Ray
- Rip Blu-Ray to audio
- Rip Blu-Ray to PC