
 Home
HomeMany users who use some latest H.265 cameras like Samsung NX 1 would complain that "My attempts at uploading H.265 videos to YouTube fail during processing." Some users even said "There is no such thing as h.265/HEVC won't be processed till YouTube can decide to support it." It is obvious that upload H.265/HEVC movies to YouTube or Vimeo may cause some issues, however, in the following page, we are going to provide you some efficient methods of encoding and decoding H.265/HEVC videos. Let's take a close reference below.
But if there is some tool which can transcode H.265 into the format that YouTube and Vimeo can recognize while maintain the quality? Here we suggest this Pavtube Video Converter for Windows/Mac (best 10 H.265 Converter Review) can decode this H.265/HEVC video into the proper format that those two websites support. Not mention about the build-in editor will allow you do the pre-editing before conversion.
(To learn the YouTube and Vimeo support formats)


How to Upload H.265/HEVC videos to YouTube or Vimeo while not quality drop?
Step 1. Install and run this H.265/HEVC Converter on your PC
Free download the Video Converter and have a quick installation. The trial version will have a "Pavtube" on your converted files, expect for that, there are no time limitation, no virus, no unnecessary bundle apps.
After that , you can click "File">"Add Video/Audio" to load your H.265/HEVC files. Or "Add from folder" will also allow you to load your files if there are all in one folder.

Step 2. Choose the proper format that YouTube and Vimeo support
After checking the YouTube and Vimeo website, we know that both of them can support H.264/MP4 format. We can go to the format bar to choose "HD Video">"H.264 HD Video (*.mp4)" as your output format.

Tips:
All the format encoded by H.264 will output as H.264 high profile.
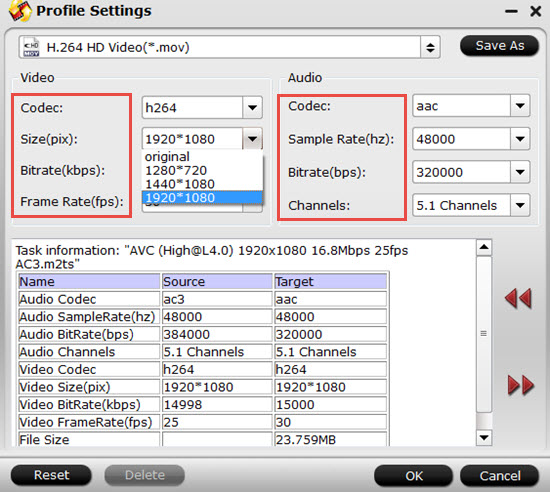
Step 3. Adjust video and audio parameters if you want
After choosing the proper format, then click "Settings" beside the "Format" bar. It will bring you to this UI that you can adjust your parameters. For uploading , you can down-size your files to 1280*720 to speed up your uploading progress.
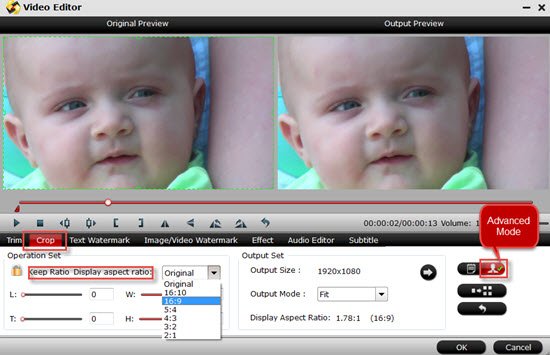
Step 4. Using build-in editor to pre-editing your videos before uploading (optional)
If you want to do some simple edits before conversion, you can click this "Pencil" icon or "Edit" to go into this interface. In this UI , you can adjust "Aspect ratio " to fit the playing screen better.
Step 5. Start to convert H.265/HEVC into MP4 format for YouTube and Vimeo
After setting the file location, click this "Convert" to start your conversion. If you forget to set the location, don't worry, just click this "Open output folder", then your files will appear in the default location. Now after the conversion, you will have the HD while compatible files which can allow you upload them without any problem.
Additional Tips:
1.For some users, they may not very familiar with H.265/HEVC codec, you can learn more in here.
2. How to upload videos to YouTube by different ways for new users.
 Free Trial Video Converter


