
 Home
HomeThere is no native Blu-ray playback support under Mac OS because of the disk protection of AACS and BD+ DRM libraries. The lack of the ability of playing Blu-ray movies on Mac has been annoying for Mac users who expect to enjoy themselves with their Blu-ray collection. How to make Blu-ray movie playback available on Mac? Here is an article that guides you step-by-step to watch Blu-ray movies on Mac with the help of VLC Media Player.
Essential tools:
Pavtube ByteCopy for Mac
An external BD drive for Mac OS
VLC Media Player
Part 1. Lossless backup/rip Blu-ray Disc to MKV with Pavtube ByteCopy for Mac
1. Load Blu-ray Disc from disc driver.
Download a free Pavtube ByteCopy on your Mac PC, install and launch it. Click “Load Disc” icon to successfully import Blu-ray Disc.
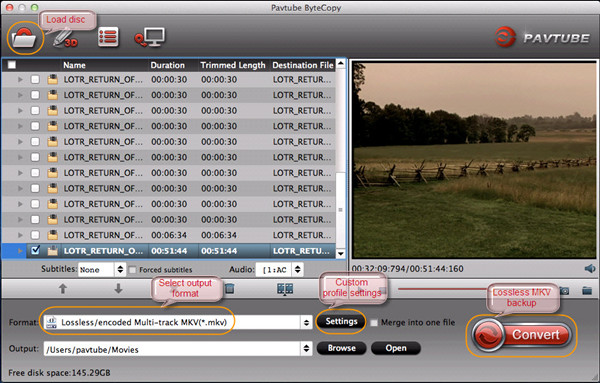
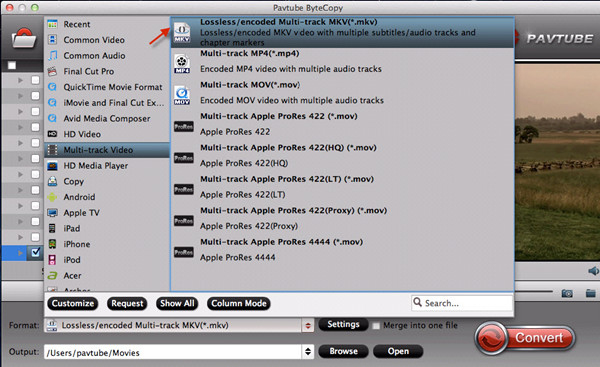
2. Select output format and custom profile presets (optional).
From “Format” tab to choose optimized profile presets. Pavtube ByteCopy for Mac is capable of backing up and ripping Blu-ray/DVD Disc to MKV with lossless quality as well as original disc structure saved in output MKV file with multiple audio streams, subtitle tracks and chapter info. You are suggested to select “Multi-track Video > Multi-track MKV” for output this time.
NOTE: To remove unwanted subtitle and audio track, you can enter “Settings” tab, unclick the audio stream(s) or subtitle track(s) and save your settings.
3. Start Blu-ray to MKV lossless backup.
On ByteCopy GUI, click the big “Convert” button and after about 30 minutes, Blu-ray to MKV conversion would complete, access output file path and locate the generated MKV movie.
Part 2. Play/watch Blu-ray MKV movie in VLC with selected audio/subtitle track
1. Add MKV file into VLC media player.
Install and run VLC player, locate the MKV file created by Pavtube Mac ByteCopy, drag & drop it into VLC.
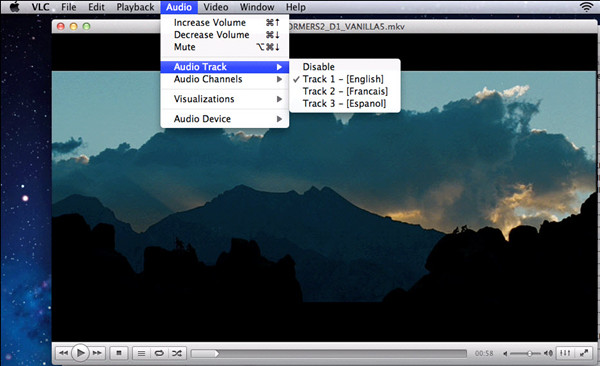
2. Select desired audio and subtitle track for movie watching.
Play the generated MKV movie in VLC player and during the playback, click “Audio > Audio Track” to select your wanted audio track.
Then follow “Video > Subtitles Track” to choose your desired subtitles as for movie playback.
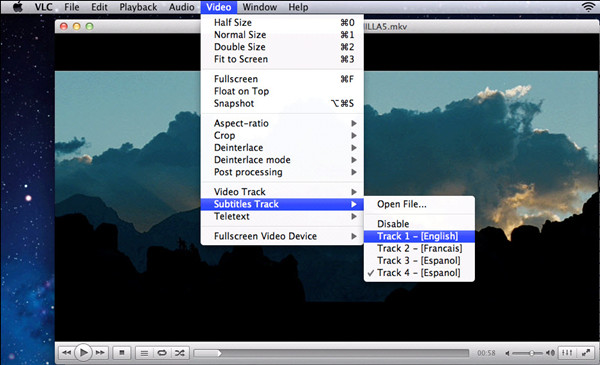
After above settings, you are able to watch and enjoy Blu-ray movies in VLC Media Player on Mac with your desired audio and subtitle track.
For users who are running a Windows PC and expect to play your Blu-ray movies on computer using VLC, you could check how to play ripped Blu-ray movies in VLC Media Player by chapters.
See more MKV playback solutions
 Free Trial ByteCopy for Mac

Useful Tips
- How to Play MXF with VLC?
- Use XBMC for Blu-ray Playback on Mac
- Play ripped Blu-ray MKV files in MPlayer with audio and subtitles track
- How to play Blu-ray movies in VLC on Mac with selected audios/subs?
- Get Windows Media Center playing MKV movie ripped from Blu-ray Disc
- Enable Windows Media Player play MKV videos


