
 Home
HomeOne of our German customer once found that "ich hab hier Video dateien einer Sony PXW X70 vorliegen, gefilmt in XAVC (4:2:2, 10Bit, 50Mbit/s) mit der Endung .MXF.Schnittsoftware wäre idealerweise Premiere Pro CS6. Leider kann Premiere das ganze scheinend nicht direkt importieren, also wollte ich eben in MPEGMPEG im Glossar erklärt oder sonst was konvertieren." According to his statement, it seemed that it is a bitter more difficulty to edit Sony PXW X70 XAVC files in Adobe Premiere Pro, right?
Pavtube Video Covnerter can easily free you from this headache situation. With its inner decoders, X70 XAVC MXF files can be easily loaded into this app and turn into several formats you want. Not mention about its perfect audio and video sync techniques.


How to Open X70 XAVC MXF Videos into Adobe Premiere Pro CS6 on Windows 8.1 ?
Step 1. Load X70 XAVC MXF into Video Converter on your PC
Download this XAVC Converter on your Windows 8.1 PC, then run it to have a quick installation. After that, click "File">"Add Video/Audio" to add your X70 XAVC videos. You can highlight the clip to preview it in the preview window.
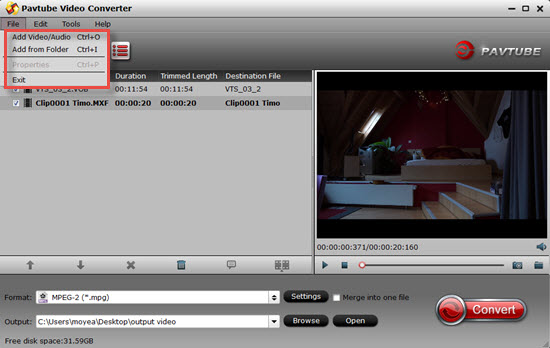
Step 2. Choose most suitable CS6 format "MPEG" to convert X70 XAVC videos
Before choosing the profper format for your CS6, you can learn the Adobe Premiere Pro supported format to make your decision. The "MPEG-2" will be a good choice for you to maintain the quality while converting.

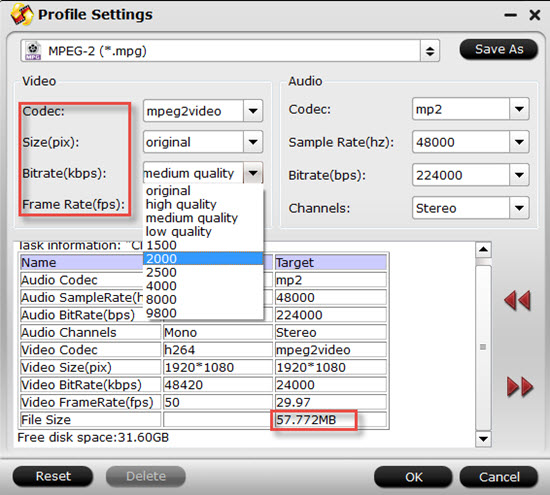
Step 3. Adjust parameters to meet your meet your needs
If you want to just keep the parameters as original or don't know how to adjust them, you can just leave the default settings here. Or if you want to make some changes to downsize your Size so that you can easily upload them on YouTube or Vimeo.
Step 4. Change "Interlaced" to "Progressive" to get a better viewing quality (optional)
If you don't like the "Interlaced" of your videos, then you can try to change it into "Progressive". Click "Pencil" to get into "Edit" UI , then choose "Effect" , you can see this "Deinterlaced" box, check it and you will have a "Progressive" one. You can see the clear differences between those two scenes. The right one is more clear than the left one.

Step 4. Start to convert X70 XAVC MXF files into MPEG-2
After all have been settled, just click this "Convert" to start your conversion. If you can't find where your converted files are, then you can just click this "Open output folder" to locate them.
Additional Tips:
1. Video Converter can help you maintain the quality after conversion, and new features like H.265/HEVC will also be a good choice if you want to enjoy your videos on 4D TV.
2. To know about how to deal with Sony F5/F55 or PXW-X180 XAVC videos into Adobe Premiere Pro.
 Free Trial Video Converter


