
 Home
HomeAdobe Premiere Elements 4.0 is developed for the basic consumer users who with some knowledge of video editing and looking to edit videos without much fuss. Its written cues, useful help guide, and intuitive menus make it easy enough for less experienced editors to catch on quickly. Aside from the difficulty of adding effects, we also found that users often encounter problems while loading MTS clips into Adobe Premiere Elements 4.0 for further editing. For example, "My Sony Alpha NEX-6 camera produces 1080p 60p HD movies in AVCHD MTS. I want to convert the MTS-files to MP4-files because Adobe Premiere Elements 4.0, which I'm using for editing, does not accept MTS-files as input files. Therefore I am looking for a program which converts the MTS footage to HD MP4 files (1080p or 720p, keeping the HD-quality). Any suggestions?"
To answer the question in short, try Pavtube MTS/M2TS Converter, open the MTS clips with Pavtube software and make a new MP4 with it. It no just only for Adobe Premiere Elements, it also can allow your videos playback on different platform. AVCHD (MTS/M2TS) can be playback on Samsung Galaxy Tab, or if you want to upload your AVCHD files on Youtube or you want to burn AVCHD HD videos into DVDs , all can be realized by this app.


How to make MTS/M2TS footage to MP4 compatible with Premiere Elements Keeping HD-quality?
Step 1. Launch the program as an MTS to MP4 Converter for Premiere Elements.
System Requirement
* Operating System: Windows XP/2003/Vista/Windows 7/Windows 8/8.1
* DirectX Version: 9.0 or above
* Memory: 64MB at least
* Processor: 500MHz Intel or 500MHz AMD CPU
* Hard Disc Space: 512MB or above
Notice:
1). The free trial version is provided for you to see if it would be able to convert your MTS videos from a camera to your required file type with expected quality.
2). The trial version will create videos with PAVTUBE logo standing in the center of the output image. To bypass the watermark, you should purchase its full version.
Step 2. Load your AVCHD (MTS/M2TS) into this MTS/M2TS Converter
After the installation, then just go to the top of this app, click "File">"Add Video/Audio" to load your files or just "Add from folder". You can load your AVCHD source files directly from your camera, or from a card reader, or from the file folder that contains the source MTS videos stored on your computer's hard disk drive.
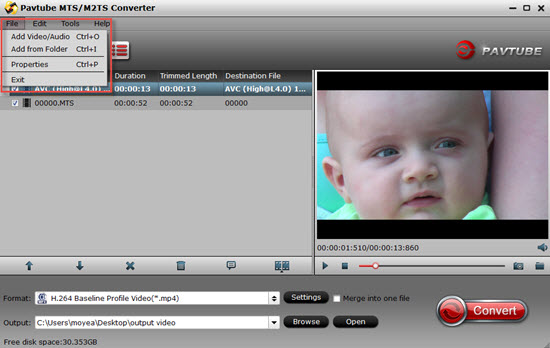
ou can preview your videos in the preview window, just highlight your target file, then click it.
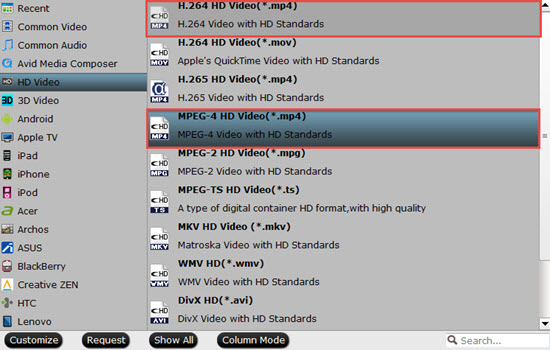
Step 3. Select output format for Adobe Premiere Elements 4.0
There are two choices for MP4, namely "H.264 HD Video (*.mp4)" and "MPEG-4 HD Video (*.mp4)". Both the two formats can be chosen as output under "HD Video".
Tips:
If there is an NVIDIA/AMD graphics card that supports GPU en-decoding acceleration installed on your computer, we suggest that you should choose "Common Video">"H.264 Baseline Profile Video (*.mp4)". Because The CUDA and AMD APP acceleration only work when creating H.264 Baseline profile encoded video files. This would largely speed up the conversion speed. Click to learn more about which graphics cards are supported?
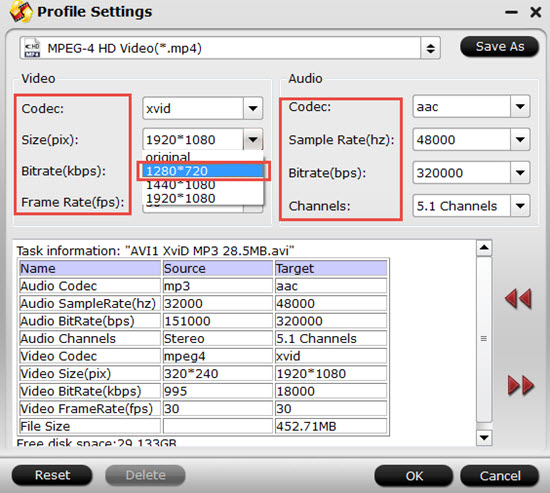
Step 4. Custom file quality (optional)
By default, either the "H.264 HD Video (*.mp4)" or the "MPEG-4 HD Video (*.mp4)" exports files in 1080p quality. If you intend to get files in 720p, you can click "Settings" button and go to "Profile Settings" windows to adjust the video resolution down to "1280*720". Plus, video bit rate, frame rate, audio sample rate, audio bit rate and audio channels are all adjustable on this panel.
Step 5. Click "Convert" button to start making MP4 from MTS keeping HD quality for Premiere Elements 4
Once the conversion finished, you can click "Open" button to get the produced 1080P/720P files for editing with Premiere Elements 4. Pavtube software guarantees producing files without audio and video out of sync issues, so the generated MP4 files can be used for editing with excellent quality.
Start a new project in Premiere Elements 4 and import the generated MP4 into your project
Open up Premiere Elements 4, you will be greeted with a welcome screen that requires you to start a new project, open an existing one, capture video, change preset settings or exit the program entirely. Simply start a new project and do what you need to do with the MP4 files generated by Pavtube software.
Since the video needed for the project already exists on the computer, copy and paste it into the 'Video' folder within the MEDIA folder. Now, within Premiere Elements, click 'Files and Folders' from the Tasks Panel and browse to MEDIA\Video and select the files to import them into the project.
Once imported, they will show in the 'Organizer' section of the interface as a series of visual 'tiles'.
Additional Tips:
1. If you would like to make some HD Video to playback on some smart TV which supports H.265/HEVC , then you can output your files into this new codec to enjoy the visual feast.
2. Learn more about editing, playing and DVD burning, just go to this AVCHD (MTS/M2TS) Page.
 Free Trial MTS/M2TS Converter

Useful Tips
- How to convert MXF to H.264 for Premiere Pro?
- MTS and Premiere Elements workflow - making 1080p/720p MP4 from AVCHD footage
- Adobe Premiere Pro Supported Formats – video and audio, camera, still-image (sequence), closed captioning and subtitle
- How to Import MP4/MOV/AVI to Photoshop CS6/CS5/CS4 for editing on Mac
- Adobe Premiere Pro workflow: How to import Media Files to Premiere Pro on Mac
- Why can't Premiere Pro and Final Cut Express 4 import my AVCHD files?


