
 Home
HomePhotoshop is the leading digital image editing application for the Internet, print, and other new media disciplines. It's likely that nearly every picture you've seen (such as posters, book covers, magazine pictures, and brochures) has either been created or edited by Photoshop. The powerful tools used to enhance and edit these pictures are also capable for use in the digital world including the infinite possibilities of the Internet. Video editing in Adobe Photoshop CS6/CS5/CS4 is easy, comprehensive and efficient with a broad compatibility of video file formats such as MOV, AVI, MPEG-4 (.mp4 or .m4v), MPEG-1 (.mpg or .mpeg) and MPEG‑2 if an MPEG‑2 encoder is installed on your computer.
However, Though Adobe Photoshop CS6/CS5/CS4 was announced to be compatibility with MP4/MOV/AVI, people still have problems in importing these videos to Photoshop CS6/CS5/CS4. If you have problem of importing MP4/MOV/AVI videos to Photoshop CS6/CS5/CS4 on Windows or on Mac, it is better to convert them to Photoshop CS6/CS5/CS4 supported video format MP4.
This article introduces a step-by-step guide on how to convert MP4/MOV/AVI videos to Adobe Photoshop supported MP4 video for successfully import MP4/MOV/AVI to Photoshop CS6, CS5 or CS4.
Software Requirement
Pavtube Media Magician (it also comes with a Mac version)
Free download Meida Magician Trial Version
Notes: The free trial version of Pavtube Media Magician has the following limitations:
1. It will add Pavtube logo watermark in output file(s).
2. Lossless output has a file size limit of 5 minutes.
If the free trial version does what you want, you can click Buy Now here to purchase its full version to bypass the above mentioned free trial limitations.
How to Import MP4/MOV/AVI to Photoshop CS6/CS5/CS4 for editing?
Step 1: Add source media into Media Magician
There are two ways available to import source media files:
1) Import from camera
Connect your camera with your computer and run Pavtube Media Magician. This camera companion program will detect your camera automatically and ask “Camcorder is connected. Are you ready to launch wizard now?” Click “Yes” to confirm.
Also, you can click the camera icon to load footage directly from a camcorder.
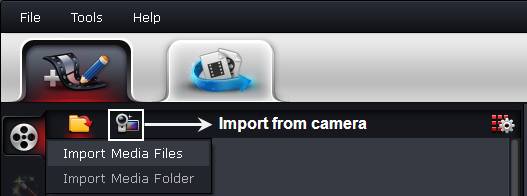
2) Import from local computer
You can also click “Import Media Files” or “Import Media Folder” to browse and load your AVCHD, MTS, MXF, MKV, etc. source files from your local computer’s HDD.
Step 2: Drag and drop source files onto Timeline
After source files are imported into the program, you need to drag and drop the clips that you want to encode to MP4/MOV/AVI onto timeline.
Step 3: Split/Cut/Reorder/Merge source clips (Optional)
If you would like to cut off unwanted parts of your video file, rearrange them in your wanted order, or merge them into one file, you can use the control buttons on timeline to do this.
The control buttons on timeline help you locate frames accurately so that you can cut, trim, delete, and merge video clips in a much easier way.
Control buttons on Timeline
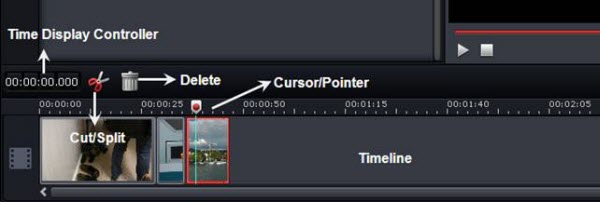
1. Time Display Controller: Move your mouse cursor on timeline, the opposite time point will be displayed here. Once you entered a time point into the time display box and click enter, the Preview Window and Timeline will switch to the frame of this time point. This helps to locate to the accurate frame that you want.
2. Zoom in and Zoom out: Drag the bar on top-right of timeline to Zoom in or out for better view.
3. Preview: Highlight a clip on timeline and click Play button, you can preview. Double click on a clip can also begin preview.
4. Trim: Put your cursor to the start or end point of a clip on timeline until it changes to trimmer. Drag the trimmer and you can trim off unwanted starting or ending.
5. Cut: Drag the pointer to the right place; Put your cursor to process bar under preview window and select the right frame; Click the Scissors button and you can cut the clip. And then you can rearrange order or delete.
6. Delete: Highlight the unwanted clip on timeline, and click Delete button. You can also delete it with right-click menu.
7. Rearrange order: Drag and hold a clip to the right place until the place line shows. Drop the clip and it will be placed right there.
8. Merge and join: All files placed on timeline will be output as one file. So if you want to merge and join several clips, just drag them to timeline in right order.
Furthermore, you can add 3D effects, special effects (e.g. Simple Gauss Blur, Flip Color, Invert, Aged Film, and Gray), or adjust volume, contrast, saturation, brightness of selected clips. You can also flip video horizontally, vertically, and rotate clockwise and counter-clockwise as you like.
 Free Trial Media Magician

Useful Tips
- How to convert MXF to H.264 for Premiere Pro?
- MTS and Premiere Elements workflow - making 1080p/720p MP4 from AVCHD footage
- Adobe Premiere Pro Supported Formats – video and audio, camera, still-image (sequence), closed captioning and subtitle
- How to Import MP4/MOV/AVI to Photoshop CS6/CS5/CS4 for editing on Mac
- Adobe Premiere Pro workflow: How to import Media Files to Premiere Pro on Mac
- Why can't Premiere Pro and Final Cut Express 4 import my AVCHD files?


