
 Home
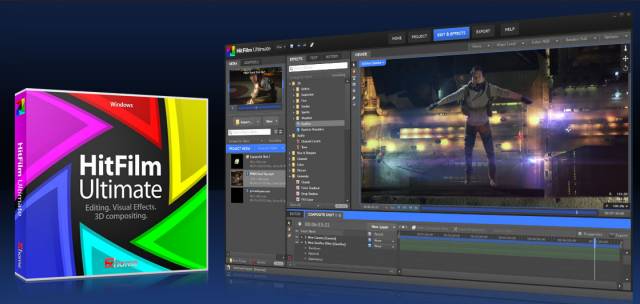
HomeHitFilm Ultimate is a video editing and visual effects software designed by FXHome. It is very user friendly and the layout is not very complicated and easy to use for beginners. It comes with an easy to use timeline that can be moved frame by frame. This software does support 1080p and a wide variety of file types. If you need a cheap and professional editing software program, the HitFilm Ultimate is highly recommended.
HitFilm supports the following file formats:
Supported Import Containers & File Formats
* AVCHD, AVI, DV, M2T, M2TS, MOV, MP4, MPEG-1 & MPEG-2 Video (MPE, MPG, MPEG, M2V), MTS, MXF (DVCPro HD), WMV
* AAC, AC3, MP3, M4A, MPA, WAV, WMA
* BMP, GIF, JPG, PNG, TIFF
* Image Sequence
* 3D formats: .LWO, .3DS and .OBJ
* Camera tracking data .MA files
* HitFilm composite shot (.HFCS)
Supported Import Technologies & Codecs
* DV, HDV, DSLR
* QuickTime
* MPEG-1, MPEG-2 (TS, PS) & MP4 (AVC/H.264 & AAC)
* Windows Media
Talking about video editing, the tech support at HitFilm has assured that the best video codec to use for editing with HitFilm is the Avid DNxHD codec and also for the video format to be .mov. That’s why users often have the needs to convert their source files (AVCHD, MTS, MXF, MKV, etc) to DNxHD MOV for HitFilm even though these files are among this software supported import category. In this article, we present how to transcode AVCHD, MTS, MXF, MKV, etc. to DNxHD MOV for HitFilm Ultimate in detail.
Software Requirement
Pavtube Media Magician (it also comes with a Mac version)
![]() Free download Media Magician Trial Version
Free download Media Magician Trial Version
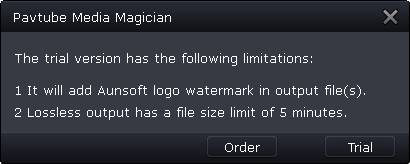
Notes: The free trial version of Pavtube Media Magician has the following limitations:
1. It will add Pavtube logo watermark in output file(s).
2. Lossless output has a file size limit of 5 minutes.
If the free trial version does what you want, you can click Buy Now here to purchase its full version to bypass the above mentioned free trial limitations.
How to convert AVCHD, MTS, MXF, MKV, etc. to DNxHD MOV for HitFilm Ultimate?
Step 1: Add source media into Media Magician
There are two ways available to import source media files:
1) Import from camera
Connect your camera with your computer and run Pavtube Media Magician. This camera companion program will detect your camera automatically and ask “Camcorder is connected. Are you ready to launch wizard now?” Click “Yes” to confirm.
Also, you can click the camera icon to load footage directly from a camcorder.
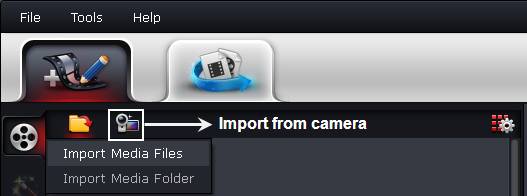
2) Import from local computer
You can also click “Import Media Files” or “Import Media Folder” to browse and load your AVCHD, MTS, MXF, MKV, etc. source files from your local computer’s HDD.
Step 2: Drag and drop source files onto Timeline
After source files are imported into the program, you need to drag and drop the clips that you want to encode to DNxHD MOV onto timeline.

Step 3: Split/Cut/Reorder/Merge source clips (Optional)
If you would like to cut off unwanted parts of your video file, rearrange them in your wanted order, or merge them into one file, you can use the control buttons on timeline to do this.
The control buttons on timeline help you locate frames accurately so that you can cut, trim, delete, and merge video clips in a much easier way.
Control buttons on Timeline
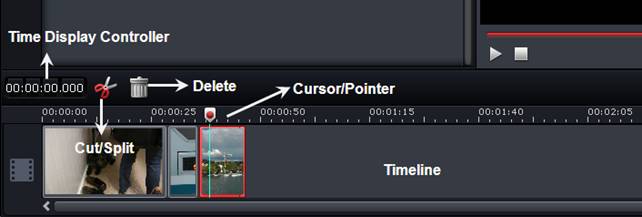
1. Time Display Controller: Move your mouse cursor on timeline, the opposite time point will be displayed here. Once you entered a time point into the time display box and click enter, the Preview Window and Timeline will switch to the frame of this time point. This helps to locate to the accurate frame that you want.
2. Zoom in and Zoom out: Drag the bar on top-right of timeline to Zoom in or out for better view.
3. Preview: Highlight a clip on timeline and click Play button, you can preview. Double click on a clip can also begin preview.
4. Trim: Put your cursor to the start or end point of a clip on timeline until it changes to trimmer. Drag the trimmer and you can trim off unwanted starting or ending.
5. Cut: Drag the pointer to the right place; Put your cursor to process bar under preview window and select the right frame; Click the Scissors button and you can cut the clip. And then you can rearrange order or delete.
6. Delete: Highlight the unwanted clip on timeline, and click Delete button. You can also delete it with right-click menu.
7. Rearrange order: Drag and hold a clip to the right place until the place line shows. Drop the clip and it will be placed right there.
8. Merge and join: All files placed on timeline will be output as one file. So if you want to merge and join several clips, just drag them to timeline in right order.
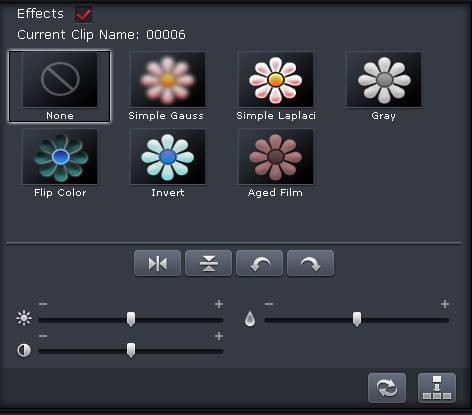
Furthermore, you can add 3D effects, special effects (e.g. Simple Gauss Blur, Flip Color, Invert, Aged Film, and Gray), or adjust volume, contrast, saturation, brightness of selected clips. You can also flip video horizontally, vertically, and rotate clockwise and counter-clockwise as you like.
Step 4: Transcode video files to DNxHD MOV for HitFilm Ultimate
Choose “Output” in the main interface, and click “Plus” icon to add conversion task before selecting output format. Then switch to “Editor” > “Avid Studio” and click “Start” to begin encoding your source files to DNxHD MOV for HitFilm Ultimate.
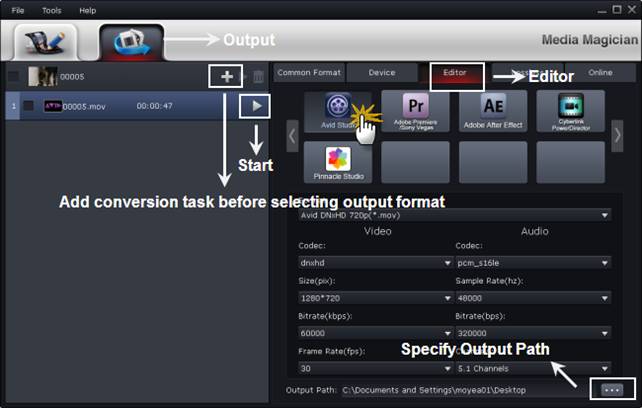
This HitFilm assistant software will specify a default folder to save the converted videos. If you’d like to change the output location (output path), please click ![]() to navigate to the folder you’d like to save videos to.
to navigate to the folder you’d like to save videos to.
When conversion task finished, you can right click on the task list and check “Find Target” to get the generated DNxHD MOV files for editing use with HitFilm Ultimate.
 Free Trial Media Magician

Useful Tips
- How to convert AVCHD MTS/M2TS to MKV?
- Convert AVCHD (MTS/M2TS) Videos for Playing on iPhone
- Convert AVCHD/AVCHD Lite Footage to Apple ProRes 422 Encoded Files for Final Cut Pro
- Sony M2TS to Windows Movie Maker Converter
- Canon Vixia MTS to Windows Movie Maker Converter
- Convert 1080p MTS Videos to Windows Movie Maker


