
 Home
HomeWindows DVD Maker has been introduced with Windows Vista and it continues to be present in Windows 7. Generally, Windows DVD Maker is not hard to use. It has some really nice customization options which should fit basic video DVD burning needs. It is "a suite of tools to import, edit, manage, and share your digital home videos—including movies captured in the high-definition video (HDV) format" by the official site of Microsoft. Yet users may doubt if it is true when they failed to import the HD footages shot with their Canon, Sony, JVC and Panasonic cameras and camcorders. Well, it is true that the Windows DVD Maker handles with high-definition video, but unfortunately it does not work most of the HD video clips because of their uncommon formats (mostly MPEG and H.264 encoded *.mod, *.tod, *.mts, *.mov files). In order to burn the HD (especially AVCHD) footages with Windows DVD Maker, you have to convert the videos to compatible formats for Windows DVD Maker.
Files Types Supported By Windows DVD Maker
Let’s take a look at the types of files which can be burned with Windows DVD Maker:
Video files: *.asf, *.avi, *.dvr-ms, *.m1v, *.mp2v, *.mpe, *.mpeg, *.mpg, *.mpv2, *.wm, and *.wmv.
Audio files: *.aif, *.aifc, *.aiff, *.asf, *.au, *.mp2, *.mp3, *.mpa, *.snd, *.wav, and *.wma.
Picture files: *.bmp, *.dib, *.emf, *.gif, *.jfif, *.jpe, *.jpeg, *.jpg, *.png, *.tif, *.tiff, and *.wmf.
Convert HD MTS, TOD, MOV, MOD to be compatible with Windows DVD Maker
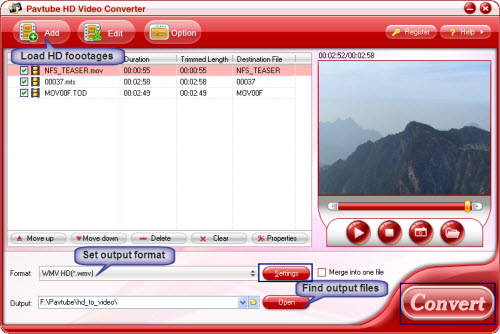
Among the versatile video converting tools on market, Pavtube HD Video Converter is a top one for you to convert HD footages taken with over majority cams at high quality. It also allows you to adjust the advanced parameters like bitrate, resolution, audio channels, etc. In the following guide I will show you how to convert HD footages to Windows DVD Maker supported formats with least quality loss.
Step 1. Getting started
Transfer the footages you’d like to edit from camcorder or memory card to PC. Install and launch HD Converter, click “Add” to load the HD video clips, or directly drag the files into file list. By default, the files are selected. You could view the files in preview window, simply highlight the file and click play button.
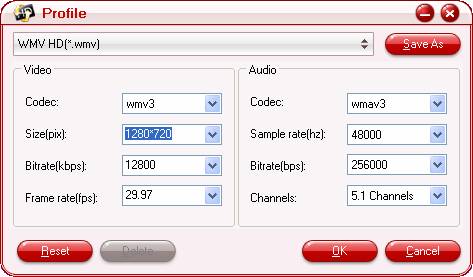
Step 2. Adjusting audio and video settings
Click “Settings” and customize advanced audio and video parameters. Now that we are converting HD files (MTS, MOV, TOD) for burning with Windows DVD Maker, you may click on the format bar and follow HD Video->HD WMV/ AVI/ MPEG-2 and then customize the advanced video and audio parameters. Take HD WMV as example, for the users who are unwilling to degrade the HD video quality, a recommended configuration could be Video at 1280*720p (or 960*540), 12800kbps, 29.97fps, and set Audio at 48000 Hz, 256 kbps, 5.1 channels. The original footages you have taken may be a full HD 1920*1080, but as we are talking about burning DVD, it is not a best choice to maintain the original resolution, since the full HD video fits for blu-ray disc rather than standard DVD.
Step 3. Converting HD footages to Windows DVD Maker supported formats
Click on “Convert” button and the Pavtube HD Video Converter will starts converting HD footages to compatible formats for Windows DVD Maker. You could set auto shutdown in progress window or leave it there and come back later.
Burn converted video clips with Windows DVD Maker
After conversion you can burn the converted videos with Windows DVD Maker now:
Step 1. Click the "Start" button and select "Windows DVD Maker" to run the program, then click the "Add items" button from the top menu and browse to the folder were the movies you want to burn are located. By default, they should be found in the "Videos" folder.
Step 2. Select the videos you want to burn and type the "Disc title". Also, you may select the order in which the movies will be saved on DVD. To dothat, select a movie and press the "Up" or "Down" button to change its order.

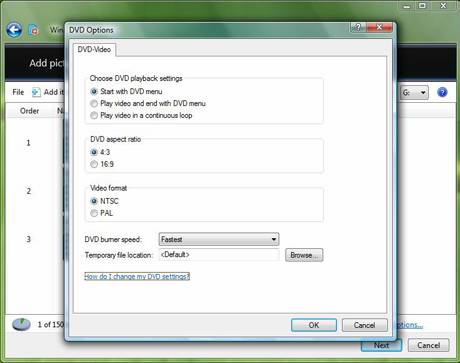
Step 3. If you want to, you can click the "Options" button and set things like the burning speed, the aspect ratio, the video format or you can choose if the DVD will have a menu or not. After you finished making the settings you want, click the "OK" button and then "Next".
Step 4. At this step you can create a custom DVD menu or you can select a predefined one. To select a predefined menu, scroll the "Menu Styles" list and select the one you like most. You can customize it by pressing the "Customize Menu" button and making the settings you want. Also, you can change the menu text by clicking the "Menu text" button and typing the text you want for each button.
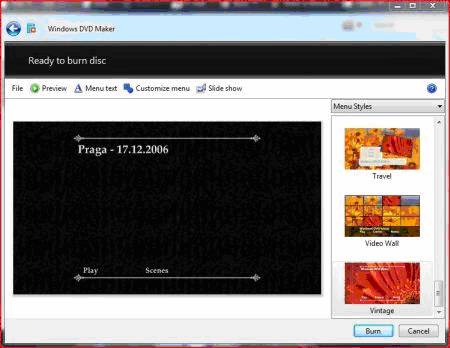
Step 5. When you have finished making all the customizations, click the "Burn" button.
First, Windows DVD Maker will encode the movie in the appropriate format and then it will burn it on DVD. Usually, the encoding process takes much more time than the burning so you have to be patient.
Additional Information:
The newly released Pavtube DVD Creator program makes DVD creation much easier than ever before. It lets you burn any kind of video sources to playable DVDs within a few clicks. The acceptable source files are ranging from common videos (MKV, AVI, MP4, WMV, MOV, etc.) to camera shootings (MXF, MTS, M2TS, H.264 MOV, TOD, and MOD), TiVo recordings to photos. For more information, see DVD Creator Quick Start Guide and DVD Creator product page.
 Free Trial HD Video Converter

Useful Tips
- The complete Blu-ray/DVD Backup Solutions for Mac OS X
- How to convert TiVo Recordings for Burning DVD with Nero?
- AVCHD MTS to iDVD - Create a DVD from your MTS/M2TS Videos
- Burn TiVo shows to a DVD using Windows DVD Maker
- How to convert HD footages for authoring with iDVD?
- How to convert F4V files for burning DVD with Nero?


