-
How to Edit, Convert and Burn HD footages to Blu-ray disc?
The HD video clips taken with new HD cam can not be imported to Premiere for editing? Have shot some magnificent footage with your AVCHD camcorder and wanna to burn the video clips a Blu-ray disc? Here is the right place for you. We’re talking about how to convert your HD footages, ie HD MOT, TOD, MTS, TS, MOD, M2TS to be compatible with editing software and all right for burning.
Part 1. Convert HD footages to fit for editing software/ Blu-ray burning with Pavtube HD Video Converter.
Here you need Pavtube HD Video Converter, which will transcode the HD videos to be compatible with overwhelming editing software (Adobe Premiere, Sony Vegas, Cyberlink Power Director, etc) at high quality and decent sync. Download trial version of Pavtube HD Video Converter, install and run the app, when the below interface pops up, click ‘Add’ to load the HD video clips, or directly drag the files into file list. By default, the files are selected. You could view the files in preview window, simply highlight the file and click play button. Tick off the box of ‘Merge into one’ so that the files will be combined together.
Adjusting audio and video settings
Click ‘Settings’ and customize advanced audio and video parameters. Now that we are converting HD files for editing software, you may choose Adobe Premiere/ Sony Vegas or DV label and select a desired format fit for your Premiere or other software. For the users who would like to burn the files to Blu-ray disc without editing, a recommended configuration could be HD Video-> MPEG-TS HD Video (*.ts), 1920*1080p, 25mbps, 24fps, AC3 codec, 5.1 channels. (click ‘Settings’ button to it).
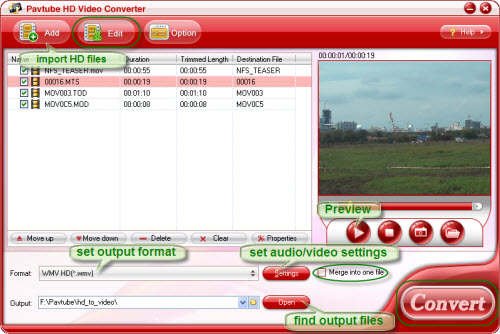
When you set everything well, click ‘Convert’ button to start converting HD footages to editable or Blu-ray compatible formats. Ripping Blu-ray takes hours and you have to be patient. To locate the converted files, click the ‘Open’ button next to output path. After editing you could still import your project into the app and burn to Blu-ray compatible formats. The Blu-ray Ripper itself features some editing facilities too, such as cropping, trimming, rotating, adding watermarks, replacing audio, adding effect etc. You may click ‘Edit’ button to enter the editor. Here you could switch to Effect tab and check ‘Deinterlacing’ box to remove the interlacing lines from the video clips.

Finally, click the big ‘Convert’ button to starting ripping Blu-ray movie to be fit for your editing software or right for burning (TS format). Blu-ray ripping could take hours, you got to be patient. After ripping completes, click the ‘Open’ button to locate converted files.
Part 2. Author Blu-ray/ Create Blu-ray structure with tsMuxeR.
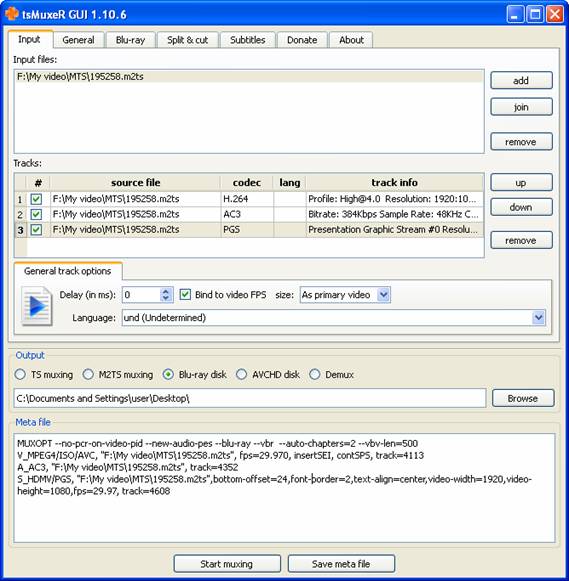
Now you need tsMuxeR to help. It is a powerful freeware and you can download it via this link. Run tsMuxeR, load TS file under Input tab. Click ‘add’ button and browse to converted TS file(s). Tick Blu-ray disk as Output result, and browse to desired directory to save the Blu-ray structure. Then you could switch to Blu-ray tab to arrange chapter info and Subtitles tab to set subtitles (if there are) for your Blu-ray disc. Once the settings be done, click the ‘Start muxing’ button and tsMuxeR will create a Blu-ray structure for you. It consists of two directories, namely BDMV and CERTIFICATE. You will need them to burn Blu-ray disc.
Part 3. Burn the contents to Blu-ray disc with ImgBurn.
ImgBurn is a recommendable freeware to burn Blu-ray disc.
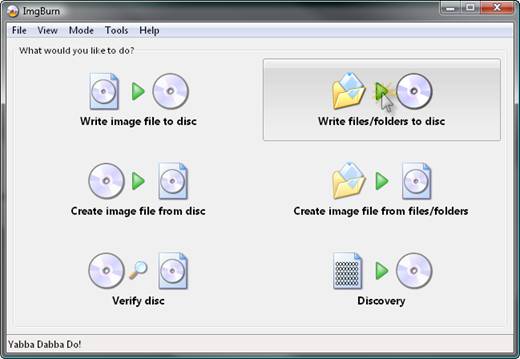
Run the app, and click the 'Write files/folders to disc' button and insert a blank (or erasable) Blu-ray disc in your burner.
Add the files/folders you want to burn to the 'Source' box. For a Blu-ray video disc that'll be the BDAV / BDMV folder and the CERTIFICATE folder.
To add those folders you can type their names in manually (one at a time) and click the '+' button, or click the 'Browse for a folder...' button, navigate to and select the appropriate folder, or drag and drop the folders from an Explorer window into the 'Source' box.
When that's done your source box should look something shown below. You could configure the program for burning a compliant Blu-ray disc, just switch to the 'Options' tab and configure the settings. Back on the 'Information' tab, you can now click the 'Calculate' button if you want to see the size of your compilation.
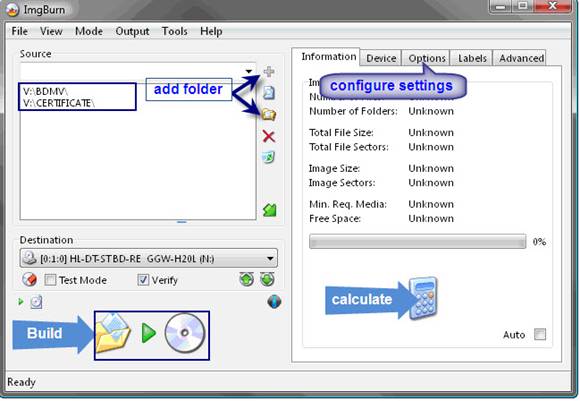
Now we're ready to burn so click big 'Build' button! If you're prompted for a volume label, you can either use the one suggested by the program or type in a new one. Click the 'OK' button when you're happy with it. When the 'Image Information' box pops up, assuming everything looks all right, click the 'OK' button.The program will then burn your files to the disc.
Guide
- Convert Blu-Ray Disc to AVI
- Convert Blu-Ray Disc to FLV
- Convert Blu-Ray Disc to PS3
- Convert Blu-Ray Disc to PSP
- Convert Blu-Ray Disc to Wii
- Convert Blu-Ray Disc to Xbox360
- How to Convert DVD to AVI?
- How to Convert DVD to MPEG?
- How to Convert DVD to WMV?
- Convert TiVo to iPhone
- Convert TiVo to MPEG
- Convert TiVo to iPod
- Convert Blu-Ray disc to Apple TV
- Convert Blu-Ray disc to Archos 7
- Convert Blu-Ray disc to iPhone, iPhone 3G
- Convert Blu-Ray disc to MKV, HD MKV for Mac
- Convert Blu-ray videos to MP4
- Convert Blu-Ray disc to WMV