
 Home
HomeAfter a video project has been completed in Final Cut Pro and exported using Compressor, it still needs to be fashioned into a DVD. This process, called authoring, is handled in the Final Cut Pro suite by Apple's DVD Studio Pro software. The iDVD is for sure able to burn all the projects created by Final Cut Pro or Final Cut Express. But sometimes we just want to save the editing process and create DVD project in iDVD with the footages shot by camcorders (Sony, Canon, JVC, whatever). To our disappointment, mostly the iDVD refuses to load these videos. Why should this happen? Well, the HD camcorders basically save footages in MTS, TOD or MOD formats, which are not acceptable for iDVD. But we know that the iDVD works well with MPG and MP4 format. So things become easier. All we need is to convert these troublesome HD or AVCHD videos to iDVD compatible format. Besides, by converting the HD videos we can compress the videos to fit for standard DVD instead of blu-ray disc, for the AVCHD or Full HD footages are naturally for making blu-ray discs in the first place.
Now let’s focus on the conversion. Many video transcoding tools on market are able to convert HD videos, but Pavtube HD Converter for Mac must be our optimal choice for its considerate profile options and adjustable video and audio parameters (resolution, bitrate, framerate, audio channels etc) and flexible editing facilities (trim, crop, watermark, audio replace, etc). In the following guide I would like to share with you some tricks of converting Full HD video footages for iDVD authoring and burning.
Step through converting MTS, TOD, MOD to iDVD compatible MPG format:
Step one. Run Pavtube HD Converter for Mac. Click ‘Add’ button, browse to the footages and load them to the converter.
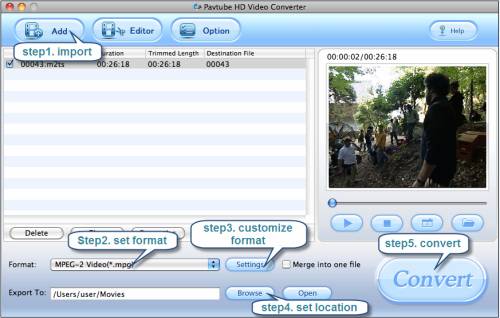
Step two. Select the items to be converted, and click on ‘Format’ bar and select Common Video->MPEG2 Video (*.mpg) in the pull-down list. You are not recommended to choose the HD formats, as I mentioned above, the Full HD is for blu-ray disc, not standard DVD.
Step three. Now you can further adjust the advanced video and audio parameters. Basically the footages are 1080p (1920*1080) or 720p (1280*720). If you would like to keep the original 16:9 aspect ratio (I believe you do, no one would prefer stretched image), make sure you set correct video size. Click the ‘Settings’ button to adjust the advance parameters. The following settings are for your reference.
Video: mpeg2video, 960*540p, 9800kbps, 29.97fps
Audio: mp2, 44.1khz, 128mbps, 6 channels

Step four. Click the ‘Browse’ button next to the Export to field and select a location on your HDD for the output video file.
Step five. Click the ‘Convert’ button to start converting HD footages on Mac. After conversion you can click the ‘Open’ button to locate converted video files.
Small Tips:
1. Preview the video- select it in file list and click ‘Preview’ button.
2. Thumbnail- click ‘Snapshoot’ button when previewing the video. Click ‘Option’ to set the image format of screenshots.
3. Deinterlace- click ‘Editor’, switch to ‘Effect’ tab, find ‘Deinterlacing’ box, and check it.
4. Combine files together- check the files to be merged in file list and check ‘Merge into one’ box beside ‘Settings’ button.
Note that trascoding will definitely degrade the video quality, this is inevitable. The quality loss is up to your settings when converting the footages. When authoring DVD, using the provided templates makes authoring quick and easy. See how to create DVD using iDVD.
Additional Information:
The newly released Pavtube DVD Creator program makes DVD creation much easier than ever before. It lets you burn any kind of video sources to playable DVDs within a few clicks. The acceptable source files are ranging from common videos (MKV, AVI, MP4, WMV, MOV, etc.) to camera shootings (MXF, MTS, M2TS, H.264 MOV, TOD, and MOD), TiVo recordings to photos. For more information, see DVD Creator Quick Start Guide and DVD Creator product page.
 Free Trial HD Video Converter for Mac

Useful Tips
- The complete Blu-ray/DVD Backup Solutions for Mac OS X
- How to convert TiVo Recordings for Burning DVD with Nero?
- AVCHD MTS to iDVD - Create a DVD from your MTS/M2TS Videos
- Burn TiVo shows to a DVD using Windows DVD Maker
- How to convert HD footages for authoring with iDVD?
- How to convert F4V files for burning DVD with Nero?


