How to compress HD footages to SD video clips for playing and editing on Mac?
Tracing back to abut 70 years ago, television made its big debut at the World's Fair in New York. Now in the first decade of the 21st century, a new TV resolution is underway. Yeah, it’s about the High Definition. The big screen HD TV is within reach of everyone now. And so is the HD DV, cams, camcorders etc. With these digital video recorders, we could take HD footages up to 1080p for playing and editing. However, many folks got scratching their heads when playing the high definition media contents or importing HD footages to editing software. This short article helps you learn the features of HD footages and what to do to get it through when the HD footages are not playable or editable on Mac OS.
Which are the typical formats of HD footages?
 HD video refers to any video system of higher resolution than standard-definition video, and most commonly involves display resolutions of 1280×720 pixels (720p) or 1920×1080 pixels (1080i/1080p). Generally different HD video camcorders (AVCHD DV included) generate footages of different HD formats. These are usually MPEG-2 or H.264/AVC encoded videos ranges from 720/30i (Panasonic Lumix series) to 1080/60p (Sony LMD models). Typical video formats of HD footages are MTS, MOV, TOD, MOD and DV. Among these formats, MTS ranks the most popular one and is widely supported by over-majority DVs and camcorders.
How to play and edit the HD footages on Mac?
QuickTime Player does not naturally support de-coding the MTS, TOD or MOD. Other universal media players like VLC Player and Mplayer is required for playing the HD footages. Both are freeware. You may try them out. VLC Player is regarded as the first choice by some folks.
Editing HD MTS, TOD, MOD, MOV can be fairly troublesome. iMovie, FCE, FCP, even FCS can’t say for sure it is capable of loading and handling all the MTS, TOD, MOV(H.264 encoded) footages properly. To our disappointment, most of the time we got error message when importing the HD footages to edit. In that case, a HD Video Converter is a must tool for editing HD footages on Mac. In the following guide I will share with you how to convert HD footages to SD video on Mac with Pavtube HD Video Converter, a powerful and user-friendly en-decoding tool for you to compress HD video to editable SD video clips.
Convert HD to SD with Pavtube HD Converter
You may download the Mac HD Converter for trial (intel processor oriented, for powerpc please go to product page). There is not any time limitation for the trial, but please note that the trial converts video with a Pavtube logo watermark on the screen.
Step 1. Install and launch Pavtube HD Video Converter, add the HD footages you want to convert. Click the “Add” button to load the desired HD files. The program supports en-decoding HD MTS, MOD, TOD, MOV, TS, DV, M2TS, TP, TRP, AVI and other formats like RM, RMVB, MP4, MKV, MOV, WMA, VOB, H.264, 3G2, AAC etc
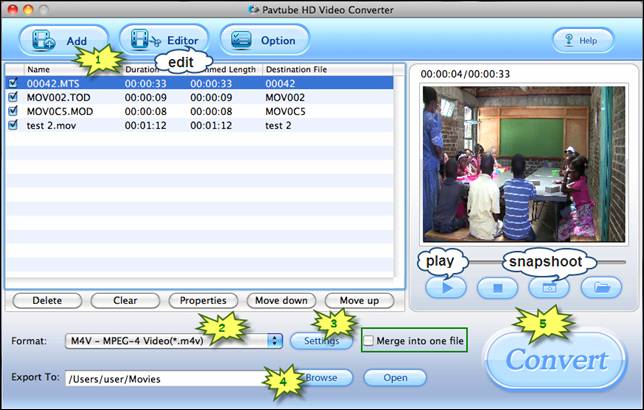
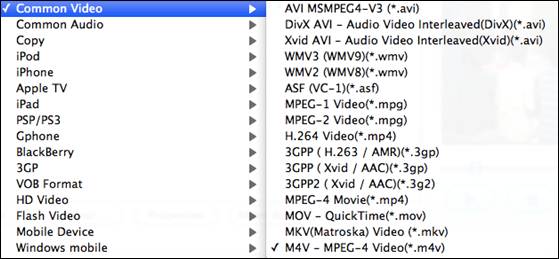
Step 2. Set output video format for HD to SD conversion. Click the “Format” bar and move to “Common Video” and then select a format from drop-down list. Here I select M4V for example. If you would like to keep the HD video quality, simply follow “HD Video” and find a desired format.
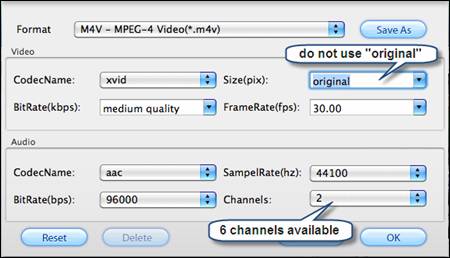
Step 3. You may also customize the video and audio parameters. Click Settings button and set output size, bitrate and frame rate. Smaller bitrate value leads to a smaller output SD file, which takes up less space. In order to avoid out of sync problem, do not set frame rate as “orginal”.
Step 4. Set output folder. Click the “Browse” button beside “Export to” field, and choose a destination folder for saving output files.
Step 5. Start Converting. Click “Convert” button to start converting HD footage to SD video. Then you could find the converted SD video in destination folder. Now you can play them on any portable devices like PSP, iPhone, iPod, Apple TV, 3G phones or share them on internet.
With this program, you could convert HD video to SD formats to enjoy it whenever and wherever.
Tricks of converting HD footage to SD using Pavtube HD Video Converter:
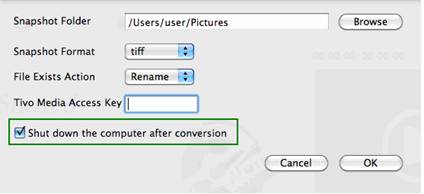
1. Let your Mac shut down automatically. Converting down HD files is time-consuming. You do not need to be there waiting all the time till it completes. To set auto shutdown, just click “Option” menu and check “Shut down the computer after conversion” before conversion starts.
2. Joint and split video clips. As mentioned above, you can combine files together by checking “Merge into one file”. To split video and trim off unwanted segments, you may click “Edit” menu, switch to “Trim” tab, and set starting and ending time to include the part you want to keep only, and then leave it to the HD Video converter.
3. Convert HD files to M4V/MOV/MKV with AC3 5.1 sound. Click “Settings” and set Audio Codec Name to “ac3” and Channels to “6” instead of “1” or “2”.
