
 Home
HomeThe Cyberlink Powerdirector video editing software is one of the fastest and most capable consumer-level video editing apps for Windows around, enables trimming, joining and overlaying of clips and effects, also support new standards such as the H.265 video and 360-degree footage. For those people who wish to take Cyberlink PowerDirector as your best video editing software, you may care much about the media content importing capability of Cyberlink PowerDirector. The following part will show you several detailed tablets which listed supported file formats by Cyberlink PowerDirector 16/15/14/13.
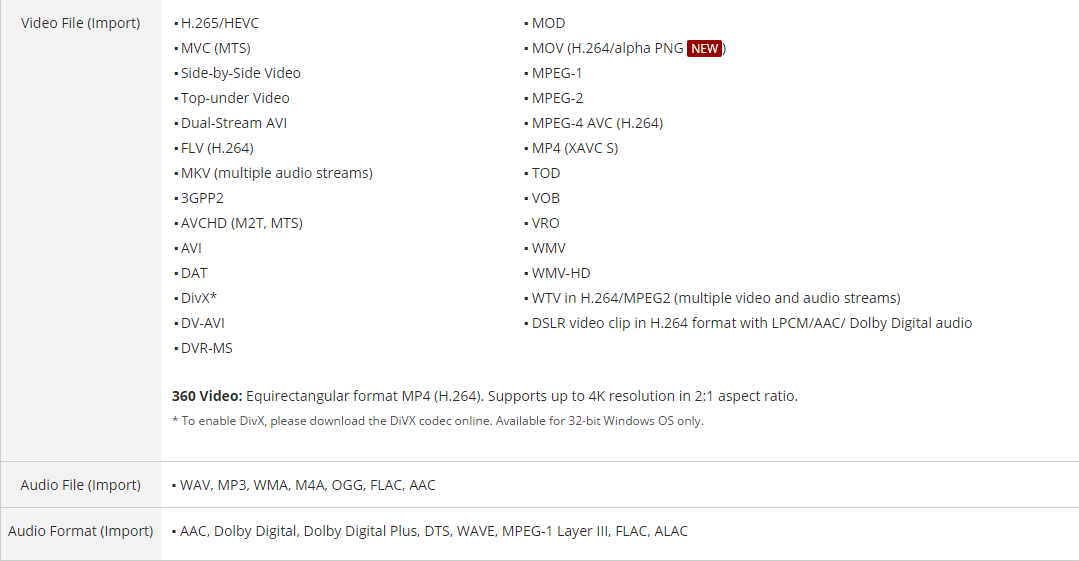
Cyberlink PowerDirector 16 supported file types
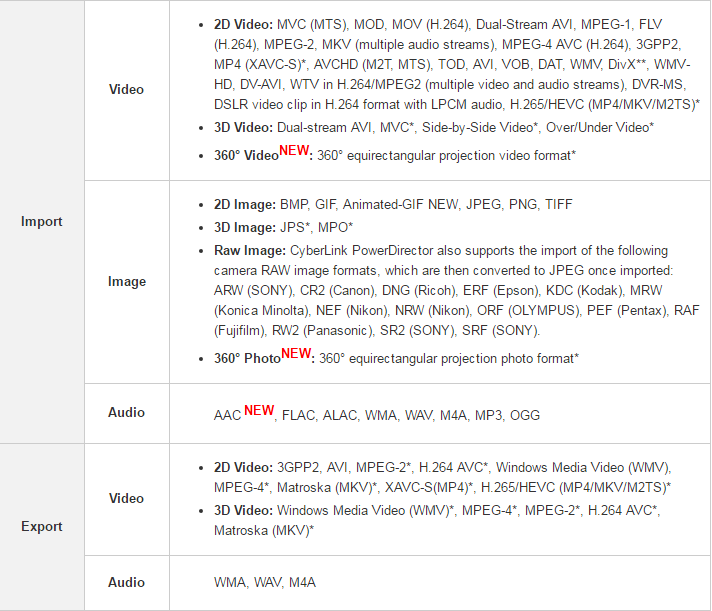
Cyberlink PowerDirector 15 supported file types
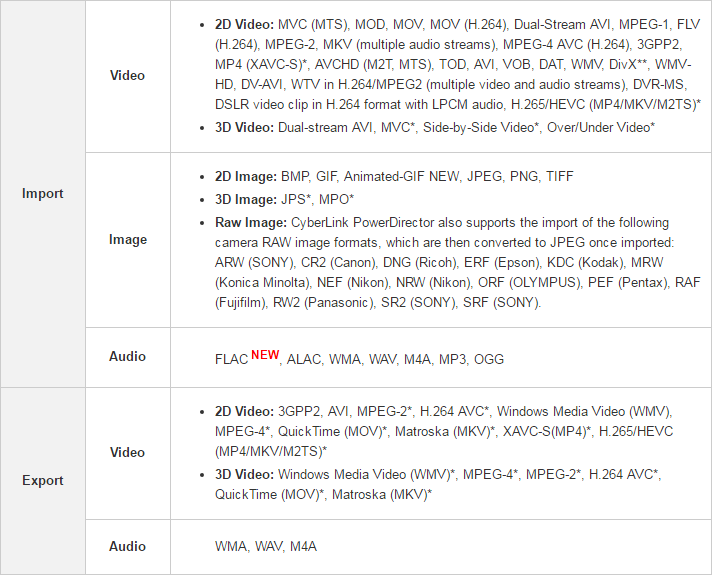
Cyberlink PowerDirector 14 supported file types
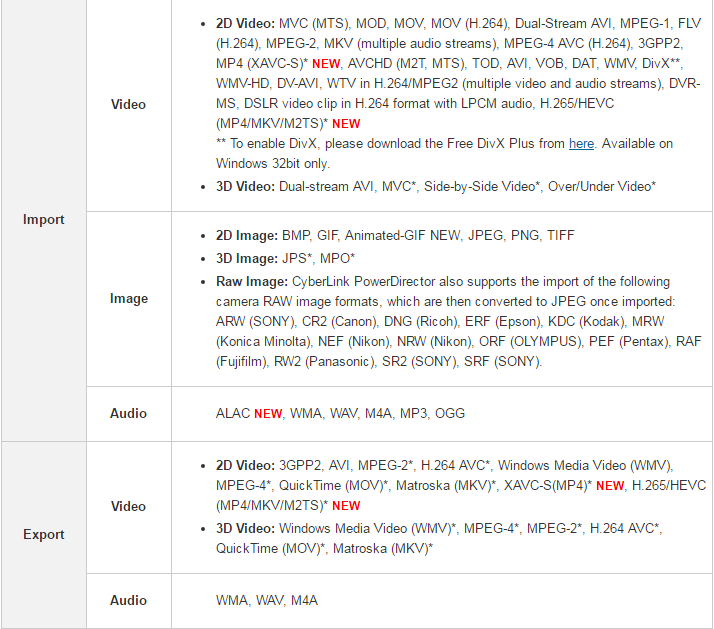
Cyberlink PowerDirector 13 supported file types
Edit unsupported file formats with Cyberlink PowerDirector
From above lists, we can see that different versions of Cyberlink PowerDirector has different media importing capabilities. In addition, you will definitely fail to load certain media types such as MXF, DNxHD, Prores CinemaDNG, ARRI Alexa, RED, etc into Cyberlink PowerDirector. What's more, sometimes, if your Windows computer doesn't meet the minimum requirements to edit 4K video, you may still suffer choppy or stutter issues when working with certain 4K video on the timeline of Cyberlink PowerDirector.
As a matter of fact, you can easily fix all those format/codec or resolution issue with a powerful third-party video conversion app. The program we highly recommend to you is called Pavtube Video Converter. The program has full importing support for all the 4K/2K/HD/SD video downloaded from various online sites or shot with different device recorders (smartphone, tablet, camera, camcorder), all the above listed unsupported file formats can be loaded into Cyberlink PowerDirector effortlessly.
Apart from transcoding unsupported file formats to Cyberlink PowerDirector supported file formats listed above, the program also assists users to compress 4K to 1080p for smooth editing experience on slow computer that fails to handle 4K resolution video editing.
Related article: Import MP4 to PowerDirector | Import Canon MXF to Cyberlink PowerDirector | Edit 4K Video with PowerDirector
Edit video with built-in editing options
Before loading video into Cyberlink PowerDirector for some professional editing workflow, you can first complete some basic editing with the built-in editing options offered by the program. You can trim or cut video to remove unwanted parts or segments, crop video to get off the black edges or unwanted size area, add video/image/transparent text watermark, apply special rendering effect, insert external srt/ass/ssa subtitle to video, etc.
Step by Step to Convert Unsupported Video for Cyberlink PowerDirector Editing
Step 1: Load unsupported video or codec into the application.
Download the free trial version of the program. Launch it on your computer. Click "File" menu and select "Add Video/Audio" or click the "Add Video" button on the top tool bar to import unsupported video or codec into the program.

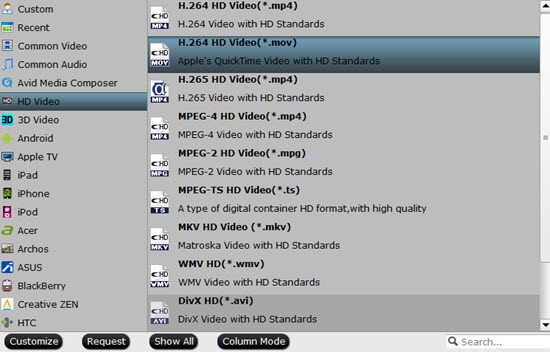
Step 2: Choose output file format.
Clicking the Format bar, from its drop-down list, select one of Cyberlink PowerDirector editable file formats such as "H.264 HD Video(*.mp4)" under "HD Video" main category.
Step 3: Edit video with built-in editing options.
On the top tool bar on the main interface, click the pencial like icon to open "Video Editor" window, you can trim Blu-ray movies to remove the unwanted parts by setting the start and end time, crop to remove the black borders or unwanted area by dragging the dash line around the video frame, flip video, add text/image/video watermark, change video picture effect, replace/remove audio in video, add external subtitles, etc.

Step 4: Begin the final conversion process.
After all setting is completed, hit the "Convert" button at the right bottom of the main interface to begin the conversion process from unsupported video/format to Cyberlink PowerDirector supported file format conversion process.
When the conversion is finished, click "Open Output Folder" icon on the main interface to open the folder with generated files.
 Free Trial Video Converter


