
 Home
HomeNVIDIA Shadowplay is a free game recording capability that is included in NVIDIA's GeForce Experience utility and is accessible by anyone with an NVIDIA GPU that is a GTX 650 or higher (they state "600 Series or higher"). If you have recorded some videos using Shadowplay, chances are you want to import Shadowplay video into Adobe Premiere CC 2017 to make the videos more stylish. However, many Non-Linear Editors, including Adobe Premiere CC 2017 may not like Shadowplay and will choke on the video, hold back sound in spurts if you try to edit the recordings. For example:
So Im trying to do some edits in Adobe Premiere CC 2017, but whenever I import my video, it imports the audio out of sync. Is there a setting to fix this? The file tyme Im using is a Shadowplay footage with a h.264 codec, AAC and its 1920x1080.
Many people are facing the similiar problems when using Shadowplay recordings in Adobe Premiere CC 2017, especially those who has updated their Shadowplay to the latest version. Below are the possible solutions for solving Shadowplay Audio Issues in Adobe Premiere CC 2017:
Fix Shadowplay Audio Issues in Adobe Premiere CC 2017
Why Adobe Premiere Pro 2017 doesn’t handle ShadowPlay’s export video well, and the reason boils down to variable framerates. One of the ways NVIDIA manages to keep ShadowPlay’s export file sizes low but retain great quality is to utilize variable framerates, but a professional tool like Premiere CC 2017 never expects anything but constant framerates. The result is a freshly-exported video with de-synced audio and video – in effect, a useless result.
But, there's a solution. It might not be a great one, but it’s a solution nonetheless.
Just load ShadowPlay footage into HandBrake and simply reencode it to a constant framerate file. At the main screen, the video file can be loaded through the “Source” menu, and after choosing a destination for the new export, you can hit-up the “Video” tab down below and make sure “Constant Framerate” is selected, as seen in this screenshot:
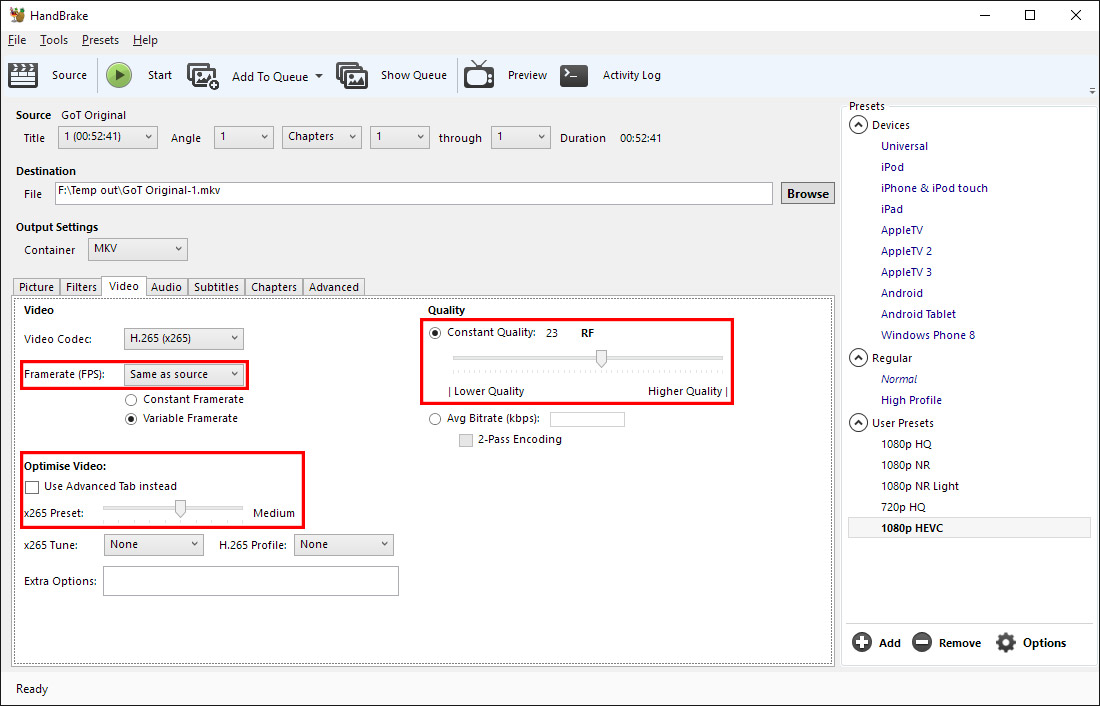
Click "Preview" to view a preview of your file as it will be outputted using the current settings. If the audio and video sync issue is fixed, you can proceed with the encode using HandBrake.
The Best Solution to Fix Shadowplay video Out of Sync in Adobe Premiere CC 2017
Above listed solutions still can't solve Shadowplay Audio Issues in Adobe Premiere CC 2017 or you are looking for a more advanced tool to eliminiate this head-scratching issue? A best Handbrake alternative - Pavtube Video Converter for Windows/Mac is highly recommended to you. The program adopts advanced audio and video sync technology to fix all video/audio sync problems so that you can enjoy smooth video with no interruption. Along with the help of Pavtube, you can effortlessly encode any shadowplay files to Adobe Premiere Pro 2017 preferred video format: MPEG-2. Apart from Premiere Pro, it also offer supports for other advanced NLEs like Final Cut Pro, Avid Media Composer, Davinci Resolve, Windows Movie Maker, Sony Vegas Pro, etc. Now don't hesitate to download the best program and follow the step-by-step guide below to convert ShadowPlay footage to Adobe Premiere Pro CC 2017 smoothly.
Tutorial: Import, Edit Shadowplay recordings in Adobe Premiere CC 2017
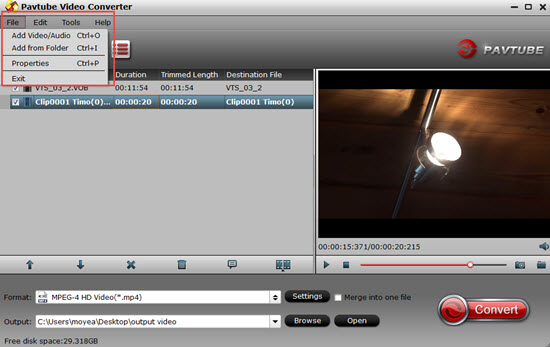
1. Download, install and run the the best Shadowplay to Adobe Premiere CC 2017 Converter, and click the “File” button to load Shadowplay recorded videos. "Drag-and-Drop" feature and batch conversion is also supported.
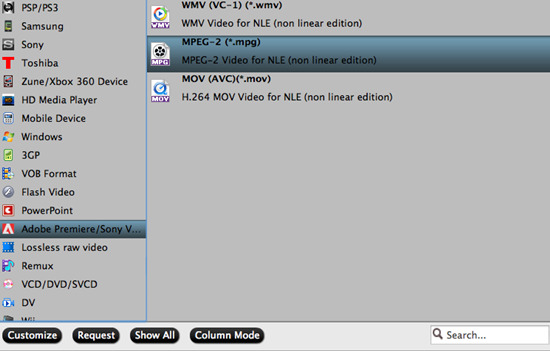
2. Click “Format” pull down list to select Adobe Premiere/Sony Vegas> MPEG-2(*.mpg) as the best video format for Adobe Premiere Pro CC 2017. WMV, MOV, MP4 formats are the good choice as well. You also can choose DV NTSC AVI video, or DV PAL AVI video in "DV" category for Premiere Pro.
Tip - click Settings: You can adjust the video codec, size, frame rate, bit rate as well as the audio codec, bitrate, number of channels, sample size to make the output video totally compatible with your Adobe Premiere Pro CC 2017.
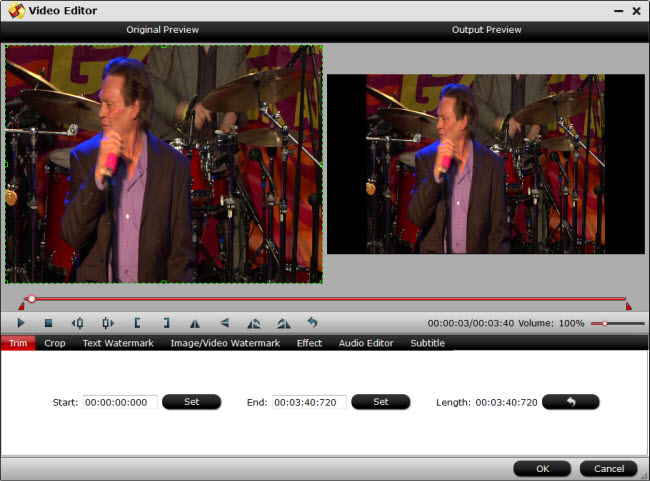
Why not come to the ‘Edit’ button to take a close look? Here, you may be surprised with the various adjustments items. Decide your video length? Cut your video edges? Let me show you around here in the following screen shot.
3. Click the Convert button, it will start encoding Shadowplay clips for importing to Adobe Premiere Pro CC 2017 immediately. Soon after the conversion, just click “Open” button to get the generated files for edit in Adobe Premiere Pro CC 2017 without any video and audio out of sync problem.
 Free Trial Video Converter


