
 Home
HomeWindows Movie Maker is designed by Windows, the latest Windows Movie Maker 2017 can work on latest Windows7, Windows 8, Windows 10 well. This software holds multiple features, like: effects, transitions, titles/credits, audio track, timeline narration. User can organize and select the photos and videos to make the special movies, edit the video effects, define your own movie theme, then share with your friends, upload to Facebook, YouTube or many other platform. The first task when edit the perfect video is to import video to Windows Movie Maker, like the following steps:
How to Import supported Videos to Windows Movie Maker From PC
Video is stored on your PC hard drive, after installing the Windows Movie Maker, you can refer to the following steps to import video to Windows Movie Maker for editing.
Step 1. Open the Import video section
In the Task pane on the left side of the screen, click "Capture Video" , at the drop-down list, choose the "Import video" section.

Step 2. Choose video to Windows Movie Maker
Windows Movie Maker will navigate to the folder that contains all the components of your movie. Click the video you want to import to Windows Movie Maker.
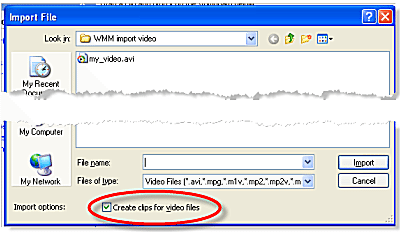
Step 3. Start to Import Videos to Windows Movie Maker
After you choose the video, on the navigate right window, click the "Import" to start to import Videos to Windows Movie Maker.
TIP 1: About "Create clips for video files", check it, video will be separate the imported into smaller clips. If you don't check this option, the video file will be imported in as a single video clip. Final decision is up to you.
TIP 2. The table is all the Windows Movie Maker Supported Formats for you.
| Windows Movie Maker Supported Formats | |
| Video Files | .asf, .avi, .wmv |
| Movie Files | .mpeg, .mpg, .mlv, .mp2, .mpa, .mpe |
| Audio Files | .wav, .snd., .au, .aif, .aifc, .aiff, .wma, .mp3 |
| Windows Media Files | .asf, .wm, .wma, .wmv |
How to Import unsupported Video to Windows Movie Maker?
From the above table, user can import limited videos to Windows Movie Maker which can't support some main popular video formats, like: H264, H.265, MOV, etc. To many who want to import these video to Windows Movie Maker, it's a big deal. In addition, not all the AVI or WMV video files are supported by with Windows Movie Maker, video files with different video codec and audio codec, like DivX AVI, NewTek SHQ3 (4:2:2:4) which is special codec, user can't import this AVI video to Windows Movie Maker well. What's more, even user can import video to Windows Movie Maker, due to the video and audio codec incompatibility issue, user only can watch the video without audio, or listen the audio, but the screen is blank.
How to import all the video to Windows Movie Maker without any video formats problems? Is it very difficult to do? A Windows Movie Maker Video Converter you need one, like: Pavtube Video Converter which can solve your problems that fail to import video to Windows Movie Maker, this software allows you to convert any video to Windows Movie Maker supported formats, in addition, this Windows Movie Maker Video Converter can play the video at the preview windows smoothly.
Most use like the Windows Movie Maker powerful video editing features, you are so lucky to be here, this Windows Movie Maker Video Converter will be your dream software you are struggled to find, except the multiple video input and 250+ video output formats, this software is excellent as Windows Movie Maker at video editing side. As an excellent video editor, add text, image and video watermarks to source video are the basic functions, this Windows Movie Maker Video Converter enables you to do these also user can merge several video clips into one bigger file by checking “Merge into one file” and splitting one video file into several clips according to the clip quantity, duration time and file size, only you like, you can do anything in the video. There is a cool feature that Windows Movie Maker Video Converter can serve user: Add the subtitles to video, make the special video can't leave a excellent subtitles, you can decide the subtitles content at will.
Are you worry about the Windows Movie Maker Video Converter can't support Mac version? No any problem, this Windows Movie Maker Video Converter can support Windows and Mac operating system, even the latest Windows 10 and macOS Sierra. The simple and clean interface is ready for you. Are you trying to convert videos one by one? Windows Movie Maker Video Converter is with high stability which can support the batch conversion for saving your time and energy.
By the way, you can import any video to Windows Movie Maker, you also can enjoy the high quality 4K video enjoyment or amazing 3D video visual feast, this Windows Movie Maker Video Converter can be a video treasure Box, just enjoy it. Want to know more? This article is useful for you.


How to use Windows Movie Maker Video Converter?
From above you can know even th video files that Windows Movie Maker supports, you won't edit the video in Windows Movie Maker snoothly due to the video and audio codec incompatibility issue, here will take the MTS as the example and tell you how to convert unsupported video to Windows Movie Maker or how to solve the video and audio codec incompatibility condition by the best Windows Movie Maker Video Converter.
Step 1. Load Video files into the Windows Movie Maker Video Converter
Install and launch MTS to Windows Movie Maker Video Converter on your computer, click "File" > "Add Video/Audio" to load MTS files that has been transferred from your camcorder to computer local drive to the program. You can click the "Folder" button to batch load multiple MTS files into the program.

Step 2. Choose output video to Windows Movie Maker supported format
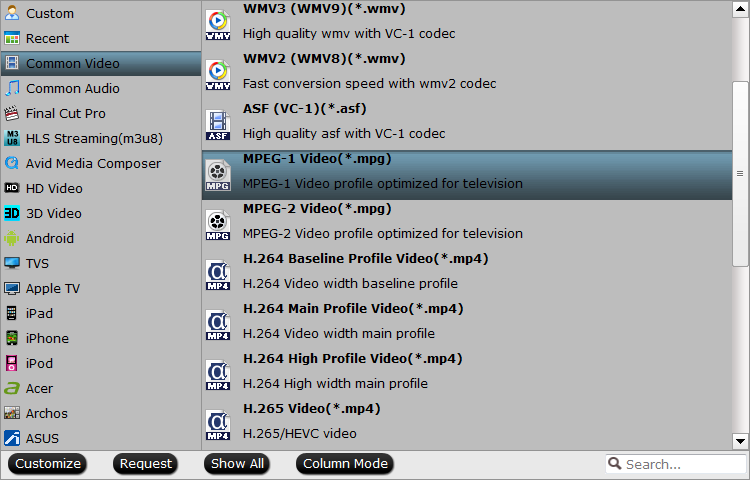
Can't import the unsupported video to Windows Movie Maker? All the problem is not the problem by using the Windows Movie Maker Video Converter. Click "Format" bar, from its drop-down list, select to output video to Windows Movie Maker supported format, like: MPEG-1, you can also choose other video formats according to your own needs.
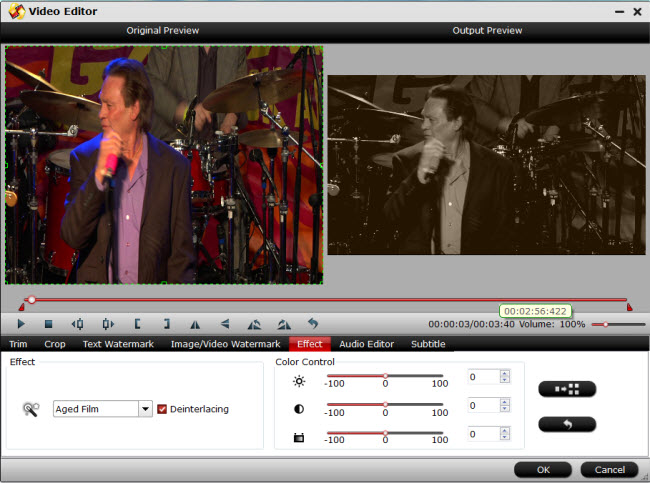
TIP 1: Before the exciting conversion, you can also edit the video at the editing menu, click the "Edit" icon on the tool bar to open the "Video Editor" window, here you are the video master, what kind od video is up to you, every editing button is waiting for you to create.
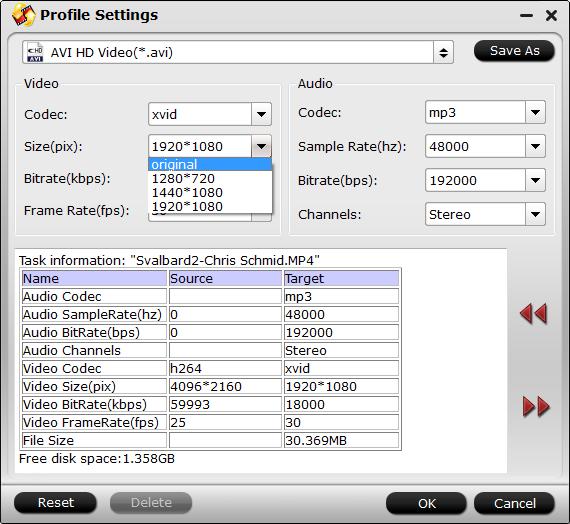
TIP 2: If use can't import the video to Windows Movie Maker because of the video and audio codec incompatibility, you can enter the "Setting" menu to set the video and audio codec to Windows Movie Maker best supported codec. In addition, other video and audio parameters you can adjust too, like: Video frames, video bitrate, audio sample rate, audio channels, etc.
Step 3. Begin to convert video to Windows Movie Maker supported format
After all settings are over, go back to main interface, hit right-bottom "Convert" button to start MTS video to Windows Movie Maker supported format: MPEG-1 conversion process. Just wait for a while, you can get a brand new video file.
This is a 100% quality output with the Windows Movie Maker Video Converter. You can use this software to convert any Windows Movie Maker unsupported video format to to AVI, MP4, MKV, etc, which are supported by Windows Movie Maker. Mac user can refer to above steps to convert output video to Windows Movie Maker supported format. Hope yo help you.
 Free Trial Video Converter

Useful Tips
- How to Flip or Rotate Videos using Handbrake?
- Play Tivo Recordings with Windows Media Player
- How to Use VLC to Convert AVI to MP4 on PC/Mac?
- MOV Compressor: How to Compress MOV to a Smaller Size on Windows/Mac?
- Stream 4K Video to Chromecast Ultra via Plex
- Get Chromebook Pro/Plus to Play MKV Files without Any Problem


