Wish to create breakout content and stunning VFX with one souped-up software: HitFilm Pro is absolutely your best choice. The latest release of HitFilm Pro 2017 comes jam-packed with a professional editor, compositor, 800+ VFX and presets and new built-in animation tools. Before making up your mind to pick HitFilm Pro as your professional video editing software choice, there are still another important issue that you should take into consideration: How about the media support capability of HitFilm Pro? It is possible for you to quickly import and mix different formats, frames rates and resolutions all in the same timeline of this professional NLE application.
HitFilm Pro supported file formats
From HitFilm Pro's official web page, we get the information that HitFilm Pro can import the following video and audio formats:
|
Video |
Audio |
|
AVCHD (M2T, MTS, M2TS) |
AAC |
From above table, we can see that the importing formats for HitFilm Pro are very limited. Obviously, you will fail to get other formats such as XAVC/XAVC S, H.265/HEVC, XDCAM/XDCAM HD MXF, Avid MXF, XF MXF, XDCAM EX, etc that's widely used by popular cameras or camcorders such as Sony, Canon, Panasonic, DJI, GoPro, etc into HitFilm Pro.
Import and edit unsupported formats with HitFilm Pro
To extend the media importing capability of HitFilm Pro, you can download a third-party video conversion app such as Pavtube Video Converter, this powerful yet simple to use application not only assist you to transcode all unsupported file formats or codec with different resolution such as 4K/2K/HD/SD, frame rates, bit rates, sample rates, channels, etc into HitFilm Pro workable editing formats listed above, but also assist you to compress 4K to 1080p or 1080p to 720p for smooth editing workflow with HitFilm Pro on slow performance computer or for offline editing.
Trim/Crop/Watermark/Apply Effect to video
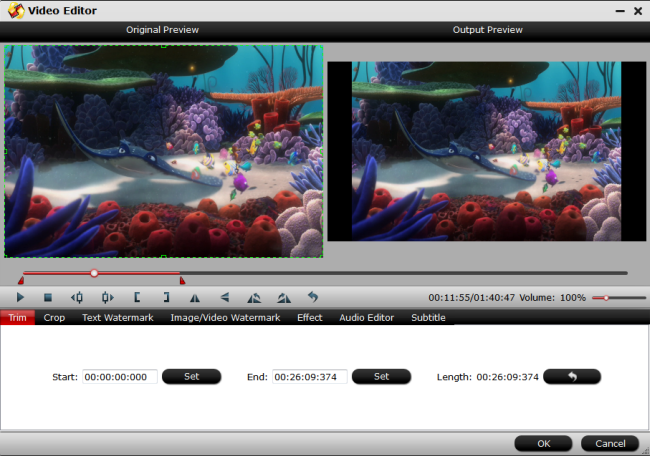
Before loading your video into HitFilm Pro for some professional post editing workflow, you can first complete some simple video editing work with the built-in editing functions offered by our application. You can Trim or cut video to remove unwanted parts or segments, crop video to get off the black edges or unwanted size area, add transparent text watermark, apply special rendering effects, insert external subtitle to videos, etc.
For your great convenience, the application can be downloaded on both Windows and Mac platform. For Mac users, you can download Pavtube Video Converter for Mac to complete the conversion on macOS High Sierra, macOS macOS Sierra, Mac OS X El Capitan, Mac OS X Yosemite and Mac OS X Mavericks, etc.
Step by Step to Convert and Import Unsupported Video to HitFilm Pro
Step 1: Load unsupported files into the application.
Download the free trial version of the program. Launch it on your computer. Click "File" menu and select "Add Video/Audio" or click the "Add Video" button on the top tool bar to import unsupported video files into the program.

Step 2: Specify output file format.
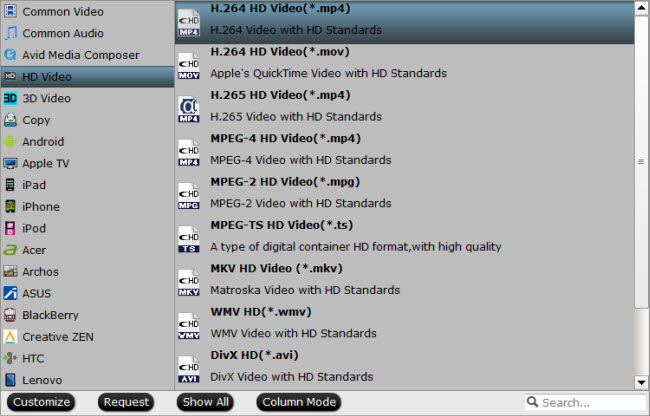
Clicking the Format bar, from its drop-down list, select one of HitFilm Pro supported editing formats such as "H.264 HD Video(*.mp4)" under "HD Video" main category. You can also choose other editing formats according to your own needs.

Step 3: Edit video with built-in editing tools.
Select an item to activate the Edit menu. When a video or movie is selected, click the pencil like Edit icon on the left top tool bar to open the video editor window, here, you can play and preview the original video and output effects. Also you can trim, crop, add watermark, apply special effect, or insert external subtitle.

Step 4: Begin the final conversion process.
After all setting is completed, hit the "Convert" button at the right bottom of the main interface to begin the conversion process from unsupported video to HitFilm Pro supported editing formats.
When the conversion is finished, click "Open Output Folder" icon on the main interface to open the folder with generated files. Then you will have no problem to import any unsupported video to HitFilm Pro for professional post editing workflow.


 Home
Home Free Trial Video Converter


