
 Home
HomePavtube Blu-Ray Ripper for Mac is a powerful tool specially designed for Mac users to rip, convert, backup and edit both Blu-ray and DVD movies. The source movie could be from Blu-ray disc, DVD, Blu-ray and DVD folder, ISO and IFO file. The ripper allows you to back up the movies to hard drive, rip and convert them into other popular audio and video formats to enjoy more freely on home server and devices like Xbox 360 and Apple TV. Besides, the M2TS files shot with AVCHD camcorders can be imported to Blu-ray Ripper for Mac and converted to compatible formats for editing in video editing software like iMovie, FCP, etc. Although most Blu-ray rippers are not able to capture the subtitles or TrueHD audio track, Pavtube Blu-ray Ripper for Mac is an exception. It recognizes TrueHD and DTS-MA 7.1 channels and output the track at 5.1 channels at best and allows you to select any subtitle you like, as long as it is there. All tracks and subtitles packaged in the Blu-ray disc are available. In the following guide I will show you how to keep English subtitle and track during the ripping procedure.
Step 1. Launch Pavtube Blu-Ray Ripper for Mac and load Blu-ray movies to it. You can click "DVD Folder" and "IFO File" to load BD movies into this program. Do not browse to certain folder or M2TS file, just choose the BDMV folder, the ripper will load all the M2TS files.
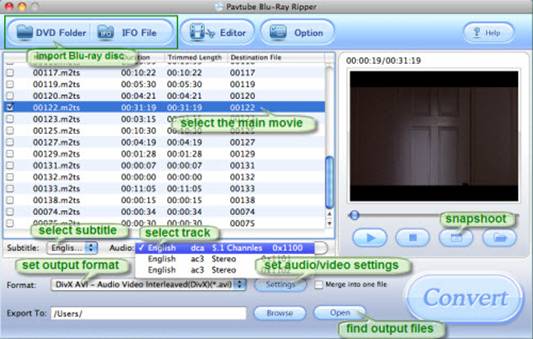
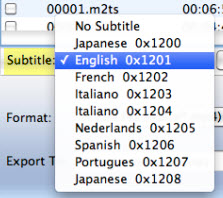
Step 2. Once files are loaded, right-click on the file list and choose “Unselect all” and then tick off the checkbox before the main movie. By main movie I mean the M2TS file which has longest duration. The extra files can be left unchecked, since the whole movie is included in the main movie. Click the drop-down list of "Subtitle", then all the subtitle info in the Blu-ray will be shown clearly, including language and stream ID, so you can select your needed language as your subtitle at will. What you need is to find English and check it. Now click the drop-down list of “Audio” and select English track. The dropdown list shows you the detailed information such as the audio language, codec, channels etc. You can use the preview window to check your selection.
Step 3. Click on the pull down menu of "Format" to select output format, at the same time, if you want to make good control of the output file quality and file size, you can click "Settings" button to adjust video and audio parameters like bit rate, frame rate, sample rate, aspect ratio, audio channels, etc.
Step 4. When all settings are done, simply click on the "Convert" button to start BD ripping as well as the subtitle ripping. After finished, you can click "Open" button to get the output files with your specified subtitle and audio.
 Free Trial Blu-ray Ripper for Mac

Useful Tips
- How to keep original/ correct aspect ratio for 16:9 and 4:3 display?
- Blu-ray Ripping- improve Blu-ray converting speed with GPU acceleration
- Convert MKV to H.264 MP4 for streaming over DLNA
- How to Play Blu-ray Movies on Android Tablet?
- Blu-ray ripping- how to keep 5.1 and 7.1 audio?
- [How to] Turn your Blu-rays to iTunes playable 1080p MP4 movies


